Instant Connection for Pixel Streaming
— New Feature Automated Setup

How to Run After Effects on Googlebook
-
How to Run After Effects on Googlebook
How to Run After Effects on Googlebook
-
Table of Contents
Creating motion graphics takes more than opening an animation template. You need a workspace where you can build compositions, animate typography, combine footage, refine effects, and render finished deliverables. Running After Effects on Googlebook should support that complete process, whether you are designing your first frame or developing a complex production.
Vagon Cloud Computer provides a Windows workspace you can access from your Googlebook. You install and activate desktop After Effects there, organize your assets, add compatible production tools, and use the workstation’s computing resources for previews and rendering. Your Googlebook becomes the way you interact with that environment, rather than the machine responsible for calculating every frame.
Adobe does not provide a native Googlebook version of After Effects. This approach gives you access to the desktop application, not a simplified browser editor.
You can start new projects, develop reusable animation systems, work on composites, and keep supporting applications alongside After Effects. This guide explains how to prepare that environment and use it throughout production, with resources matched to the work you create.

Source: Adobe Help
Your After Effects Workspace, Not Just a Place to Open Projects
A complete After Effects environment includes the application, the tools you work with, and the files that support your production. On Vagon, those components can live together inside your Windows workspace, giving you a place to develop work from the first composition through final output.
You can create a new .aep project, import source material, and build compositions using the desktop application’s Timeline, Graph Editor, Effects Controls, and other panels. The workflow is not restricted to editing uploaded templates or submitting projects for rendering.
Build Your Production Around the Work You Create
Different projects need different combinations of tools:
Production need | What you can do in the workspace |
|---|---|
Motion graphics | Create shape animations, kinetic typography, titles, and transitions |
Compositing | Combine footage using masks, mattes, tracking, keying, and effects |
Reusable designs | Build precompositions, expression controls, and adjustable animation systems |
Supporting assets | Prepare graphics in other installed, licensed applications |
Delivery | Generate previews, render masters, and encode distribution files |
You can also install compatible Windows plugins, scripts, animation presets, and fonts. That lets you configure the environment around your own production methods instead of treating each session as an isolated task. Compatibility and activation still depend on the individual tool and After Effects version.
Keep the Working Environment Together
Project folders, source footage, graphics, and rendered outputs can remain on the cloud computer between sessions, subject to your storage and account settings. Save your work before disconnecting, and maintain independent backups of important production files.
Vagon Files provides a way to bring assets into that environment and transfer deliverables out. Once your working files are available on the workstation, you do not need to upload the entire production again for every adjustment.
The workstation provides the computing environment; your Adobe subscription authorizes After Effects. Additional applications and third-party tools may require their own licenses. With those in place, the result is a configurable production workspace you can return to as projects develop.
Set Up After Effects on Vagon in Four Steps
Prepare the workspace around your tools and production needs. You can begin with After Effects alone, then add supporting applications as the work requires them.
1. Configure the Workstation
Choose a nearby available Vagon region and allocate resources for the compositions you intend to create. Leave storage for source assets, cache, and rendered outputs, not just the application installation.
Check the workstation’s Windows version against the requirements for your After Effects release. Adobe’s current 26.x requirements specify Windows 11 24H2, at least 16 GB of RAM, and compatible graphics hardware. For 4K and higher-resolution media, Adobe recommends 32 GB of RAM or more.
Those figures are starting points. Layer count, source formats, effects, and other open applications can increase resource demands.
2. Install and Activate After Effects
Inside the Windows desktop, use Adobe’s official installer to set up the Creative Cloud desktop application. Sign in with an Adobe account whose plan includes After Effects, then install the appropriate release.
For an existing team production, confirm version compatibility before opening and saving project files. Install a compatible Media Encoder version if you need its encoding workflow.
Vagon usage and Adobe licensing are separate. The cloud computer provides the workspace and computing resources, while your Adobe entitlement provides access to the software.
3. Add Your Production Tools
Install the fonts, plugins, scripts, and animation presets you actually use. Check Windows compatibility and support for the installed After Effects release, then complete any required activation.
If your workflow includes preparing layered graphics or editing a sequence, you can install appropriately licensed supporting applications in the same environment. You do not need every application installed before starting your first composition.
Arrange the panels into a useful layout and save your workspace. Give the Timeline, Composition panel, and frequently used controls enough room for comfortable work from your Googlebook’s display.
4. Organize Files and Cache
Use Vagon Files to transfer footage, graphics, audio, and project packages. Establish separate working folders for source assets, project files, cache, and exports.
For a new production, create and save your .aep project before importing substantial media. For an existing project, preserve its folder structure and resolve missing footage before continuing.
Review After Effects’ cache location and available disk space. Keep generated cache separate from source assets so you can identify what is replaceable.
Finish with a small functional test: import representative media, animate a layer, run a preview, and render a short output. This confirms that the application, assets, and output path work together before production grows.
Start From a Blank Composition and Build the Motion
You do not need an existing animation to begin working. Create a new project, then set up a composition around the intended deliverable: dimensions, frame rate, duration, and background appearance. A title sequence for a film and a vertical social graphic need different layouts, even when they share the same visual identity.
Keep source assets organized in the Project panel, with separate folders for footage, graphics, audio, and compositions. Name the main composition clearly so it remains easy to identify as the project grows.
Design With Layers You Can Control
Build a simple animated title using text and shape layers. Create the typography, add supporting graphic elements, and establish their arrangement before introducing movement. Text animators let you control characters, words, or lines without separating every letter onto its own layer.
For artwork prepared elsewhere, choose import options that preserve the structure you need. Layered Photoshop or Illustrator files can provide a starting composition, but check layer dimensions and anchor points before animating them.
Place anchor points deliberately. They determine the origin of transformations such as rotation and scale. Use null objects and parenting when several elements should move together, while keeping individual layer animation available.
Shape the Timing, Not Just the Positions
Set initial and final keyframes for a small group of properties, then review the movement before adding more. Position, scale, rotation, and opacity are enough to establish many motion graphics sequences.
Easing changes how motion accelerates and settles. Use the Graph Editor to refine that behavior rather than applying the same interpolation to every transition.

Source: Adobe Help
For a title sequence, a useful progression is:
Establish when the headline enters and becomes readable.
Offset supporting elements to create a clear visual order.
Leave enough time for the message to hold.
Design an exit that connects naturally to the next shot.

Source: Adobe Help
Keep the Animation Flexible
Precompose related layers when they form a useful unit, such as a complete title card. Remember that nesting introduces another composition with its own timing and dimensions.
Use expressions where they simplify the design. A loopOut("cycle") expression can repeat an appropriately keyframed property, while linked controls can keep related elements consistent.
Save a new project version at meaningful milestones. You now have an original animation built within the workspace, with editable layers and timing ready for further development.

Source: Adobe Help
Build Composites, Not Just Animated Graphics
After Effects also gives you a workspace for combining live-action footage, graphics, and effects into a single shot. You can build these composites alongside your motion graphics, using the same project assets and production tools.
Start by matching the composition to the footage and checking its interpretation, including frame rate and alpha where relevant. Arrange the layers, then decide which elements need isolation, tracking, or image adjustments.
Choose the Right Method for the Shot
Masks and track mattes both control visibility, but they work differently. A mask belongs to a layer and defines a path-based region. A track matte uses another layer’s alpha or luminance to control what appears.
The right combination depends on the result:
Goal | Useful approach |
|---|---|
Place a graphic on a moving screen | Tracking, corner pin, and foreground masks |
Position text behind a person | Rotoscoping and layer ordering |
Replace a green-screen background | Keying, spill suppression, and edge refinement |
Add depth to layered graphics | 3D layers, cameras, and appropriate lighting |
Tracking data provides movement, not a finished composite. For a screen replacement, inspect the corners throughout the shot, then address reflections, blur, and objects passing in front of the insert.
Refine Isolation Across the Entire Shot
For a foreground subject, Roto Brush can help separate the subject from the background. Establish a useful selection, propagate it through the required range, and correct frames where the boundary drifts. Pay particular attention to hair, motion blur, and partial occlusion.
Freeze the propagation when the result is ready, and revisit it if changes require recalculation. Do not judge the matte from one clean frame.
With green-screen footage, inspect edge detail and unwanted color spill after extracting the background. A strong key can still need adjustments around transparent materials or fine hair.

Source: Adobe Help
Make the Elements Belong Together
Match exposure, color, sharpness, grain, and motion blur between the inserted element and the original footage. Check contact shadows and perspective where they affect believability.
For layered 3D work, choose the composition renderer around the features you need. The Advanced 3D renderer has additional hardware requirements, so verify support before making it essential to the project.
Review the complete shot in motion, then inspect difficult frames at full resolution. The workstation handles the calculations, while the composite remains editable for further creative decisions.

Source: Adobe Help
Turn One Design Into a Reusable Motion System
A title animation becomes more useful when it can support several messages, formats, or episodes without rebuilding the movement. Instead of creating unrelated copies, organize the design around reusable compositions and clearly defined controls.
Separate the Design From Its Variations
Build the shared animation in a source composition. Keep related elements together and use descriptive layer names so you can distinguish the headline, background, supporting shapes, and control layers.
Decide which properties should vary. A title system might expose the headline text, accent color, and background treatment while keeping its entrance animation consistent.
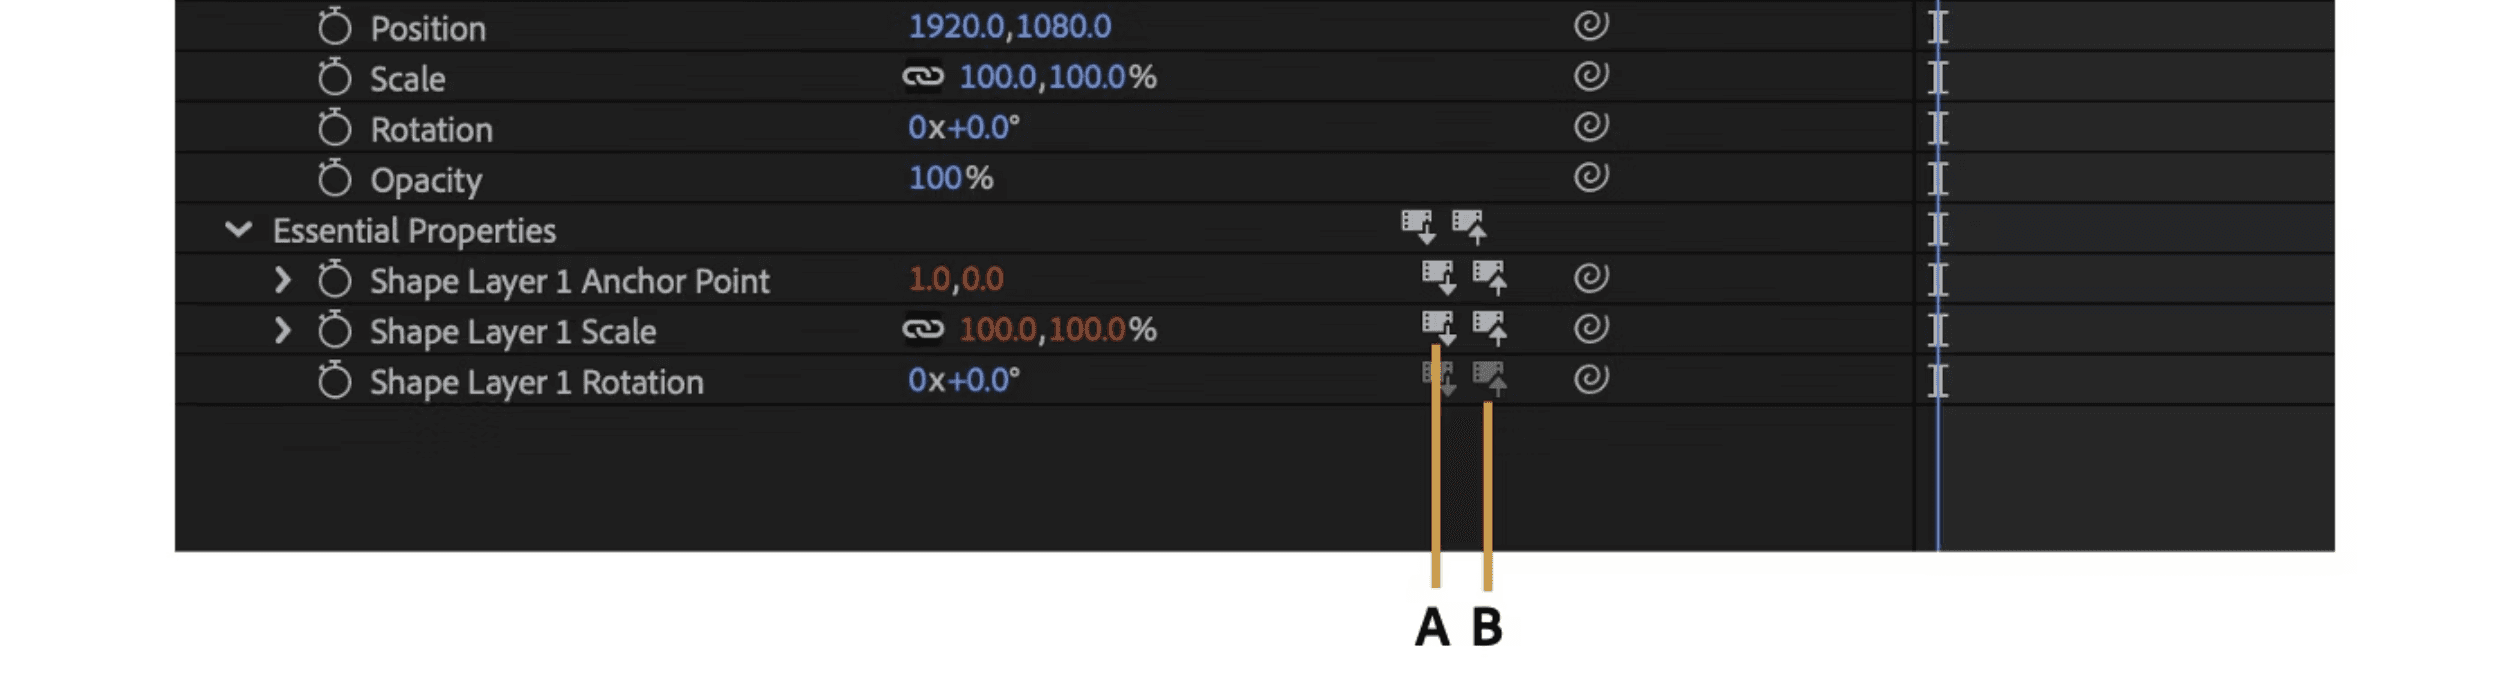
Essential Properties let you access supported properties of a nested composition from its parent. Add the relevant controls through the Essential Graphics panel, then adjust them on individual precomposition instances.
This gives you a useful distinction:
Shared source | Individual variation |
|---|---|
Core layer structure | Headline wording |
Default animation | Exposed color controls |
Common graphic treatment | Supported media replacements |
Base design settings | Instance-specific property overrides |
An override changes that instance without requiring a separate source composition. However, shared source edits and overridden values behave differently. Review which properties remain linked before expecting a source change to update every variation.
Source: Adobe Help
Adapt the Composition, Not Just the Dimensions
Create clearly named output compositions for horizontal, square, or vertical delivery. Reuse the shared elements where appropriate, but adjust positioning, line breaks, and visual hierarchy for each layout.
A headline that fits comfortably across a horizontal frame may need a different arrangement in portrait. Check the animation throughout its duration, not only at its final position.
Use expressions or linked controls when they make these relationships easier to maintain. Keep the setup understandable enough that another designer can identify what to change.
Save a clean project version before generating the delivery set. Your cloud workspace can then hold an evolving library of editable designs, source assets, and presets that supports future productions, rather than only the files for one finished video.
Give Previews and Renders the Resources They Actually Need
After Effects calculates frames before it can play them smoothly. A composition that pauses during its first preview may play correctly once those frames are cached. Distinguish calculation speed from playback speed before assuming the workstation is underpowered.
Start with a representative section containing the layers, effects, and footage you actually use. An empty composition tells you little about how the finished production will perform.

Source: Adobe Help
Balance CPU, Memory, GPU, and Storage
Each resource contributes differently:
Resource | Main role |
|---|---|
CPU | Evaluates expressions, processes effects, and calculates frames |
RAM | Supports active processing and stores cached frames |
GPU | Accelerates supported effects and rendering features |
Fast storage | Serves source media, disk cache, and output files |
Multi-Frame Rendering allows After Effects to process multiple frames concurrently. Its benefit depends on available CPU capacity, sufficient memory, and the effects involved. Adding cores without enough RAM may not produce the improvement you expect.
GPU acceleration also depends on the composition. A stronger GPU can help supported processing, but it will not accelerate every expression, plugin, or stage of rendering.
Use Vagon’s scalable performance options to match resources to those demands. A lightweight design stage and a complex finishing stage do not necessarily need the same configuration.
Make Preview Settings Work for You
Set the work area around the section you are developing. Use Half or Quarter resolution when judging broad movement, then inspect fine details at Full resolution. Preview resolution and final output settings are separate decisions.
Give disk cache sufficient space on fast workstation storage. Current After Effects releases can use disk-cached frames for extended preview playback, reducing dependence on keeping every calculated frame in RAM. Cached frames still need recalculating when relevant source content or settings change.
For demanding footage, proxies can reduce the cost of repeated decoding. For expensive, temporarily settled elements, a pre-render can simplify the working composition. Preserve the editable source and check that final output uses the intended assets.
Find the Bottleneck Before Increasing Resources
Enable the Timeline’s Render Time column to inspect the Composition Profiler. It helps identify layers and effects that account for substantial processing time in the current frame.
Temporarily disable a suspected effect or simplify a layer, then compare the result. Test more than one frame because processing demands can change throughout the animation.
Finally, separate composition performance from connection quality. Delayed mouse input across the desktop suggests a different problem from a responsive interface waiting for a complex frame. Check connection stability and region for the former; investigate processing, cache, and composition complexity for the latter.
The goal is not simply a larger workstation. It is a production environment whose resources support the way your project is built.

Source: Adobe Help
Keep the Rest of the Adobe Workflow Close
An After Effects production often begins outside After Effects. You might prepare a layered image in Photoshop, create vector artwork in Illustrator, or assemble the main edit in Premiere. Installing the applications your licenses cover on the same cloud workstation keeps those tasks within one working environment.
Prepare and Update Source Graphics
Use Photoshop for layered image preparation and Illustrator for vector assets, then import them with options suited to the animation. Preserve useful layer structures and check how source updates affect the composition.
Keeping source documents alongside the project makes it easier to revise artwork without transferring files between computers for every change. Maintain clear folders so After Effects continues to find the intended assets.
Connect Compositing to the Edit
Dynamic Link connects After Effects compositions with Premiere without requiring an intermediate render for every update. Use compatible application versions and confirm that both can access the necessary media.
A linked composition still needs processing. Complex effects can slow playback in Premiere, so Dynamic Link should not be treated as a guarantee of real-time performance.
Media Encoder provides another option for managing encoding presets and queued deliverables. It complements After Effects’ Render Queue rather than replacing it for every output.
These applications are not automatically included with your Vagon subscription or necessarily covered by an After Effects-only Adobe plan. Install the tools you need, activate them appropriately, and allow enough memory for applications running together. The value is having design, animation, compositing, and delivery tools available in the same workspace.
Deliver Finished Work and Keep the Project Editable
A completed composition needs an output suited to its destination. Add it to the Render Queue, then confirm the resolution, frame rate, time span, and output path. A work area used for previewing can accidentally limit the export, so check the range explicitly.
Choose the Format Around the Deliverable
Current After Effects versions support H.264 export from the Render Queue, making it an option for review copies and standard video delivery. Media Encoder is useful when you want its encoding presets or queue workflow.

Source: Adobe Help
For transparency, choose an alpha-capable format and the appropriate RGB + Alpha output settings. A standard H.264 MP4 does not preserve an alpha channel. For demanding animation or compositing handoffs, an image sequence can provide a practical alternative to a single movie file.
Render a representative section before committing to a long export. Open the saved result and inspect:
Duration, dimensions, and frame range.
Typography, fine edges, and effects.
Audio synchronization where applicable.
Color and transparency in the destination application.
Keep the workstation running until the job finishes, and review inactivity or automatic shutdown settings before leaving it unattended.
Preserve More Than the Render
Save the editable project, then use Collect Files to gather a project copy and the selected source dependencies. Review the collection options and report rather than assuming everything has been packaged.
Fonts and plugins require separate availability and licensing. Reopen the collected project to check for missing footage or effects, and retain an independent backup of important production assets.
Use Vagon Files to transfer approved deliverables and project packages. You can keep the working environment available for future production while maintaining copies outside the workstation.
Final Thoughts
Running After Effects on Googlebook can mean creating original motion graphics, building composites, developing reusable designs, and delivering finished work from one Windows workspace. Your projects, assets, compatible tools, and supporting applications can stay together as production develops.
Vagon Cloud Computer provides that working environment, with resources you can adjust around your compositions. Set up your licensed applications, organize your production files, and use the workspace to build new work, not only revise projects created elsewhere.
FAQs
Can I install After Effects directly on Googlebook?
Adobe does not provide a supported native Googlebook release. Through Vagon, you access After Effects installed on a Windows cloud workstation.
Can I create projects from scratch on Vagon?
Yes. You can create projects and compositions, animate text and shapes, build composites, and render deliverables. You are not limited to uploaded templates or existing projects.
Is this the desktop version of After Effects?
Yes. The Windows desktop application runs on the workstation. Your Googlebook displays the remote environment and sends keyboard and mouse input.
Is an Adobe subscription included?
No. Vagon usage and Adobe licensing are separate. You need an Adobe entitlement that includes After Effects.
Can I install fonts, plugins, and scripts?
You can install compatible tools inside the Windows workspace. Check their After Effects version requirements, activation rules, and support for the environment.
Can I use Premiere and Media Encoder in the same workspace?
Yes, with appropriate licenses and compatible versions. Allow enough workstation memory for the applications you plan to run together.
Can the workstation handle 4K compositions?
Choose resources suited to the project. Adobe recommends at least 32 GB of RAM for 4K and higher-resolution media, but effects, layers, and source formats can increase requirements.
Will rendering continue after I close the browser?
Only if the workstation and rendering application remain running. Check inactivity and shutdown settings before leaving a job unattended.
Creating motion graphics takes more than opening an animation template. You need a workspace where you can build compositions, animate typography, combine footage, refine effects, and render finished deliverables. Running After Effects on Googlebook should support that complete process, whether you are designing your first frame or developing a complex production.
Vagon Cloud Computer provides a Windows workspace you can access from your Googlebook. You install and activate desktop After Effects there, organize your assets, add compatible production tools, and use the workstation’s computing resources for previews and rendering. Your Googlebook becomes the way you interact with that environment, rather than the machine responsible for calculating every frame.
Adobe does not provide a native Googlebook version of After Effects. This approach gives you access to the desktop application, not a simplified browser editor.
You can start new projects, develop reusable animation systems, work on composites, and keep supporting applications alongside After Effects. This guide explains how to prepare that environment and use it throughout production, with resources matched to the work you create.
Source: Adobe Help
Your After Effects Workspace, Not Just a Place to Open Projects
A complete After Effects environment includes the application, the tools you work with, and the files that support your production. On Vagon, those components can live together inside your Windows workspace, giving you a place to develop work from the first composition through final output.
You can create a new .aep project, import source material, and build compositions using the desktop application’s Timeline, Graph Editor, Effects Controls, and other panels. The workflow is not restricted to editing uploaded templates or submitting projects for rendering.
Build Your Production Around the Work You Create
Different projects need different combinations of tools:
Production need | What you can do in the workspace |
|---|---|
Motion graphics | Create shape animations, kinetic typography, titles, and transitions |
Compositing | Combine footage using masks, mattes, tracking, keying, and effects |
Reusable designs | Build precompositions, expression controls, and adjustable animation systems |
Supporting assets | Prepare graphics in other installed, licensed applications |
Delivery | Generate previews, render masters, and encode distribution files |
You can also install compatible Windows plugins, scripts, animation presets, and fonts. That lets you configure the environment around your own production methods instead of treating each session as an isolated task. Compatibility and activation still depend on the individual tool and After Effects version.
Keep the Working Environment Together
Project folders, source footage, graphics, and rendered outputs can remain on the cloud computer between sessions, subject to your storage and account settings. Save your work before disconnecting, and maintain independent backups of important production files.
Vagon Files provides a way to bring assets into that environment and transfer deliverables out. Once your working files are available on the workstation, you do not need to upload the entire production again for every adjustment.
The workstation provides the computing environment; your Adobe subscription authorizes After Effects. Additional applications and third-party tools may require their own licenses. With those in place, the result is a configurable production workspace you can return to as projects develop.
Set Up After Effects on Vagon in Four Steps
Prepare the workspace around your tools and production needs. You can begin with After Effects alone, then add supporting applications as the work requires them.
1. Configure the Workstation
Choose a nearby available Vagon region and allocate resources for the compositions you intend to create. Leave storage for source assets, cache, and rendered outputs, not just the application installation.
Check the workstation’s Windows version against the requirements for your After Effects release. Adobe’s current 26.x requirements specify Windows 11 24H2, at least 16 GB of RAM, and compatible graphics hardware. For 4K and higher-resolution media, Adobe recommends 32 GB of RAM or more.
Those figures are starting points. Layer count, source formats, effects, and other open applications can increase resource demands.
2. Install and Activate After Effects
Inside the Windows desktop, use Adobe’s official installer to set up the Creative Cloud desktop application. Sign in with an Adobe account whose plan includes After Effects, then install the appropriate release.
For an existing team production, confirm version compatibility before opening and saving project files. Install a compatible Media Encoder version if you need its encoding workflow.
Vagon usage and Adobe licensing are separate. The cloud computer provides the workspace and computing resources, while your Adobe entitlement provides access to the software.
3. Add Your Production Tools
Install the fonts, plugins, scripts, and animation presets you actually use. Check Windows compatibility and support for the installed After Effects release, then complete any required activation.
If your workflow includes preparing layered graphics or editing a sequence, you can install appropriately licensed supporting applications in the same environment. You do not need every application installed before starting your first composition.
Arrange the panels into a useful layout and save your workspace. Give the Timeline, Composition panel, and frequently used controls enough room for comfortable work from your Googlebook’s display.
4. Organize Files and Cache
Use Vagon Files to transfer footage, graphics, audio, and project packages. Establish separate working folders for source assets, project files, cache, and exports.
For a new production, create and save your .aep project before importing substantial media. For an existing project, preserve its folder structure and resolve missing footage before continuing.
Review After Effects’ cache location and available disk space. Keep generated cache separate from source assets so you can identify what is replaceable.
Finish with a small functional test: import representative media, animate a layer, run a preview, and render a short output. This confirms that the application, assets, and output path work together before production grows.
Start From a Blank Composition and Build the Motion
You do not need an existing animation to begin working. Create a new project, then set up a composition around the intended deliverable: dimensions, frame rate, duration, and background appearance. A title sequence for a film and a vertical social graphic need different layouts, even when they share the same visual identity.
Keep source assets organized in the Project panel, with separate folders for footage, graphics, audio, and compositions. Name the main composition clearly so it remains easy to identify as the project grows.
Design With Layers You Can Control
Build a simple animated title using text and shape layers. Create the typography, add supporting graphic elements, and establish their arrangement before introducing movement. Text animators let you control characters, words, or lines without separating every letter onto its own layer.
For artwork prepared elsewhere, choose import options that preserve the structure you need. Layered Photoshop or Illustrator files can provide a starting composition, but check layer dimensions and anchor points before animating them.
Place anchor points deliberately. They determine the origin of transformations such as rotation and scale. Use null objects and parenting when several elements should move together, while keeping individual layer animation available.
Shape the Timing, Not Just the Positions
Set initial and final keyframes for a small group of properties, then review the movement before adding more. Position, scale, rotation, and opacity are enough to establish many motion graphics sequences.
Easing changes how motion accelerates and settles. Use the Graph Editor to refine that behavior rather than applying the same interpolation to every transition.
Source: Adobe Help
For a title sequence, a useful progression is:
Establish when the headline enters and becomes readable.
Offset supporting elements to create a clear visual order.
Leave enough time for the message to hold.
Design an exit that connects naturally to the next shot.
Source: Adobe Help
Keep the Animation Flexible
Precompose related layers when they form a useful unit, such as a complete title card. Remember that nesting introduces another composition with its own timing and dimensions.
Use expressions where they simplify the design. A loopOut("cycle") expression can repeat an appropriately keyframed property, while linked controls can keep related elements consistent.
Save a new project version at meaningful milestones. You now have an original animation built within the workspace, with editable layers and timing ready for further development.
Source: Adobe Help
Build Composites, Not Just Animated Graphics
After Effects also gives you a workspace for combining live-action footage, graphics, and effects into a single shot. You can build these composites alongside your motion graphics, using the same project assets and production tools.
Start by matching the composition to the footage and checking its interpretation, including frame rate and alpha where relevant. Arrange the layers, then decide which elements need isolation, tracking, or image adjustments.
Choose the Right Method for the Shot
Masks and track mattes both control visibility, but they work differently. A mask belongs to a layer and defines a path-based region. A track matte uses another layer’s alpha or luminance to control what appears.
The right combination depends on the result:
Goal | Useful approach |
|---|---|
Place a graphic on a moving screen | Tracking, corner pin, and foreground masks |
Position text behind a person | Rotoscoping and layer ordering |
Replace a green-screen background | Keying, spill suppression, and edge refinement |
Add depth to layered graphics | 3D layers, cameras, and appropriate lighting |
Tracking data provides movement, not a finished composite. For a screen replacement, inspect the corners throughout the shot, then address reflections, blur, and objects passing in front of the insert.
Refine Isolation Across the Entire Shot
For a foreground subject, Roto Brush can help separate the subject from the background. Establish a useful selection, propagate it through the required range, and correct frames where the boundary drifts. Pay particular attention to hair, motion blur, and partial occlusion.
Freeze the propagation when the result is ready, and revisit it if changes require recalculation. Do not judge the matte from one clean frame.
With green-screen footage, inspect edge detail and unwanted color spill after extracting the background. A strong key can still need adjustments around transparent materials or fine hair.
Source: Adobe Help
Make the Elements Belong Together
Match exposure, color, sharpness, grain, and motion blur between the inserted element and the original footage. Check contact shadows and perspective where they affect believability.
For layered 3D work, choose the composition renderer around the features you need. The Advanced 3D renderer has additional hardware requirements, so verify support before making it essential to the project.
Review the complete shot in motion, then inspect difficult frames at full resolution. The workstation handles the calculations, while the composite remains editable for further creative decisions.
Source: Adobe Help
Turn One Design Into a Reusable Motion System
A title animation becomes more useful when it can support several messages, formats, or episodes without rebuilding the movement. Instead of creating unrelated copies, organize the design around reusable compositions and clearly defined controls.
Separate the Design From Its Variations
Build the shared animation in a source composition. Keep related elements together and use descriptive layer names so you can distinguish the headline, background, supporting shapes, and control layers.
Decide which properties should vary. A title system might expose the headline text, accent color, and background treatment while keeping its entrance animation consistent.
Essential Properties let you access supported properties of a nested composition from its parent. Add the relevant controls through the Essential Graphics panel, then adjust them on individual precomposition instances.
This gives you a useful distinction:
Shared source | Individual variation |
|---|---|
Core layer structure | Headline wording |
Default animation | Exposed color controls |
Common graphic treatment | Supported media replacements |
Base design settings | Instance-specific property overrides |
An override changes that instance without requiring a separate source composition. However, shared source edits and overridden values behave differently. Review which properties remain linked before expecting a source change to update every variation.
Source: Adobe Help
Adapt the Composition, Not Just the Dimensions
Create clearly named output compositions for horizontal, square, or vertical delivery. Reuse the shared elements where appropriate, but adjust positioning, line breaks, and visual hierarchy for each layout.
A headline that fits comfortably across a horizontal frame may need a different arrangement in portrait. Check the animation throughout its duration, not only at its final position.
Use expressions or linked controls when they make these relationships easier to maintain. Keep the setup understandable enough that another designer can identify what to change.
Save a clean project version before generating the delivery set. Your cloud workspace can then hold an evolving library of editable designs, source assets, and presets that supports future productions, rather than only the files for one finished video.
Give Previews and Renders the Resources They Actually Need
After Effects calculates frames before it can play them smoothly. A composition that pauses during its first preview may play correctly once those frames are cached. Distinguish calculation speed from playback speed before assuming the workstation is underpowered.
Start with a representative section containing the layers, effects, and footage you actually use. An empty composition tells you little about how the finished production will perform.
Source: Adobe Help
Balance CPU, Memory, GPU, and Storage
Each resource contributes differently:
Resource | Main role |
|---|---|
CPU | Evaluates expressions, processes effects, and calculates frames |
RAM | Supports active processing and stores cached frames |
GPU | Accelerates supported effects and rendering features |
Fast storage | Serves source media, disk cache, and output files |
Multi-Frame Rendering allows After Effects to process multiple frames concurrently. Its benefit depends on available CPU capacity, sufficient memory, and the effects involved. Adding cores without enough RAM may not produce the improvement you expect.
GPU acceleration also depends on the composition. A stronger GPU can help supported processing, but it will not accelerate every expression, plugin, or stage of rendering.
Use Vagon’s scalable performance options to match resources to those demands. A lightweight design stage and a complex finishing stage do not necessarily need the same configuration.
Make Preview Settings Work for You
Set the work area around the section you are developing. Use Half or Quarter resolution when judging broad movement, then inspect fine details at Full resolution. Preview resolution and final output settings are separate decisions.
Give disk cache sufficient space on fast workstation storage. Current After Effects releases can use disk-cached frames for extended preview playback, reducing dependence on keeping every calculated frame in RAM. Cached frames still need recalculating when relevant source content or settings change.
For demanding footage, proxies can reduce the cost of repeated decoding. For expensive, temporarily settled elements, a pre-render can simplify the working composition. Preserve the editable source and check that final output uses the intended assets.
Find the Bottleneck Before Increasing Resources
Enable the Timeline’s Render Time column to inspect the Composition Profiler. It helps identify layers and effects that account for substantial processing time in the current frame.
Temporarily disable a suspected effect or simplify a layer, then compare the result. Test more than one frame because processing demands can change throughout the animation.
Finally, separate composition performance from connection quality. Delayed mouse input across the desktop suggests a different problem from a responsive interface waiting for a complex frame. Check connection stability and region for the former; investigate processing, cache, and composition complexity for the latter.
The goal is not simply a larger workstation. It is a production environment whose resources support the way your project is built.
Source: Adobe Help
Keep the Rest of the Adobe Workflow Close
An After Effects production often begins outside After Effects. You might prepare a layered image in Photoshop, create vector artwork in Illustrator, or assemble the main edit in Premiere. Installing the applications your licenses cover on the same cloud workstation keeps those tasks within one working environment.
Prepare and Update Source Graphics
Use Photoshop for layered image preparation and Illustrator for vector assets, then import them with options suited to the animation. Preserve useful layer structures and check how source updates affect the composition.
Keeping source documents alongside the project makes it easier to revise artwork without transferring files between computers for every change. Maintain clear folders so After Effects continues to find the intended assets.
Connect Compositing to the Edit
Dynamic Link connects After Effects compositions with Premiere without requiring an intermediate render for every update. Use compatible application versions and confirm that both can access the necessary media.
A linked composition still needs processing. Complex effects can slow playback in Premiere, so Dynamic Link should not be treated as a guarantee of real-time performance.
Media Encoder provides another option for managing encoding presets and queued deliverables. It complements After Effects’ Render Queue rather than replacing it for every output.
These applications are not automatically included with your Vagon subscription or necessarily covered by an After Effects-only Adobe plan. Install the tools you need, activate them appropriately, and allow enough memory for applications running together. The value is having design, animation, compositing, and delivery tools available in the same workspace.
Deliver Finished Work and Keep the Project Editable
A completed composition needs an output suited to its destination. Add it to the Render Queue, then confirm the resolution, frame rate, time span, and output path. A work area used for previewing can accidentally limit the export, so check the range explicitly.
Choose the Format Around the Deliverable
Current After Effects versions support H.264 export from the Render Queue, making it an option for review copies and standard video delivery. Media Encoder is useful when you want its encoding presets or queue workflow.
Source: Adobe Help
For transparency, choose an alpha-capable format and the appropriate RGB + Alpha output settings. A standard H.264 MP4 does not preserve an alpha channel. For demanding animation or compositing handoffs, an image sequence can provide a practical alternative to a single movie file.
Render a representative section before committing to a long export. Open the saved result and inspect:
Duration, dimensions, and frame range.
Typography, fine edges, and effects.
Audio synchronization where applicable.
Color and transparency in the destination application.
Keep the workstation running until the job finishes, and review inactivity or automatic shutdown settings before leaving it unattended.
Preserve More Than the Render
Save the editable project, then use Collect Files to gather a project copy and the selected source dependencies. Review the collection options and report rather than assuming everything has been packaged.
Fonts and plugins require separate availability and licensing. Reopen the collected project to check for missing footage or effects, and retain an independent backup of important production assets.
Use Vagon Files to transfer approved deliverables and project packages. You can keep the working environment available for future production while maintaining copies outside the workstation.
Final Thoughts
Running After Effects on Googlebook can mean creating original motion graphics, building composites, developing reusable designs, and delivering finished work from one Windows workspace. Your projects, assets, compatible tools, and supporting applications can stay together as production develops.
Vagon Cloud Computer provides that working environment, with resources you can adjust around your compositions. Set up your licensed applications, organize your production files, and use the workspace to build new work, not only revise projects created elsewhere.
FAQs
Can I install After Effects directly on Googlebook?
Adobe does not provide a supported native Googlebook release. Through Vagon, you access After Effects installed on a Windows cloud workstation.
Can I create projects from scratch on Vagon?
Yes. You can create projects and compositions, animate text and shapes, build composites, and render deliverables. You are not limited to uploaded templates or existing projects.
Is this the desktop version of After Effects?
Yes. The Windows desktop application runs on the workstation. Your Googlebook displays the remote environment and sends keyboard and mouse input.
Is an Adobe subscription included?
No. Vagon usage and Adobe licensing are separate. You need an Adobe entitlement that includes After Effects.
Can I install fonts, plugins, and scripts?
You can install compatible tools inside the Windows workspace. Check their After Effects version requirements, activation rules, and support for the environment.
Can I use Premiere and Media Encoder in the same workspace?
Yes, with appropriate licenses and compatible versions. Allow enough workstation memory for the applications you plan to run together.
Can the workstation handle 4K compositions?
Choose resources suited to the project. Adobe recommends at least 32 GB of RAM for 4K and higher-resolution media, but effects, layers, and source formats can increase requirements.
Will rendering continue after I close the browser?
Only if the workstation and rendering application remain running. Check inactivity and shutdown settings before leaving a job unattended.
Get Beyond Your Computer Performance
Run applications on your cloud computer with the latest generation hardware. No more crashes or lags.

Trial includes 1 hour usage + 7 days of storage.
Summarize with AI

Ready to focus on your creativity?
Vagon gives you the ability to create & render projects, collaborate, and stream applications with the power of the best hardware.

Vagon Blog
Run heavy applications on any device with
your personal computer on the cloud.
San Francisco, California
Solutions
Vagon Teams
Vagon Streams
Use Cases
Resources
Vagon Blog
How to Run Cinema 4D on Googlebook
How to Run DaVinci Resolve on Googlebook
How to Run Godot on Googlebook: Game Development Guide
How to Run Premiere Pro on Googlebook: Editing Guide
How to Run Revit on Googlebook: Complete BIM Guide
How to Run SOLIDWORKS on Googlebook: Complete CAD Guide
How to Run AutoCAD on Googlebook
How to Run Photoshop on Googlebook
How to Run After Effects on Googlebook
Vagon Blog
Run heavy applications on any device with
your personal computer on the cloud.
San Francisco, California
Solutions
Vagon Teams
Vagon Streams
Use Cases
Resources
Vagon Blog
How to Run Cinema 4D on Googlebook
How to Run DaVinci Resolve on Googlebook
How to Run Godot on Googlebook: Game Development Guide
How to Run Premiere Pro on Googlebook: Editing Guide
How to Run Revit on Googlebook: Complete BIM Guide
How to Run SOLIDWORKS on Googlebook: Complete CAD Guide
How to Run AutoCAD on Googlebook
How to Run Photoshop on Googlebook
How to Run After Effects on Googlebook
Vagon Blog
Run heavy applications on any device with
your personal computer on the cloud.
San Francisco, California
Solutions
Vagon Teams
Vagon Streams
Use Cases
Resources
Vagon Blog