Instant Connection for Pixel Streaming
— New Feature Automated Setup

How to Run DaVinci Resolve on Googlebook
VideoProduction
-
How to Run DaVinci Resolve on Googlebook
VideoProduction
How to Run DaVinci Resolve on Googlebook
VideoProduction
-
Table of Contents
Editing a film rarely ends with the last cut. The footage still needs consistent color, dialogue that sits clearly above the music, titles that match the project, and exports prepared for delivery. DaVinci Resolve brings these tasks into one application, letting you develop a production from the first assembly through finishing without rebuilding it across separate tools.
If you want to run DaVinci Resolve on Googlebook, the important distinction is where that application runs. Resolve’s desktop releases support Windows, macOS, and Linux, rather than a native Googlebook installation. With Vagon Cloud Computer, you can access a Windows workstation from your Googlebook while the cloud computer handles media processing, effects, and rendering.
That gives you a workspace for starting new productions as well as continuing existing projects. You can organize footage, build timelines, grade shots, create Fusion effects, mix audio in Fairlight, and prepare finished deliverables within the same environment.
The right setup depends on your footage, effects, and choice of Resolve Free or Studio. This guide covers how to prepare that workspace, manage your media, and carry a project through postproduction, with performance decisions tied to the work you actually need to do.
What Runs on Googlebook, and What Runs in the Cloud?
When you use Resolve through a cloud workstation, your Googlebook displays the desktop and sends your keyboard and mouse input. The Windows computer runs Resolve, accesses the working media, processes the timeline, and renders your exports. Your internet connection carries the interactive session rather than asking the Googlebook’s local graphics hardware to process every frame.
It helps to separate three parts of the setup:
Component | Its role |
|---|---|
Googlebook | Your screen, keyboard, and access point for the remote workspace |
Vagon Cloud Computer | The Windows workstation where Resolve, working files, and supporting tools run |
Blackmagic Cloud | Optional services for sharing project libraries and supporting collaboration |
Blackmagic Cloud is not a substitute for the workstation running Resolve. Sharing a project library also does not automatically make every source clip available to each collaborator. Project access and media access need to be arranged together.
Choose Resolve Free or Studio for the Features You Need
Resolve Free already includes substantial editing, color correction, Fusion compositing, and Fairlight audio tools. It is a practical starting point for many productions, not simply a viewer or a trial that expires.
DaVinci Resolve Studio adds features such as temporal noise reduction, selected AI tools, and broader support for particular formats and acceleration workflows. Exact codec capabilities depend on the operating system, software release, and hardware.
These are separate decisions: workstation resources determine the processing capacity available, while the Resolve edition determines which licensed features you can use. A more powerful GPU does not unlock Studio-only tools, and a cloud computer subscription does not itself include a Studio license.
Choose the edition around your actual footage and finishing requirements. You can then size the workstation to support that workload.
Create Your Resolve Workspace on Vagon
Start by choosing a workstation for the production you plan to build, not just the first clip you want to import. A straightforward interview edit and a commercial with layered Fusion effects can place very different demands on the same computer, even when both use 4K footage.
1. Choose Resources Around Your Workload
Select a nearby available region to help keep interaction responsive. Then consider GPU resources, memory, and storage together.
For editing, source codecs and simultaneous video streams affect playback demands. Color work adds GPU processing, particularly with noise reduction and complex node trees. Fusion compositions can require substantial system memory as well as GPU memory.
Storage should accommodate more than the original footage. Leave room for proxies, cache files, graphics, audio, and finished exports. Scalable performance lets you adjust computing resources as your workload changes, rather than choosing one configuration for every stage of production.
2. Select DaVinci Resolve in the Application Catalog
During computer creation, open the application selection and look under Video & Motion for DaVinci Resolve. Select it as part of your workstation setup.
Once the desktop is available, launch Resolve and check the installed version and edition. The application listing should not be treated as a promise of a particular release or an included Studio license.
If your production requires another supported release, use Blackmagic Design’s official installer. For shared projects, agree on the Resolve version before opening or upgrading the project library.
3. Prepare the Tools Your Project Depends On
Install the fonts, plugins, and other supporting tools you actually need. Add your LUTs to the appropriate Resolve location and confirm that third-party effects load correctly before building timelines around them.
If you use Studio, confirm that your licensing method works with the cloud workstation. Do not assume a USB activation dongle connected to your Googlebook will automatically be available inside the remote desktop.
A new production may need only Resolve and its built-in tools. An existing project may depend on specific plugin versions or fonts, so check those dependencies early.
4. Transfer Media With Vagon Files
Use Vagon Files to transfer your footage, audio, graphics, and project files into the workspace. Preserve the folder structure when transferring an existing production to make relinking easier.
Before uploading everything, test a representative camera clip. Import it, check its picture and sound, apply a typical correction, and render a short sample. This checks the actual format and workflow before you commit the full production.
Set Up the Project Before Importing Everything
A few early decisions keep an organized production from becoming a collection of mismatched timelines and missing files. Open Resolve’s Project Manager, choose the project library you want to use, and create a clearly named project. A local library is sufficient for working independently; a shared cloud library is an option when collaborators need access.
Establish the Timeline and Color Settings
Open Project Settings before building your first timeline. Set the intended timeline resolution and frame rate around the delivery requirements. You can work with mixed source formats, but deciding the project’s timing early avoids unnecessary conversions and surprises later.
A 24 fps film, a 25 fps interview, and a 60 fps gameplay video need different decisions. Higher frame rates are not automatically better, and changing a timeline’s timing after editing has begun can be disruptive.
Choose your color-management approach at this stage too. DaVinci YRGB Color Managed can help handle different camera color spaces within a defined working and output pipeline. It still requires correct source interpretation. Do not assume every imported clip has been identified correctly, particularly when mixing log footage, screen recordings, and downloaded graphics.

Source: Blackmagic Design
Separate Source Media From Generated Files
Create a predictable folder structure on the workstation, then organize the Media Pool with bins that reflect how you will edit. Bins organize project references; they do not replace the underlying folders containing your footage.

Source: Blackmagic Design
A useful starting checklist is:
Source media: Camera originals, production audio, music, and graphics.
Generated media: Proxy, optimized-media, and render-cache locations.
Deliverables: Review files and approved exports.
Project protection: Project backups and separate copies of important media.
Check Resolve’s working-folder paths so cache files do not consume space intended for source footage. Keep generated files separate enough that you can identify what is replaceable.
Finally, review Live Save and Project Backups in Resolve’s preferences. Live Save preserves ongoing changes, while project backups provide earlier project states. Neither replaces a separate media backup, and exporting a .drp project file does not package the camera originals with it. Set up both project protection and media protection before substantial editing begins.
Build the Edit Without Moving Between Applications
With the project configured, start turning your media into a sequence. Resolve’s Cut and Edit pages offer different approaches to the same production: the Cut page emphasizes fast assembly, while the Edit page provides a more detailed timeline workspace. You can use either or move between them without transferring the project.
Assemble the Story Before Polishing Every Shot
Review footage in the source viewer, mark useful In and Out points, and place selections into the timeline. Insert edits make space for a new shot; overwrite edits replace material within the destination range. Understanding that difference makes assembly more predictable than dragging clips and repairing accidental gaps.
For a short product film, you might first establish the sequence of wide shots, feature details, and demonstrations. Add the interview or voiceover that explains the product, then shape the supporting images around it. Detailed effects can wait until the structure works.
Use markers for unresolved decisions, such as a replacement shot or a missing graphic. Name timelines clearly so a teammate can distinguish the main edit from an experiment.

Source: Blackmagic Design
Refine Timing Without Disturbing the Sequence
Once the assembly communicates the story, tighten the pacing. Ripple trims change a clip’s duration while shifting subsequent material. Roll trims move the boundary between adjacent clips without changing their combined duration. Watch linked audio and track-selection controls when adjusting either.
For interviews recorded with separate sound, synchronize the recordings before making extensive cuts. Multicam editing can simplify productions with several camera angles, provided the sources are synchronized correctly.

Source: Blackmagic Design
A practical review pass should check:
Whether each cut supports the story rather than simply shortening it.
Dialogue continuity across picture changes.
Accidental gaps, black frames, or disabled clips.
Music placement and room for speech.
Placeholder graphics that still need replacement.
Proxies can help with demanding source footage, but they should not change the editorial decisions you make. Their performance role comes later in the workflow.
Build Versions Without Losing the Approved Edit
Before producing a shorter cut or a vertical version, duplicate the timeline and give the copy a descriptive name. Adjust framing, graphics, and pacing for the destination rather than treating a different aspect ratio as an export setting alone.
Add titles and subtitles where needed, checking line breaks and placement against the actual image. If you choose an AI-assisted editing or transcription feature, confirm that it is available in your installed Resolve edition.
When the edit is ready for finishing, the timeline remains available within the same project. You can move into Color for grading, open individual shots in Fusion, and develop the sound in Fairlight without rebuilding the sequence in another application.
Establish Color Consistency Before Building a Look
A polished grade starts with shots that belong together. Before adding a dramatic contrast curve or a film-style treatment, check that exposure, white balance, and source interpretation are consistent across the sequence. A creative look will not reliably hide a camera mismatch.
The Color page combines grading controls, node-based processing, scopes, and shot comparisons. Use those tools to establish a dependable baseline before making selective adjustments.
Check How Each Source Enters the Pipeline
Log footage, camera RAW, and standard video do not necessarily need the same treatment. Verify the input color space assigned to each source and, where relevant, the RAW decoding settings.
If you configured color management earlier, understand which transformations it already performs. Adding a technical LUT or Color Space Transform on top of an equivalent automatic conversion can produce excessive contrast, clipped highlights, or distorted saturation.
Keep three questions clear:
What color space does the source use?
Where does the working-space conversion happen?
What output color space does the delivery require?
There is no universal node order that suits every project. The important point is to know what each correction or transform contributes.
Balance Shots, Then Shape the Look
Start with primary corrections. Adjust exposure and color balance, then compare neighboring shots for distracting changes in brightness or skin tone. Use reference stills and split-screen comparisons to judge continuity without relying entirely on visual memory.
Read the waveform when assessing tonal distribution, the RGB parade when investigating channel imbalances, and the vectorscope when evaluating hue and saturation. Scopes support your judgment, but they do not prescribe a single correct appearance for every scene.
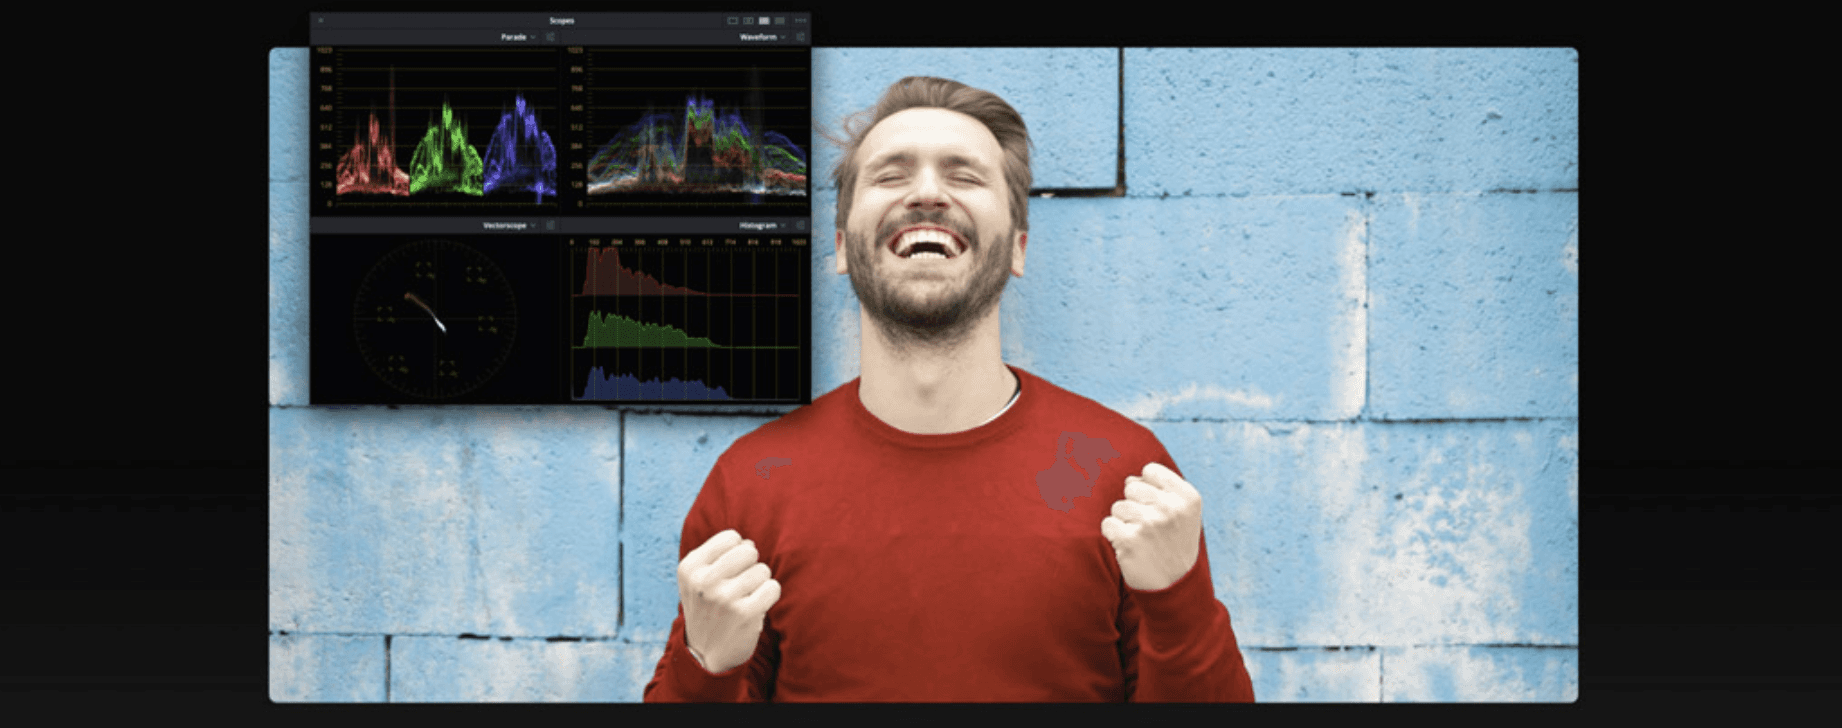
Source: Blackmagic Design
Once the sequence feels consistent, introduce the creative treatment. Separate major operations into clearly labeled nodes so you can distinguish balancing from the look and from targeted corrections. Windows, qualifiers, and tracking can help isolate a face or product detail when a global adjustment affects too much of the frame.
Review Color With the Delivery in Mind
Check the grade across the sequence, not only on its strongest shot. Look for clipped channels, noisy shadows, unnatural skin, and abrupt changes between angles.
Your Googlebook’s display and the streamed desktop remain part of the viewing chain. A remote session is useful for grading work, but it does not automatically provide calibrated reference monitoring or an HDR review setup. For color-critical approval, validate the output through an appropriate monitoring workflow and inspect a rendered sample before committing to the complete delivery.
Finish Effects and Sound in the Same Project
Once the edit and grade are taking shape, use Fusion and Fairlight for the work that individual shots and the overall soundtrack still need. Keeping these tasks inside Resolve makes it easier to check them against the current sequence.
Use Fusion Where the Shot Needs It
The Fusion page provides node-based compositing for tasks such as screen replacements, tracked labels, animated graphics, and cleanup. For a typical timeline clip, the image enters through MediaIn, passes through processing nodes, and returns through MediaOut.

Source: Blackmagic Design
A screen replacement might combine a tracked insert with the original footage through a Merge node, using a mask to control where the insert appears. Check the result across the entire shot, especially when motion blur, reflections, or objects crossing the screen make the composite harder to maintain.
Keep the composition focused on the required result. Label important nodes, review at the intended delivery resolution, and cache demanding work when necessary. The integrated Fusion page is not the same product as standalone Fusion Studio.
Build a Clear, Controlled Mix in Fairlight
In Fairlight, organize dialogue, music, and sound effects onto separate tracks. Balance their levels before applying extensive processing. Dialogue should remain intelligible without forcing the viewer to keep adjusting playback volume.
Use EQ and dynamics to solve specific problems, then check how tracks feed the output buses. A clear stereo mix requires correct routing as well as good individual track levels.

Source: Blackmagic Design
Before delivery, check:
Dialogue consistency between speakers and edits.
Music transitions and sound-effect peaks.
Unwanted noise, clicks, or abrupt audio endings.
Output channels and loudness against the delivery specification.
Some tools, including selected voice-isolation and noise-reduction features, depend on the Resolve edition. Confirm availability before making them essential to the workflow. Finish by listening through the complete timeline, not only the sections you changed.
Fix the Right Playback Bottleneck
When playback slows down, identify what Resolve is struggling to process before changing the workstation configuration. Compressed camera footage, a demanding Fusion composition, and a complex grade can cause similar symptoms for different reasons.
Start by comparing an untreated source clip with the finished timeline. If the source plays smoothly but the graded sequence does not, decoding may not be the main problem. Temporarily bypass effects or test individual sections to narrow the cause.
Choose the Appropriate Playback Aid
Resolve offers several ways to reduce repeated processing, but they serve different purposes:
Tool | What it does | Useful when |
|---|---|---|
Proxy media | Creates lighter versions linked to the originals | Source footage is demanding to edit |
Optimized media | Generates alternate media for Resolve playback | The original format is inefficient for the working setup |
Render cache | Stores processed frames for reuse | Grades or effects are expensive to calculate repeatedly |
These files consume storage and take time to generate. Apply them where they improve the workflow rather than generating every type for the entire production.

Source: Blackmagic Design
Match Resources to the Cause
If performance remains limited, look at the workload. Heavy Color processing may benefit from more GPU capacity or GPU memory. Fusion can also place substantial demands on system RAM. Cache performance depends on available storage and throughput.
Codec acceleration is another variable: support depends on the format, operating system, Resolve edition, and compatible hardware. A larger GPU does not automatically accelerate every source codec.
Finally, separate timeline performance from connection quality. If Resolve’s interface responds slowly even while the timeline is stopped, investigate the streaming connection and region as well as workstation load. Proxies will not fix an unstable internet connection. Adjusting cloud workstation resources is most useful after identifying which resource the production actually needs.
Deliver the Film and Preserve the Editable Project
A finished timeline needs two outcomes: a file that meets the delivery requirements and a project you can reliably return to. Treat export and archiving as separate tasks, rather than assuming the rendered video protects the production.
Check the Deliver Settings Against the Brief
On the Deliver page, choose the container and codec, then confirm resolution, frame rate, quality settings, and the intended timeline range. A preset is a starting point, not proof that every setting matches the client’s specification.
Check the audio source and output channels too. If the project contains separate dialogue, music, or effects buses, make sure the export uses the required mix. Decide whether subtitles should be burned into the image, embedded where supported, or supplied as a separate file.
Before committing to a long render, export a representative section containing demanding effects, titles, and audio transitions.

Source: Blackmagic Design
Review the actual output file for:
Correct duration, framing, and first and last frames.
Missing media, fonts, graphics, or effects.
Audio synchronization and channel layout.
Subtitle timing and readability.
Unexpected color or brightness changes.
A successful render notification confirms completion, not that the deliverable is correct.
Keep More Than the Export
Export a .drp file to preserve the project data, but remember that it does not include the source footage. A .dra project archive can collect the project with media and other content selected during archiving. Review those options and verify the resulting archive rather than assuming every dependency is included.
Keep camera originals and important production assets backed up independently. Record the Resolve version and retain any required fonts, LUTs, and plugin information so the project can be reconstructed later. Where practical, test restoring the archive before removing working copies.
If you use Blackmagic Cloud collaboration, confirm that collaborators have access to the necessary media as well as the shared project. Those are related but distinct requirements.
Finally, use Vagon Files to transfer finished deliverables and backup packages to their intended destinations. Keep the editable production available until delivery has been checked and approved.
Final Thoughts
Running DaVinci Resolve on Googlebook can support a complete production workflow, from organizing camera footage to editing, grading, compositing, mixing, and delivery. The key is preparing a workspace around your media and finishing requirements, then protecting the project alongside its exports.
Vagon Cloud Computer gives you access to a Windows workstation for that process, with computing resources you can adjust as the production develops. Choose the appropriate Resolve edition, test your source formats early, and build from there.
FAQs
Can I install DaVinci Resolve directly on Googlebook?
There is no supported native Googlebook release. Resolve’s desktop versions support Windows, macOS, and Linux. With a cloud workstation, you access the Windows application remotely rather than installing it on Googlebook.
Can I use DaVinci Resolve Free on Vagon?
Yes. Resolve Free can handle editing, color correction, Fusion compositing, and Fairlight audio work. The cloud computer has its own charges, separate from your choice of Resolve edition.
Does selecting Resolve include a Studio license?
Do not assume so. The application catalog listing does not establish Studio entitlement. Studio requires a valid license and an activation method compatible with your workspace.
Can I edit 4K and 10-bit footage?
Support depends on the specific codec, operating system, Resolve edition, and workstation hardware. Check your camera format and test a representative clip before transferring an entire production.
Do I need Blackmagic Cloud?
No. You can work independently using a local project library on the cloud computer. Blackmagic Cloud is optional for supported collaboration and sharing workflows.
Does a .drp file include my footage?
No. It contains project data, not the source media. Back up footage separately or create and verify a project archive with the required media included.
Can I connect a USB license dongle or control panel?
Do not assume peripherals connected to Googlebook will pass through to the remote workstation. Verify support for the specific device and connection method first.
Will rendering continue if I close the browser?
Only if the cloud computer and Resolve remain running. Check shutdown, inactivity, and session settings before leaving a render unattended.
Editing a film rarely ends with the last cut. The footage still needs consistent color, dialogue that sits clearly above the music, titles that match the project, and exports prepared for delivery. DaVinci Resolve brings these tasks into one application, letting you develop a production from the first assembly through finishing without rebuilding it across separate tools.
If you want to run DaVinci Resolve on Googlebook, the important distinction is where that application runs. Resolve’s desktop releases support Windows, macOS, and Linux, rather than a native Googlebook installation. With Vagon Cloud Computer, you can access a Windows workstation from your Googlebook while the cloud computer handles media processing, effects, and rendering.
That gives you a workspace for starting new productions as well as continuing existing projects. You can organize footage, build timelines, grade shots, create Fusion effects, mix audio in Fairlight, and prepare finished deliverables within the same environment.
The right setup depends on your footage, effects, and choice of Resolve Free or Studio. This guide covers how to prepare that workspace, manage your media, and carry a project through postproduction, with performance decisions tied to the work you actually need to do.
What Runs on Googlebook, and What Runs in the Cloud?
When you use Resolve through a cloud workstation, your Googlebook displays the desktop and sends your keyboard and mouse input. The Windows computer runs Resolve, accesses the working media, processes the timeline, and renders your exports. Your internet connection carries the interactive session rather than asking the Googlebook’s local graphics hardware to process every frame.
It helps to separate three parts of the setup:
Component | Its role |
|---|---|
Googlebook | Your screen, keyboard, and access point for the remote workspace |
Vagon Cloud Computer | The Windows workstation where Resolve, working files, and supporting tools run |
Blackmagic Cloud | Optional services for sharing project libraries and supporting collaboration |
Blackmagic Cloud is not a substitute for the workstation running Resolve. Sharing a project library also does not automatically make every source clip available to each collaborator. Project access and media access need to be arranged together.
Choose Resolve Free or Studio for the Features You Need
Resolve Free already includes substantial editing, color correction, Fusion compositing, and Fairlight audio tools. It is a practical starting point for many productions, not simply a viewer or a trial that expires.
DaVinci Resolve Studio adds features such as temporal noise reduction, selected AI tools, and broader support for particular formats and acceleration workflows. Exact codec capabilities depend on the operating system, software release, and hardware.
These are separate decisions: workstation resources determine the processing capacity available, while the Resolve edition determines which licensed features you can use. A more powerful GPU does not unlock Studio-only tools, and a cloud computer subscription does not itself include a Studio license.
Choose the edition around your actual footage and finishing requirements. You can then size the workstation to support that workload.
Create Your Resolve Workspace on Vagon
Start by choosing a workstation for the production you plan to build, not just the first clip you want to import. A straightforward interview edit and a commercial with layered Fusion effects can place very different demands on the same computer, even when both use 4K footage.
1. Choose Resources Around Your Workload
Select a nearby available region to help keep interaction responsive. Then consider GPU resources, memory, and storage together.
For editing, source codecs and simultaneous video streams affect playback demands. Color work adds GPU processing, particularly with noise reduction and complex node trees. Fusion compositions can require substantial system memory as well as GPU memory.
Storage should accommodate more than the original footage. Leave room for proxies, cache files, graphics, audio, and finished exports. Scalable performance lets you adjust computing resources as your workload changes, rather than choosing one configuration for every stage of production.
2. Select DaVinci Resolve in the Application Catalog
During computer creation, open the application selection and look under Video & Motion for DaVinci Resolve. Select it as part of your workstation setup.
Once the desktop is available, launch Resolve and check the installed version and edition. The application listing should not be treated as a promise of a particular release or an included Studio license.
If your production requires another supported release, use Blackmagic Design’s official installer. For shared projects, agree on the Resolve version before opening or upgrading the project library.
3. Prepare the Tools Your Project Depends On
Install the fonts, plugins, and other supporting tools you actually need. Add your LUTs to the appropriate Resolve location and confirm that third-party effects load correctly before building timelines around them.
If you use Studio, confirm that your licensing method works with the cloud workstation. Do not assume a USB activation dongle connected to your Googlebook will automatically be available inside the remote desktop.
A new production may need only Resolve and its built-in tools. An existing project may depend on specific plugin versions or fonts, so check those dependencies early.
4. Transfer Media With Vagon Files
Use Vagon Files to transfer your footage, audio, graphics, and project files into the workspace. Preserve the folder structure when transferring an existing production to make relinking easier.
Before uploading everything, test a representative camera clip. Import it, check its picture and sound, apply a typical correction, and render a short sample. This checks the actual format and workflow before you commit the full production.
Set Up the Project Before Importing Everything
A few early decisions keep an organized production from becoming a collection of mismatched timelines and missing files. Open Resolve’s Project Manager, choose the project library you want to use, and create a clearly named project. A local library is sufficient for working independently; a shared cloud library is an option when collaborators need access.
Establish the Timeline and Color Settings
Open Project Settings before building your first timeline. Set the intended timeline resolution and frame rate around the delivery requirements. You can work with mixed source formats, but deciding the project’s timing early avoids unnecessary conversions and surprises later.
A 24 fps film, a 25 fps interview, and a 60 fps gameplay video need different decisions. Higher frame rates are not automatically better, and changing a timeline’s timing after editing has begun can be disruptive.
Choose your color-management approach at this stage too. DaVinci YRGB Color Managed can help handle different camera color spaces within a defined working and output pipeline. It still requires correct source interpretation. Do not assume every imported clip has been identified correctly, particularly when mixing log footage, screen recordings, and downloaded graphics.
Source: Blackmagic Design
Separate Source Media From Generated Files
Create a predictable folder structure on the workstation, then organize the Media Pool with bins that reflect how you will edit. Bins organize project references; they do not replace the underlying folders containing your footage.
Source: Blackmagic Design
A useful starting checklist is:
Source media: Camera originals, production audio, music, and graphics.
Generated media: Proxy, optimized-media, and render-cache locations.
Deliverables: Review files and approved exports.
Project protection: Project backups and separate copies of important media.
Check Resolve’s working-folder paths so cache files do not consume space intended for source footage. Keep generated files separate enough that you can identify what is replaceable.
Finally, review Live Save and Project Backups in Resolve’s preferences. Live Save preserves ongoing changes, while project backups provide earlier project states. Neither replaces a separate media backup, and exporting a .drp project file does not package the camera originals with it. Set up both project protection and media protection before substantial editing begins.
Build the Edit Without Moving Between Applications
With the project configured, start turning your media into a sequence. Resolve’s Cut and Edit pages offer different approaches to the same production: the Cut page emphasizes fast assembly, while the Edit page provides a more detailed timeline workspace. You can use either or move between them without transferring the project.
Assemble the Story Before Polishing Every Shot
Review footage in the source viewer, mark useful In and Out points, and place selections into the timeline. Insert edits make space for a new shot; overwrite edits replace material within the destination range. Understanding that difference makes assembly more predictable than dragging clips and repairing accidental gaps.
For a short product film, you might first establish the sequence of wide shots, feature details, and demonstrations. Add the interview or voiceover that explains the product, then shape the supporting images around it. Detailed effects can wait until the structure works.
Use markers for unresolved decisions, such as a replacement shot or a missing graphic. Name timelines clearly so a teammate can distinguish the main edit from an experiment.
Source: Blackmagic Design
Refine Timing Without Disturbing the Sequence
Once the assembly communicates the story, tighten the pacing. Ripple trims change a clip’s duration while shifting subsequent material. Roll trims move the boundary between adjacent clips without changing their combined duration. Watch linked audio and track-selection controls when adjusting either.
For interviews recorded with separate sound, synchronize the recordings before making extensive cuts. Multicam editing can simplify productions with several camera angles, provided the sources are synchronized correctly.
Source: Blackmagic Design
A practical review pass should check:
Whether each cut supports the story rather than simply shortening it.
Dialogue continuity across picture changes.
Accidental gaps, black frames, or disabled clips.
Music placement and room for speech.
Placeholder graphics that still need replacement.
Proxies can help with demanding source footage, but they should not change the editorial decisions you make. Their performance role comes later in the workflow.
Build Versions Without Losing the Approved Edit
Before producing a shorter cut or a vertical version, duplicate the timeline and give the copy a descriptive name. Adjust framing, graphics, and pacing for the destination rather than treating a different aspect ratio as an export setting alone.
Add titles and subtitles where needed, checking line breaks and placement against the actual image. If you choose an AI-assisted editing or transcription feature, confirm that it is available in your installed Resolve edition.
When the edit is ready for finishing, the timeline remains available within the same project. You can move into Color for grading, open individual shots in Fusion, and develop the sound in Fairlight without rebuilding the sequence in another application.
Establish Color Consistency Before Building a Look
A polished grade starts with shots that belong together. Before adding a dramatic contrast curve or a film-style treatment, check that exposure, white balance, and source interpretation are consistent across the sequence. A creative look will not reliably hide a camera mismatch.
The Color page combines grading controls, node-based processing, scopes, and shot comparisons. Use those tools to establish a dependable baseline before making selective adjustments.
Check How Each Source Enters the Pipeline
Log footage, camera RAW, and standard video do not necessarily need the same treatment. Verify the input color space assigned to each source and, where relevant, the RAW decoding settings.
If you configured color management earlier, understand which transformations it already performs. Adding a technical LUT or Color Space Transform on top of an equivalent automatic conversion can produce excessive contrast, clipped highlights, or distorted saturation.
Keep three questions clear:
What color space does the source use?
Where does the working-space conversion happen?
What output color space does the delivery require?
There is no universal node order that suits every project. The important point is to know what each correction or transform contributes.
Balance Shots, Then Shape the Look
Start with primary corrections. Adjust exposure and color balance, then compare neighboring shots for distracting changes in brightness or skin tone. Use reference stills and split-screen comparisons to judge continuity without relying entirely on visual memory.
Read the waveform when assessing tonal distribution, the RGB parade when investigating channel imbalances, and the vectorscope when evaluating hue and saturation. Scopes support your judgment, but they do not prescribe a single correct appearance for every scene.
Source: Blackmagic Design
Once the sequence feels consistent, introduce the creative treatment. Separate major operations into clearly labeled nodes so you can distinguish balancing from the look and from targeted corrections. Windows, qualifiers, and tracking can help isolate a face or product detail when a global adjustment affects too much of the frame.
Review Color With the Delivery in Mind
Check the grade across the sequence, not only on its strongest shot. Look for clipped channels, noisy shadows, unnatural skin, and abrupt changes between angles.
Your Googlebook’s display and the streamed desktop remain part of the viewing chain. A remote session is useful for grading work, but it does not automatically provide calibrated reference monitoring or an HDR review setup. For color-critical approval, validate the output through an appropriate monitoring workflow and inspect a rendered sample before committing to the complete delivery.
Finish Effects and Sound in the Same Project
Once the edit and grade are taking shape, use Fusion and Fairlight for the work that individual shots and the overall soundtrack still need. Keeping these tasks inside Resolve makes it easier to check them against the current sequence.
Use Fusion Where the Shot Needs It
The Fusion page provides node-based compositing for tasks such as screen replacements, tracked labels, animated graphics, and cleanup. For a typical timeline clip, the image enters through MediaIn, passes through processing nodes, and returns through MediaOut.
Source: Blackmagic Design
A screen replacement might combine a tracked insert with the original footage through a Merge node, using a mask to control where the insert appears. Check the result across the entire shot, especially when motion blur, reflections, or objects crossing the screen make the composite harder to maintain.
Keep the composition focused on the required result. Label important nodes, review at the intended delivery resolution, and cache demanding work when necessary. The integrated Fusion page is not the same product as standalone Fusion Studio.
Build a Clear, Controlled Mix in Fairlight
In Fairlight, organize dialogue, music, and sound effects onto separate tracks. Balance their levels before applying extensive processing. Dialogue should remain intelligible without forcing the viewer to keep adjusting playback volume.
Use EQ and dynamics to solve specific problems, then check how tracks feed the output buses. A clear stereo mix requires correct routing as well as good individual track levels.
Source: Blackmagic Design
Before delivery, check:
Dialogue consistency between speakers and edits.
Music transitions and sound-effect peaks.
Unwanted noise, clicks, or abrupt audio endings.
Output channels and loudness against the delivery specification.
Some tools, including selected voice-isolation and noise-reduction features, depend on the Resolve edition. Confirm availability before making them essential to the workflow. Finish by listening through the complete timeline, not only the sections you changed.
Fix the Right Playback Bottleneck
When playback slows down, identify what Resolve is struggling to process before changing the workstation configuration. Compressed camera footage, a demanding Fusion composition, and a complex grade can cause similar symptoms for different reasons.
Start by comparing an untreated source clip with the finished timeline. If the source plays smoothly but the graded sequence does not, decoding may not be the main problem. Temporarily bypass effects or test individual sections to narrow the cause.
Choose the Appropriate Playback Aid
Resolve offers several ways to reduce repeated processing, but they serve different purposes:
Tool | What it does | Useful when |
|---|---|---|
Proxy media | Creates lighter versions linked to the originals | Source footage is demanding to edit |
Optimized media | Generates alternate media for Resolve playback | The original format is inefficient for the working setup |
Render cache | Stores processed frames for reuse | Grades or effects are expensive to calculate repeatedly |
These files consume storage and take time to generate. Apply them where they improve the workflow rather than generating every type for the entire production.
Source: Blackmagic Design
Match Resources to the Cause
If performance remains limited, look at the workload. Heavy Color processing may benefit from more GPU capacity or GPU memory. Fusion can also place substantial demands on system RAM. Cache performance depends on available storage and throughput.
Codec acceleration is another variable: support depends on the format, operating system, Resolve edition, and compatible hardware. A larger GPU does not automatically accelerate every source codec.
Finally, separate timeline performance from connection quality. If Resolve’s interface responds slowly even while the timeline is stopped, investigate the streaming connection and region as well as workstation load. Proxies will not fix an unstable internet connection. Adjusting cloud workstation resources is most useful after identifying which resource the production actually needs.
Deliver the Film and Preserve the Editable Project
A finished timeline needs two outcomes: a file that meets the delivery requirements and a project you can reliably return to. Treat export and archiving as separate tasks, rather than assuming the rendered video protects the production.
Check the Deliver Settings Against the Brief
On the Deliver page, choose the container and codec, then confirm resolution, frame rate, quality settings, and the intended timeline range. A preset is a starting point, not proof that every setting matches the client’s specification.
Check the audio source and output channels too. If the project contains separate dialogue, music, or effects buses, make sure the export uses the required mix. Decide whether subtitles should be burned into the image, embedded where supported, or supplied as a separate file.
Before committing to a long render, export a representative section containing demanding effects, titles, and audio transitions.
Source: Blackmagic Design
Review the actual output file for:
Correct duration, framing, and first and last frames.
Missing media, fonts, graphics, or effects.
Audio synchronization and channel layout.
Subtitle timing and readability.
Unexpected color or brightness changes.
A successful render notification confirms completion, not that the deliverable is correct.
Keep More Than the Export
Export a .drp file to preserve the project data, but remember that it does not include the source footage. A .dra project archive can collect the project with media and other content selected during archiving. Review those options and verify the resulting archive rather than assuming every dependency is included.
Keep camera originals and important production assets backed up independently. Record the Resolve version and retain any required fonts, LUTs, and plugin information so the project can be reconstructed later. Where practical, test restoring the archive before removing working copies.
If you use Blackmagic Cloud collaboration, confirm that collaborators have access to the necessary media as well as the shared project. Those are related but distinct requirements.
Finally, use Vagon Files to transfer finished deliverables and backup packages to their intended destinations. Keep the editable production available until delivery has been checked and approved.
Final Thoughts
Running DaVinci Resolve on Googlebook can support a complete production workflow, from organizing camera footage to editing, grading, compositing, mixing, and delivery. The key is preparing a workspace around your media and finishing requirements, then protecting the project alongside its exports.
Vagon Cloud Computer gives you access to a Windows workstation for that process, with computing resources you can adjust as the production develops. Choose the appropriate Resolve edition, test your source formats early, and build from there.
FAQs
Can I install DaVinci Resolve directly on Googlebook?
There is no supported native Googlebook release. Resolve’s desktop versions support Windows, macOS, and Linux. With a cloud workstation, you access the Windows application remotely rather than installing it on Googlebook.
Can I use DaVinci Resolve Free on Vagon?
Yes. Resolve Free can handle editing, color correction, Fusion compositing, and Fairlight audio work. The cloud computer has its own charges, separate from your choice of Resolve edition.
Does selecting Resolve include a Studio license?
Do not assume so. The application catalog listing does not establish Studio entitlement. Studio requires a valid license and an activation method compatible with your workspace.
Can I edit 4K and 10-bit footage?
Support depends on the specific codec, operating system, Resolve edition, and workstation hardware. Check your camera format and test a representative clip before transferring an entire production.
Do I need Blackmagic Cloud?
No. You can work independently using a local project library on the cloud computer. Blackmagic Cloud is optional for supported collaboration and sharing workflows.
Does a .drp file include my footage?
No. It contains project data, not the source media. Back up footage separately or create and verify a project archive with the required media included.
Can I connect a USB license dongle or control panel?
Do not assume peripherals connected to Googlebook will pass through to the remote workstation. Verify support for the specific device and connection method first.
Will rendering continue if I close the browser?
Only if the cloud computer and Resolve remain running. Check shutdown, inactivity, and session settings before leaving a render unattended.
Get Beyond Your Computer Performance
Run applications on your cloud computer with the latest generation hardware. No more crashes or lags.

Trial includes 1 hour usage + 7 days of storage.
Summarize with AI

Ready to focus on your creativity?
Vagon gives you the ability to create & render projects, collaborate, and stream applications with the power of the best hardware.

Vagon Blog
Run heavy applications on any device with
your personal computer on the cloud.
San Francisco, California
Solutions
Vagon Teams
Vagon Streams
Use Cases
Resources
Vagon Blog
How to Run Cinema 4D on Googlebook
How to Run DaVinci Resolve on Googlebook
How to Run Godot on Googlebook: Game Development Guide
How to Run Premiere Pro on Googlebook: Editing Guide
How to Run Revit on Googlebook: Complete BIM Guide
How to Run SOLIDWORKS on Googlebook: Complete CAD Guide
How to Run AutoCAD on Googlebook
How to Run Photoshop on Googlebook
How to Run After Effects on Googlebook
Vagon Blog
Run heavy applications on any device with
your personal computer on the cloud.
San Francisco, California
Solutions
Vagon Teams
Vagon Streams
Use Cases
Resources
Vagon Blog
How to Run Cinema 4D on Googlebook
How to Run DaVinci Resolve on Googlebook
How to Run Godot on Googlebook: Game Development Guide
How to Run Premiere Pro on Googlebook: Editing Guide
How to Run Revit on Googlebook: Complete BIM Guide
How to Run SOLIDWORKS on Googlebook: Complete CAD Guide
How to Run AutoCAD on Googlebook
How to Run Photoshop on Googlebook
How to Run After Effects on Googlebook
Vagon Blog
Run heavy applications on any device with
your personal computer on the cloud.
San Francisco, California
Solutions
Vagon Teams
Vagon Streams
Use Cases
Resources
Vagon Blog