Instant Connection for Pixel Streaming
— New Feature Automated Setup

How to Run Photoshop on Googlebook
DigitalArt
-
How to Run Photoshop on Googlebook
DigitalArt
How to Run Photoshop on Googlebook
DigitalArt
-
Table of Contents
Creating campaign graphics, retouching photos, and building product compositions should not depend on keeping a powerful laptop beside you. If you use a Googlebook, the challenge is getting a Photoshop environment with the desktop tools, computing resources, and file access your work needs.
Vagon Cloud Computer provides a Windows workspace where you can install desktop Photoshop through Adobe Creative Cloud and control it from your Googlebook’s browser. Photoshop runs on the cloud computer, while you use your laptop’s screen, keyboard, and mouse. Your installed applications and saved files remain available for future sessions.
That gives you a place to create new designs, develop layered documents, organize photo collections, and automate repetitive production tasks. It is a different workflow from Photoshop on the web, which has its own feature set and platform requirements.
This guide covers the complete process: setting up Photoshop, bringing in assets, designing from scratch, editing photos, choosing resources, and exporting finished work. You will need your own Adobe license. We will also explain Adobe’s virtual-machine support limits so access to the desktop application is not confused with a guarantee for every feature.

Source: Adobe
What Running Photoshop on Googlebook Actually Means
The key distinction is where Photoshop runs. A native installation would run directly on Googlebook OS. Photoshop on the web runs through a supported browser environment. With Vagon, desktop Photoshop runs on a Windows cloud computer that you control remotely.
Adobe’s desktop requirements list Windows and macOS, not Googlebook OS. Googlebook’s Linux Terminal does not provide an official installation route either, because Adobe does not offer native desktop Photoshop for Linux.
The web version deserves separate consideration. It includes layers, selections, masks, and many editing tools, so it is not simply a lightweight image viewer. However, Adobe’s Photoshop Web requirements do not explicitly list Googlebook OS. Having Chrome installed alone does not establish official compatibility.
Option | What it means for your work |
|---|---|
Native desktop installation | No documented Photoshop installation for Googlebook OS. |
Photoshop on the web | Browser editing, subject to platform compatibility and available features. |
Desktop Photoshop through Vagon | Access to the Windows application, its tools, and a desktop file environment. |
This guide uses the third option. It lets you build your process around desktop tools such as Actions, Smart Filters, and broader typography controls, which Adobe distinguishes in its web and desktop comparison.
Your Photoshop documents and source assets reside in the workstation or the storage service you deliberately choose. Googlebook provides access to that environment rather than hosting the application locally.
Next, we will prepare the Windows workspace and install Photoshop through Creative Cloud. Resource choices and Adobe’s cloud-environment support boundaries are covered in the performance section.
Set Up Your Photoshop Workspace on Vagon
You only need to install Photoshop when preparing the workstation or changing its application setup. Afterward, you can reconnect to the same environment and continue with your saved files.
Step 1: Create Your Cloud Computer
Create your Vagon Cloud Computer, choose a nearby location, and select resources appropriate for your work. A nearer workstation can help reduce connection latency, while RAM, processor capacity, and storage affect the editing workload.
Adobe recommends 16 GB or more of RAM for current Photoshop versions. Larger compositions and multiple open documents may need additional capacity. Leave storage available for application installation, working files, exports, and temporary scratch data.
Photoshop is not currently listed in Vagon’s automatic application catalog. Plan to install it through Adobe Creative Cloud inside Windows.
Step 2: Connect From Your Googlebook
Start the computer from your dashboard and open the Windows desktop through your browser. Switch to full-screen view so Photoshop’s canvas and panels have enough room.
A mouse is helpful for selections, transform handles, and panel controls. If your workflow depends on a drawing tablet, check compatibility with the connection method before assuming pressure sensitivity will pass through.
Set a comfortable desktop display scale. Interface elements should remain readable without taking unnecessary space away from the canvas.
Step 3: Install Photoshop Through Creative Cloud
Inside the Windows workspace, download the Creative Cloud desktop app from Adobe. Sign in with your Adobe account, locate Photoshop, and install the version available through your plan.
Launch the application and complete any activation prompts. Your Adobe subscription is separate from Vagon usage. For a managed business account, follow your organization’s installation and licensing requirements.
If you depend on a particular plug-in, confirm which Photoshop version it supports before choosing your installation.
Step 4: Bring In Assets and Arrange Your Panels
Use Vagon Files to upload photos, logos, reference images, or existing documents from Googlebook. Access them inside Windows before beginning your design.
Open the panels you need most often, such as Layers, Properties, and Adjustments. Arrange them around the canvas and save a custom Photoshop workspace if you want to reuse that layout.
Before starting production, create a small document, save it, and reopen it to confirm that Photoshop launches correctly and your working location is accessible.
Bring Your Photos, Fonts, and Assets Into One Place
Organize your assets before building a design. A clear folder structure makes sources easier to locate and prevents finished exports from getting mixed with editable documents.
Upload individual files or a ZIP archive through Vagon Files, then access them inside Windows. An archive is useful when transferring related assets because it keeps their folder structure together.
Folder | Contents |
|---|---|
Source | Original photos, logos, references, and supplied artwork. |
Working | Editable Photoshop documents and supporting assets. |
Exports | Files prepared for publishing or delivery. |
Keep source files unchanged where practical. Create your working documents separately so you can return to an original photograph or supplied logo when another treatment is needed.
Preserve Linked Files and Required Fonts
An embedded Smart Object stores its content within the Photoshop document. A Linked Smart Object points to an external file. If you transfer only the PSD, that linked source may be missing.
Bring those external files into the workstation too. If Photoshop reports a missing link, reconnect it to the correct source before continuing.
Install properly licensed font files or activate fonts available through your Adobe account. Check documents for substituted fonts, since substitutions can change line breaks and layout. Third-party plug-ins require their own installation and compatibility checks.

Source: Adobe
Choose Where the Working Document Lives
Vagon Files and Adobe cloud documents serve different purposes. The former supports file transfer and storage access; the latter is an Adobe-managed document workflow associated with your account.
Choose a deliberate save location for each project. Keep important masters backed up or versioned, and confirm that saves and transfers have completed before ending the session.
Create Designs From Scratch, Not Just Edit Existing PSDs
Start a new design with its destination in mind. A social graphic, website banner, and printed poster need different dimensions and layouts, even when they share the same photography and branding.
Choose File > New and enter the required canvas size. For digital work, use the destination’s pixel dimensions. For print, follow the printer’s specifications for physical size, resolution, and color profile. Increasing resolution later cannot recover detail missing from a source image.

Source: Adobe
Build a Campaign Graphic With Editable Layers
Create separate layers for the background, imagery, headline, and supporting text. Name them clearly, then group related elements. This keeps changes manageable when you replace a photograph or revise a message.
Use type layers for editable text and shape layers for graphic elements that need flexible sizing. Place imagery as Smart Objects when you want to preserve source content through repeated transformations.
A useful starting structure is:
Layer group | Purpose |
|---|---|
Background | Base color, texture, or background image. |
Product or subject | Main imagery and its masks. |
Typography | Headline, supporting copy, and call to action. |
Finishing | Editable color adjustments and effects. |
Keep reusable assets separate from campaign-specific content. That makes the document easier to adapt without accidentally changing a logo or fixed brand element.
Create a Product Composition
Place the product and background on separate layers. Select the subject, then use a layer mask to hide unwanted areas rather than permanently erasing them.
Inspect the edges against the new background. Reflective surfaces, translucent materials, and fine detail can need more refinement than a simple automatic selection provides.
Next, match scale, perspective, and lighting. A clean cutout can still look misplaced if its angle conflicts with the background or its highlights suggest another light direction. Add shadows and tonal corrections on editable layers where practical.
Review the composition both close up and at its intended viewing size. Edge defects become visible when enlarged, while balance and readability are easier to judge at normal size.
Develop Layouts for Different Placements
A vertical graphic usually needs more than a crop of the landscape version. Reposition the subject and text around the available space, preserving the intended visual hierarchy.
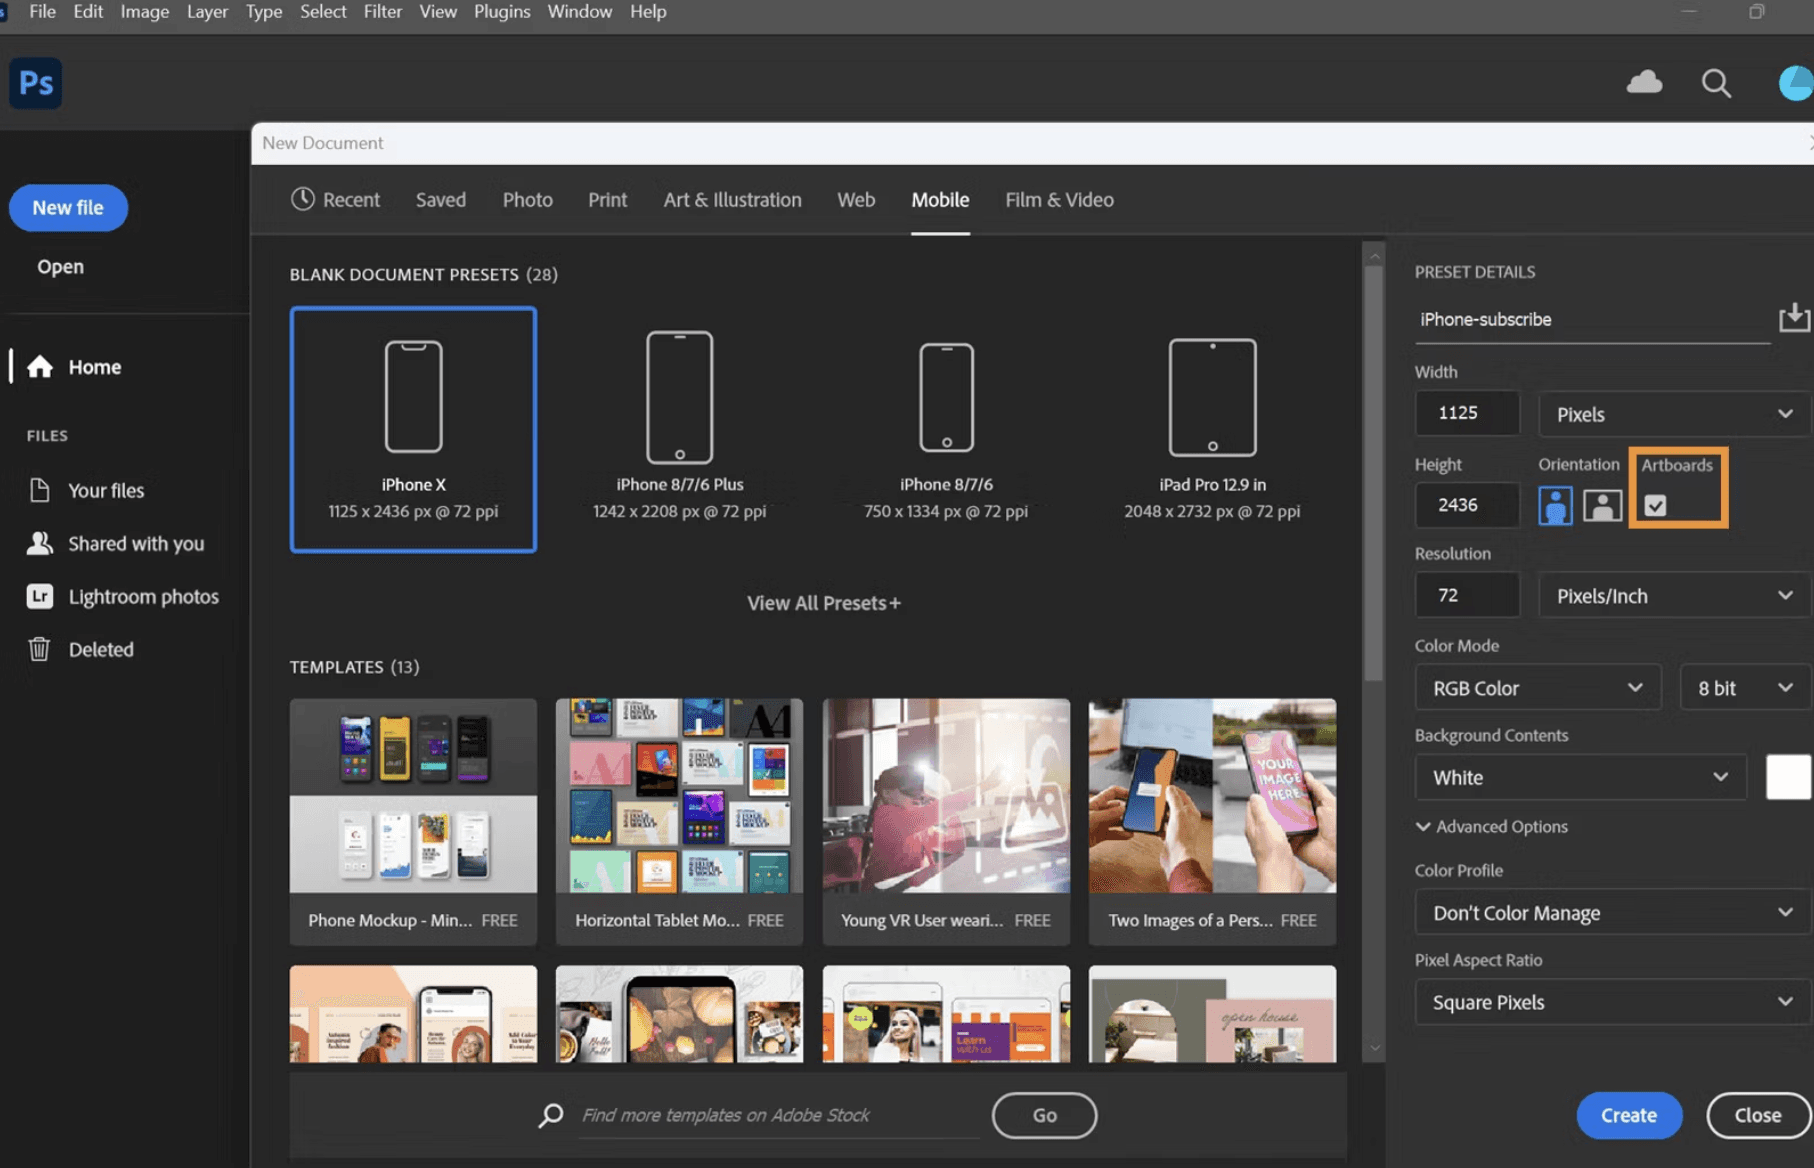
Use artboards for related layouts or separate documents when that is easier to manage. Name each variant by its destination or dimensions.
Save the layered design before moving on. The export section will cover how to preserve that master and prepare the files each destination needs.
Source: Adobe
Build a Flexible Photo Editing and Retouching Workflow
Photo editing works best when exposure, color, and retouching remain separate decisions. That lets you refine the image without repeatedly changing its underlying pixels.
Begin with the source photograph, establish its overall appearance, then move into local corrections.
Start With Camera Raw
For supported RAW files, use Camera Raw to adjust white balance, exposure, highlights, and shadows. Check that important detail remains visible before adding stronger contrast or a stylized color treatment.
Keep the original file. If you want to revisit Camera Raw settings after adding Photoshop layers, open the photograph as a Smart Object.
Camera Raw also supports certain JPEG and TIFF workflows, but adjustments cannot restore detail already lost through clipping or compression. Judge the available image data rather than expecting every source to tolerate the same changes.

Source: Adobe
Separate Tonal Adjustments From Retouching
Use non-destructive editing to keep corrections editable. Adjustment layers let you change tone and color without permanently replacing the pixels beneath them.
For example, add a Curves adjustment for contrast, then use its mask to limit the effect. White reveals the adjustment, black hides it, and gray applies it partially.

Source: Adobe
Create a separate layer for healing or cloning. Choose the sampling setting appropriate for the tool, and confirm that it reads the intended layers. Avoid unintentionally incorporating adjustment effects into the retouching twice.
Task | Editable approach |
|---|---|
Overall exposure and color | Camera Raw settings or adjustment layers. |
Local brightness changes | Adjustment layers controlled by masks. |
Blemishes and distractions | Healing or cloning on a separate layer. |
Reframing | Non-destructive cropping where supported. |
Review Detail and Overall Balance
Inspect the photograph at 100% zoom for repeated cloning patterns, halos, rough mask edges, and unnatural texture. Then zoom out to assess the whole image.
Toggle individual adjustments to check whether they improve the result. A stronger correction is not necessarily a better one, particularly when it changes skin tones or product colors.
Save the layered document so its adjustments, masks, and retouching remain editable.

Source: Adobe
Choose Performance for Large Documents and Everyday Production
Photoshop’s resource needs depend on the documents and operations you work with. A layered composition with embedded images, masks, and extensive history can demand more memory than its saved file size suggests. Several open documents add to that workload.
Choose your workstation around those demands, rather than treating GPU capacity as the only performance measure.
Resource | Main contribution |
|---|---|
RAM | Active document data and multiple open files. |
CPU | Many filters, editing operations, and automation tasks. |
GPU and VRAM | Supported accelerated display and editing features, where available. |
Fast storage | Opening, saving, and accessing temporary scratch data. |
Free disk space | Capacity for scratch files and production output. |
Adobe’s desktop requirements recommend 16 GB or more of RAM. Larger layered documents and simultaneous applications can need additional memory.
Balance Memory Allocation and Scratch Space
In Windows, open Edit > Preferences > Performance to review memory allocation. Photoshop uses approximately 70% of available RAM by default, according to Adobe’s memory guidance.
Leave memory for Windows and other applications. Giving Photoshop all available RAM can create system bottlenecks rather than improve editing.
When allocated memory fills, Photoshop uses a scratch disk for temporary data. Keep sufficient free space on suitable workstation storage. Vagon Files storage and Photoshop’s scratch disk serve different purposes; upload capacity does not replace scratch space.

Source: Adobe
Adjust Capacity as the Workload Changes
Vagon’s scalable performance lets you change resources while retaining your applications and files. You can therefore increase capacity for heavier compositions or larger image collections without rebuilding the editing environment.
Evaluate the change using the same document and operation. A representative filter, save, or batch task provides a more useful comparison than an empty canvas.
Adobe also sets an important support boundary: Photoshop in virtual machines is not officially supported, and its GPU guidance excludes GPU-enabled VM and remote-desktop configurations. Test the features your workflow depends on; cloud GPU availability is not a guarantee of compatibility.
Identify Processing Delays and Input Delays Separately
A filter taking time to finish is different from a cursor responding late. For input delay, check connection stability and workstation location before changing Photoshop’s memory settings.
For color-critical work, account for the Googlebook display and streamed preview too. Use an appropriate proofing setup for final color decisions; embedded profiles alone do not compensate for an uncalibrated screen.
Turn Repetitive Editing Into a Repeatable Workflow
Desktop Photoshop’s automation tools are useful when a collection needs the same predictable treatment. Resizing product images, applying a standard finishing step, and preparing delivery files can often be turned into reusable operations.
Record the Steps That Stay Consistent
Open Window > Actions and create a named action. Start recording, perform the supported commands you want to reuse, then stop.
Keep the action focused. A resizing routine is easier to test and maintain than one that mixes dimensions, color correction, cropping, and saving without clear boundaries.
Repeated task | Suitable automation |
|---|---|
Standard dimensions | A tested resizing sequence. |
Consistent finishing | Repeatable adjustments or sharpening settings. |
Delivery preparation | Supported format, naming, and saving operations. |
Not every edit should be automatic. Different photographs may need individual exposure corrections, and a fixed crop can remove important content from another image.

Source: Adobe
Test Before Running a Batch
Run the action on duplicate files first. Include images with different dimensions and orientations to reveal assumptions in the recorded steps.
Check for unexpected prompts, fixed filenames, and unsuitable results. Refine the action before processing the full collection.
Use File > Automate > Batch to apply an action across a folder. Select the action, source, and destination deliberately. Prefer a separate output folder when you need to protect originals; Save and Close can overwrite the source files.
If the action includes an Open or Save As command, review the relevant override options so the batch does not repeatedly target the file or location used during recording.
After processing, inspect representative outputs and confirm that the expected files were saved. Keep the tested action set with your production resources so it is available for future jobs.
Save Editable Masters and Deliver the Right Files
Your working document and final deliverable serve different purposes. The master preserves layers, masks, text, and adjustments. The delivery file should meet the requirements of the website, publication, printer, or client receiving it.
Save the master before resizing or exporting a delivery version.
Match the Format to the Destination
Format | Typical use |
|---|---|
PSD | Editable Photoshop master. |
PSB | Large documents that exceed PSD limits. |
JPEG | Photos and graphics without transparency. |
PNG | Lossless screen graphics, including transparent images. |
TIFF | High-quality delivery when requested. |
Confirm dimensions, transparency, and any file-size limit before exporting. A social platform may need a compressed JPEG, while a product cutout may need a transparent PNG. Neither replaces the layered source document.
Check text and fine detail at the intended output size. Simply reducing a large design can make smaller typography unreadable.
Use the Appropriate Color Profile
For online viewing, Adobe recommends converting images with other profiles to sRGB. Convert the colors using the appropriate command or export setting; assigning a different profile is not the same operation.
Where the format supports it, embed the color profile to help receiving applications interpret the image correctly.
For print, obtain the recipient’s specifications before choosing a profile or converting to CMYK. There is no single CMYK setup suitable for every printing process.

Source: Adobe
Inspect the Export Before Sending It
Open the exported file separately and verify:
The dimensions and crop are correct.
Transparency behaves as intended.
Text, edges, and detail remain clear.
The format and filename match the delivery requirements.
For automated exports, inspect several examples rather than only the first file.
Place approved output in your Exports folder, then use Vagon Files to transfer it to Googlebook when needed. Keep the editable master and any linked sources together for future revisions.
Final Thoughts
Vagon gives your Googlebook access to a desktop Photoshop workspace for design, photo editing, and repeatable production. You can start with a blank canvas, keep edits flexible, automate suitable tasks, and deliver files prepared for their destination.
Create your Vagon Cloud Computer, install Photoshop through Creative Cloud, and build the workspace around your needs. Choose resources for the documents you actually produce, test essential features against Adobe’s support limits, and keep editable masters separate from finished exports.
FAQs
Can I install desktop Photoshop directly on Googlebook?
Adobe lists Windows and macOS as desktop Photoshop platforms, not Googlebook OS. Googlebook’s Linux Terminal does not provide an official native installation route. With Vagon, Photoshop runs inside a Windows workspace accessed through your browser.
Does Photoshop Web officially support Googlebook?
Adobe’s published requirements list Windows, macOS, and ChromeOS, but do not explicitly list Googlebook OS. Having Chrome alone does not establish official support. Check the current requirements and device behavior before choosing it for regular work.
Can I create designs from scratch through Vagon?
Yes. You can create new documents, build layered compositions, edit photographs, and prepare multiple layouts in desktop Photoshop. You are accessing the application, not just a viewer for existing PSD files.
Is Photoshop included in the Vagon subscription?
No. Vagon usage and Adobe licensing are separate. Install Photoshop through Creative Cloud using your own valid Adobe entitlement, or follow your organization’s managed-account requirements.
Can I use Camera Raw, Actions, and third-party plug-ins?
These are desktop workflows, subject to the installed Photoshop version and their individual requirements. Third-party plug-ins need compatible Windows versions, installation, and any required licenses. Test essential tools before relying on them for production.
How much RAM and storage do I need?
Adobe recommends 16 GB or more of RAM for current desktop versions. Large layered documents can need additional capacity. Allow storage for installation, assets, working documents, exports, and temporary scratch data.
Does Adobe support GPU-enabled Photoshop in virtual machines?
Adobe does not officially support Photoshop in virtual machines and excludes GPU-enabled VM and remote-desktop configurations from support. A cloud workstation’s GPU therefore does not guarantee compatibility with every accelerated feature.
Will my files remain available for another session?
Saved files and installed applications can remain on your Vagon computer when you stop it and return later. Save documents and complete transfers before stopping the workstation. Keep important masters backed up separately.
Creating campaign graphics, retouching photos, and building product compositions should not depend on keeping a powerful laptop beside you. If you use a Googlebook, the challenge is getting a Photoshop environment with the desktop tools, computing resources, and file access your work needs.
Vagon Cloud Computer provides a Windows workspace where you can install desktop Photoshop through Adobe Creative Cloud and control it from your Googlebook’s browser. Photoshop runs on the cloud computer, while you use your laptop’s screen, keyboard, and mouse. Your installed applications and saved files remain available for future sessions.
That gives you a place to create new designs, develop layered documents, organize photo collections, and automate repetitive production tasks. It is a different workflow from Photoshop on the web, which has its own feature set and platform requirements.
This guide covers the complete process: setting up Photoshop, bringing in assets, designing from scratch, editing photos, choosing resources, and exporting finished work. You will need your own Adobe license. We will also explain Adobe’s virtual-machine support limits so access to the desktop application is not confused with a guarantee for every feature.
Source: Adobe
What Running Photoshop on Googlebook Actually Means
The key distinction is where Photoshop runs. A native installation would run directly on Googlebook OS. Photoshop on the web runs through a supported browser environment. With Vagon, desktop Photoshop runs on a Windows cloud computer that you control remotely.
Adobe’s desktop requirements list Windows and macOS, not Googlebook OS. Googlebook’s Linux Terminal does not provide an official installation route either, because Adobe does not offer native desktop Photoshop for Linux.
The web version deserves separate consideration. It includes layers, selections, masks, and many editing tools, so it is not simply a lightweight image viewer. However, Adobe’s Photoshop Web requirements do not explicitly list Googlebook OS. Having Chrome installed alone does not establish official compatibility.
Option | What it means for your work |
|---|---|
Native desktop installation | No documented Photoshop installation for Googlebook OS. |
Photoshop on the web | Browser editing, subject to platform compatibility and available features. |
Desktop Photoshop through Vagon | Access to the Windows application, its tools, and a desktop file environment. |
This guide uses the third option. It lets you build your process around desktop tools such as Actions, Smart Filters, and broader typography controls, which Adobe distinguishes in its web and desktop comparison.
Your Photoshop documents and source assets reside in the workstation or the storage service you deliberately choose. Googlebook provides access to that environment rather than hosting the application locally.
Next, we will prepare the Windows workspace and install Photoshop through Creative Cloud. Resource choices and Adobe’s cloud-environment support boundaries are covered in the performance section.
Set Up Your Photoshop Workspace on Vagon
You only need to install Photoshop when preparing the workstation or changing its application setup. Afterward, you can reconnect to the same environment and continue with your saved files.
Step 1: Create Your Cloud Computer
Create your Vagon Cloud Computer, choose a nearby location, and select resources appropriate for your work. A nearer workstation can help reduce connection latency, while RAM, processor capacity, and storage affect the editing workload.
Adobe recommends 16 GB or more of RAM for current Photoshop versions. Larger compositions and multiple open documents may need additional capacity. Leave storage available for application installation, working files, exports, and temporary scratch data.
Photoshop is not currently listed in Vagon’s automatic application catalog. Plan to install it through Adobe Creative Cloud inside Windows.
Step 2: Connect From Your Googlebook
Start the computer from your dashboard and open the Windows desktop through your browser. Switch to full-screen view so Photoshop’s canvas and panels have enough room.
A mouse is helpful for selections, transform handles, and panel controls. If your workflow depends on a drawing tablet, check compatibility with the connection method before assuming pressure sensitivity will pass through.
Set a comfortable desktop display scale. Interface elements should remain readable without taking unnecessary space away from the canvas.
Step 3: Install Photoshop Through Creative Cloud
Inside the Windows workspace, download the Creative Cloud desktop app from Adobe. Sign in with your Adobe account, locate Photoshop, and install the version available through your plan.
Launch the application and complete any activation prompts. Your Adobe subscription is separate from Vagon usage. For a managed business account, follow your organization’s installation and licensing requirements.
If you depend on a particular plug-in, confirm which Photoshop version it supports before choosing your installation.
Step 4: Bring In Assets and Arrange Your Panels
Use Vagon Files to upload photos, logos, reference images, or existing documents from Googlebook. Access them inside Windows before beginning your design.
Open the panels you need most often, such as Layers, Properties, and Adjustments. Arrange them around the canvas and save a custom Photoshop workspace if you want to reuse that layout.
Before starting production, create a small document, save it, and reopen it to confirm that Photoshop launches correctly and your working location is accessible.
Bring Your Photos, Fonts, and Assets Into One Place
Organize your assets before building a design. A clear folder structure makes sources easier to locate and prevents finished exports from getting mixed with editable documents.
Upload individual files or a ZIP archive through Vagon Files, then access them inside Windows. An archive is useful when transferring related assets because it keeps their folder structure together.
Folder | Contents |
|---|---|
Source | Original photos, logos, references, and supplied artwork. |
Working | Editable Photoshop documents and supporting assets. |
Exports | Files prepared for publishing or delivery. |
Keep source files unchanged where practical. Create your working documents separately so you can return to an original photograph or supplied logo when another treatment is needed.
Preserve Linked Files and Required Fonts
An embedded Smart Object stores its content within the Photoshop document. A Linked Smart Object points to an external file. If you transfer only the PSD, that linked source may be missing.
Bring those external files into the workstation too. If Photoshop reports a missing link, reconnect it to the correct source before continuing.
Install properly licensed font files or activate fonts available through your Adobe account. Check documents for substituted fonts, since substitutions can change line breaks and layout. Third-party plug-ins require their own installation and compatibility checks.
Source: Adobe
Choose Where the Working Document Lives
Vagon Files and Adobe cloud documents serve different purposes. The former supports file transfer and storage access; the latter is an Adobe-managed document workflow associated with your account.
Choose a deliberate save location for each project. Keep important masters backed up or versioned, and confirm that saves and transfers have completed before ending the session.
Create Designs From Scratch, Not Just Edit Existing PSDs
Start a new design with its destination in mind. A social graphic, website banner, and printed poster need different dimensions and layouts, even when they share the same photography and branding.
Choose File > New and enter the required canvas size. For digital work, use the destination’s pixel dimensions. For print, follow the printer’s specifications for physical size, resolution, and color profile. Increasing resolution later cannot recover detail missing from a source image.
Source: Adobe
Build a Campaign Graphic With Editable Layers
Create separate layers for the background, imagery, headline, and supporting text. Name them clearly, then group related elements. This keeps changes manageable when you replace a photograph or revise a message.
Use type layers for editable text and shape layers for graphic elements that need flexible sizing. Place imagery as Smart Objects when you want to preserve source content through repeated transformations.
A useful starting structure is:
Layer group | Purpose |
|---|---|
Background | Base color, texture, or background image. |
Product or subject | Main imagery and its masks. |
Typography | Headline, supporting copy, and call to action. |
Finishing | Editable color adjustments and effects. |
Keep reusable assets separate from campaign-specific content. That makes the document easier to adapt without accidentally changing a logo or fixed brand element.
Create a Product Composition
Place the product and background on separate layers. Select the subject, then use a layer mask to hide unwanted areas rather than permanently erasing them.
Inspect the edges against the new background. Reflective surfaces, translucent materials, and fine detail can need more refinement than a simple automatic selection provides.
Next, match scale, perspective, and lighting. A clean cutout can still look misplaced if its angle conflicts with the background or its highlights suggest another light direction. Add shadows and tonal corrections on editable layers where practical.
Review the composition both close up and at its intended viewing size. Edge defects become visible when enlarged, while balance and readability are easier to judge at normal size.
Develop Layouts for Different Placements
A vertical graphic usually needs more than a crop of the landscape version. Reposition the subject and text around the available space, preserving the intended visual hierarchy.
Use artboards for related layouts or separate documents when that is easier to manage. Name each variant by its destination or dimensions.
Save the layered design before moving on. The export section will cover how to preserve that master and prepare the files each destination needs.
Source: Adobe
Build a Flexible Photo Editing and Retouching Workflow
Photo editing works best when exposure, color, and retouching remain separate decisions. That lets you refine the image without repeatedly changing its underlying pixels.
Begin with the source photograph, establish its overall appearance, then move into local corrections.
Start With Camera Raw
For supported RAW files, use Camera Raw to adjust white balance, exposure, highlights, and shadows. Check that important detail remains visible before adding stronger contrast or a stylized color treatment.
Keep the original file. If you want to revisit Camera Raw settings after adding Photoshop layers, open the photograph as a Smart Object.
Camera Raw also supports certain JPEG and TIFF workflows, but adjustments cannot restore detail already lost through clipping or compression. Judge the available image data rather than expecting every source to tolerate the same changes.
Source: Adobe
Separate Tonal Adjustments From Retouching
Use non-destructive editing to keep corrections editable. Adjustment layers let you change tone and color without permanently replacing the pixels beneath them.
For example, add a Curves adjustment for contrast, then use its mask to limit the effect. White reveals the adjustment, black hides it, and gray applies it partially.
Source: Adobe
Create a separate layer for healing or cloning. Choose the sampling setting appropriate for the tool, and confirm that it reads the intended layers. Avoid unintentionally incorporating adjustment effects into the retouching twice.
Task | Editable approach |
|---|---|
Overall exposure and color | Camera Raw settings or adjustment layers. |
Local brightness changes | Adjustment layers controlled by masks. |
Blemishes and distractions | Healing or cloning on a separate layer. |
Reframing | Non-destructive cropping where supported. |
Review Detail and Overall Balance
Inspect the photograph at 100% zoom for repeated cloning patterns, halos, rough mask edges, and unnatural texture. Then zoom out to assess the whole image.
Toggle individual adjustments to check whether they improve the result. A stronger correction is not necessarily a better one, particularly when it changes skin tones or product colors.
Save the layered document so its adjustments, masks, and retouching remain editable.
Source: Adobe
Choose Performance for Large Documents and Everyday Production
Photoshop’s resource needs depend on the documents and operations you work with. A layered composition with embedded images, masks, and extensive history can demand more memory than its saved file size suggests. Several open documents add to that workload.
Choose your workstation around those demands, rather than treating GPU capacity as the only performance measure.
Resource | Main contribution |
|---|---|
RAM | Active document data and multiple open files. |
CPU | Many filters, editing operations, and automation tasks. |
GPU and VRAM | Supported accelerated display and editing features, where available. |
Fast storage | Opening, saving, and accessing temporary scratch data. |
Free disk space | Capacity for scratch files and production output. |
Adobe’s desktop requirements recommend 16 GB or more of RAM. Larger layered documents and simultaneous applications can need additional memory.
Balance Memory Allocation and Scratch Space
In Windows, open Edit > Preferences > Performance to review memory allocation. Photoshop uses approximately 70% of available RAM by default, according to Adobe’s memory guidance.
Leave memory for Windows and other applications. Giving Photoshop all available RAM can create system bottlenecks rather than improve editing.
When allocated memory fills, Photoshop uses a scratch disk for temporary data. Keep sufficient free space on suitable workstation storage. Vagon Files storage and Photoshop’s scratch disk serve different purposes; upload capacity does not replace scratch space.
Source: Adobe
Adjust Capacity as the Workload Changes
Vagon’s scalable performance lets you change resources while retaining your applications and files. You can therefore increase capacity for heavier compositions or larger image collections without rebuilding the editing environment.
Evaluate the change using the same document and operation. A representative filter, save, or batch task provides a more useful comparison than an empty canvas.
Adobe also sets an important support boundary: Photoshop in virtual machines is not officially supported, and its GPU guidance excludes GPU-enabled VM and remote-desktop configurations. Test the features your workflow depends on; cloud GPU availability is not a guarantee of compatibility.
Identify Processing Delays and Input Delays Separately
A filter taking time to finish is different from a cursor responding late. For input delay, check connection stability and workstation location before changing Photoshop’s memory settings.
For color-critical work, account for the Googlebook display and streamed preview too. Use an appropriate proofing setup for final color decisions; embedded profiles alone do not compensate for an uncalibrated screen.
Turn Repetitive Editing Into a Repeatable Workflow
Desktop Photoshop’s automation tools are useful when a collection needs the same predictable treatment. Resizing product images, applying a standard finishing step, and preparing delivery files can often be turned into reusable operations.
Record the Steps That Stay Consistent
Open Window > Actions and create a named action. Start recording, perform the supported commands you want to reuse, then stop.
Keep the action focused. A resizing routine is easier to test and maintain than one that mixes dimensions, color correction, cropping, and saving without clear boundaries.
Repeated task | Suitable automation |
|---|---|
Standard dimensions | A tested resizing sequence. |
Consistent finishing | Repeatable adjustments or sharpening settings. |
Delivery preparation | Supported format, naming, and saving operations. |
Not every edit should be automatic. Different photographs may need individual exposure corrections, and a fixed crop can remove important content from another image.
Source: Adobe
Test Before Running a Batch
Run the action on duplicate files first. Include images with different dimensions and orientations to reveal assumptions in the recorded steps.
Check for unexpected prompts, fixed filenames, and unsuitable results. Refine the action before processing the full collection.
Use File > Automate > Batch to apply an action across a folder. Select the action, source, and destination deliberately. Prefer a separate output folder when you need to protect originals; Save and Close can overwrite the source files.
If the action includes an Open or Save As command, review the relevant override options so the batch does not repeatedly target the file or location used during recording.
After processing, inspect representative outputs and confirm that the expected files were saved. Keep the tested action set with your production resources so it is available for future jobs.
Save Editable Masters and Deliver the Right Files
Your working document and final deliverable serve different purposes. The master preserves layers, masks, text, and adjustments. The delivery file should meet the requirements of the website, publication, printer, or client receiving it.
Save the master before resizing or exporting a delivery version.
Match the Format to the Destination
Format | Typical use |
|---|---|
PSD | Editable Photoshop master. |
PSB | Large documents that exceed PSD limits. |
JPEG | Photos and graphics without transparency. |
PNG | Lossless screen graphics, including transparent images. |
TIFF | High-quality delivery when requested. |
Confirm dimensions, transparency, and any file-size limit before exporting. A social platform may need a compressed JPEG, while a product cutout may need a transparent PNG. Neither replaces the layered source document.
Check text and fine detail at the intended output size. Simply reducing a large design can make smaller typography unreadable.
Use the Appropriate Color Profile
For online viewing, Adobe recommends converting images with other profiles to sRGB. Convert the colors using the appropriate command or export setting; assigning a different profile is not the same operation.
Where the format supports it, embed the color profile to help receiving applications interpret the image correctly.
For print, obtain the recipient’s specifications before choosing a profile or converting to CMYK. There is no single CMYK setup suitable for every printing process.
Source: Adobe
Inspect the Export Before Sending It
Open the exported file separately and verify:
The dimensions and crop are correct.
Transparency behaves as intended.
Text, edges, and detail remain clear.
The format and filename match the delivery requirements.
For automated exports, inspect several examples rather than only the first file.
Place approved output in your Exports folder, then use Vagon Files to transfer it to Googlebook when needed. Keep the editable master and any linked sources together for future revisions.
Final Thoughts
Vagon gives your Googlebook access to a desktop Photoshop workspace for design, photo editing, and repeatable production. You can start with a blank canvas, keep edits flexible, automate suitable tasks, and deliver files prepared for their destination.
Create your Vagon Cloud Computer, install Photoshop through Creative Cloud, and build the workspace around your needs. Choose resources for the documents you actually produce, test essential features against Adobe’s support limits, and keep editable masters separate from finished exports.
FAQs
Can I install desktop Photoshop directly on Googlebook?
Adobe lists Windows and macOS as desktop Photoshop platforms, not Googlebook OS. Googlebook’s Linux Terminal does not provide an official native installation route. With Vagon, Photoshop runs inside a Windows workspace accessed through your browser.
Does Photoshop Web officially support Googlebook?
Adobe’s published requirements list Windows, macOS, and ChromeOS, but do not explicitly list Googlebook OS. Having Chrome alone does not establish official support. Check the current requirements and device behavior before choosing it for regular work.
Can I create designs from scratch through Vagon?
Yes. You can create new documents, build layered compositions, edit photographs, and prepare multiple layouts in desktop Photoshop. You are accessing the application, not just a viewer for existing PSD files.
Is Photoshop included in the Vagon subscription?
No. Vagon usage and Adobe licensing are separate. Install Photoshop through Creative Cloud using your own valid Adobe entitlement, or follow your organization’s managed-account requirements.
Can I use Camera Raw, Actions, and third-party plug-ins?
These are desktop workflows, subject to the installed Photoshop version and their individual requirements. Third-party plug-ins need compatible Windows versions, installation, and any required licenses. Test essential tools before relying on them for production.
How much RAM and storage do I need?
Adobe recommends 16 GB or more of RAM for current desktop versions. Large layered documents can need additional capacity. Allow storage for installation, assets, working documents, exports, and temporary scratch data.
Does Adobe support GPU-enabled Photoshop in virtual machines?
Adobe does not officially support Photoshop in virtual machines and excludes GPU-enabled VM and remote-desktop configurations from support. A cloud workstation’s GPU therefore does not guarantee compatibility with every accelerated feature.
Will my files remain available for another session?
Saved files and installed applications can remain on your Vagon computer when you stop it and return later. Save documents and complete transfers before stopping the workstation. Keep important masters backed up separately.
Get Beyond Your Computer Performance
Run applications on your cloud computer with the latest generation hardware. No more crashes or lags.

Trial includes 1 hour usage + 7 days of storage.
Summarize with AI

Ready to focus on your creativity?
Vagon gives you the ability to create & render projects, collaborate, and stream applications with the power of the best hardware.

Vagon Blog
Run heavy applications on any device with
your personal computer on the cloud.
San Francisco, California
Solutions
Vagon Teams
Vagon Streams
Use Cases
Resources
Vagon Blog
How to Run Photoshop on Googlebook
How to Use SketchUp With Codex: MCP and Computer Use
How to Use SketchUp With Claude: MCP and Computer Use
How to Use ComfyUI With Codex: MCP and Computer Use
How to Use Godot With Codex: MCP & Computer Use Guide
How to Use Houdini With Codex: MCP, Computer Use & RBD
How to Use Cinema 4D With Codex: MCP & Computer Use
How to Use Higgsfield With Codex: MCP & Computer Use
How to Use DaVinci Resolve With Codex: MCP & Computer Use
Vagon Blog
Run heavy applications on any device with
your personal computer on the cloud.
San Francisco, California
Solutions
Vagon Teams
Vagon Streams
Use Cases
Resources
Vagon Blog
How to Run Photoshop on Googlebook
How to Use SketchUp With Codex: MCP and Computer Use
How to Use SketchUp With Claude: MCP and Computer Use
How to Use ComfyUI With Codex: MCP and Computer Use
How to Use Godot With Codex: MCP & Computer Use Guide
How to Use Houdini With Codex: MCP, Computer Use & RBD
How to Use Cinema 4D With Codex: MCP & Computer Use
How to Use Higgsfield With Codex: MCP & Computer Use
How to Use DaVinci Resolve With Codex: MCP & Computer Use
Vagon Blog
Run heavy applications on any device with
your personal computer on the cloud.
San Francisco, California
Solutions
Vagon Teams
Vagon Streams
Use Cases
Resources
Vagon Blog