Instant Connection for Pixel Streaming
— New Feature Automated Setup

How to Use Houdini With Codex: MCP, Computer Use & RBD
DigitalArt
-
How to Use Houdini With Codex: MCP, Computer Use & RBD
DigitalArt
How to Use Houdini With Codex: MCP, Computer Use & RBD
DigitalArt
-
Table of Contents
The glass panel in your Houdini shot already breaks at the right moment. Then the director requests a lighter impact and a more violent version, both using the approved camera, timing, and panel design. A solver change may produce either result, but an old cache can hide the change, while flying shards can leave the frame.
Codex becomes useful when it can inspect the scene you are editing. Through a compatible Houdini MCP server, it can read node paths, connections, and parameters, then propose changes to the fracture or constraint setup. The available tools depend on the connector and Houdini version.
Computer Use adds a visual check. With access to the Houdini window, Codex can inspect node warnings, examine the fractured geometry, and review a flipbook around the moment of impact. Those observations help determine whether a successful cook produced the intended shot.
This guide follows the revision from live connection and graph inspection through controlled variations, cache checks, and render approval. Each step gives you evidence to review before the next cook or file write.

Source: SideFX
The Shot: Three Impact Variations, One Protected Setup
Start with the approved simulation as the reference. The director wants two alternatives, but has not asked for a new glass asset, camera move, or animation. Define that boundary before Codex touches the scene.
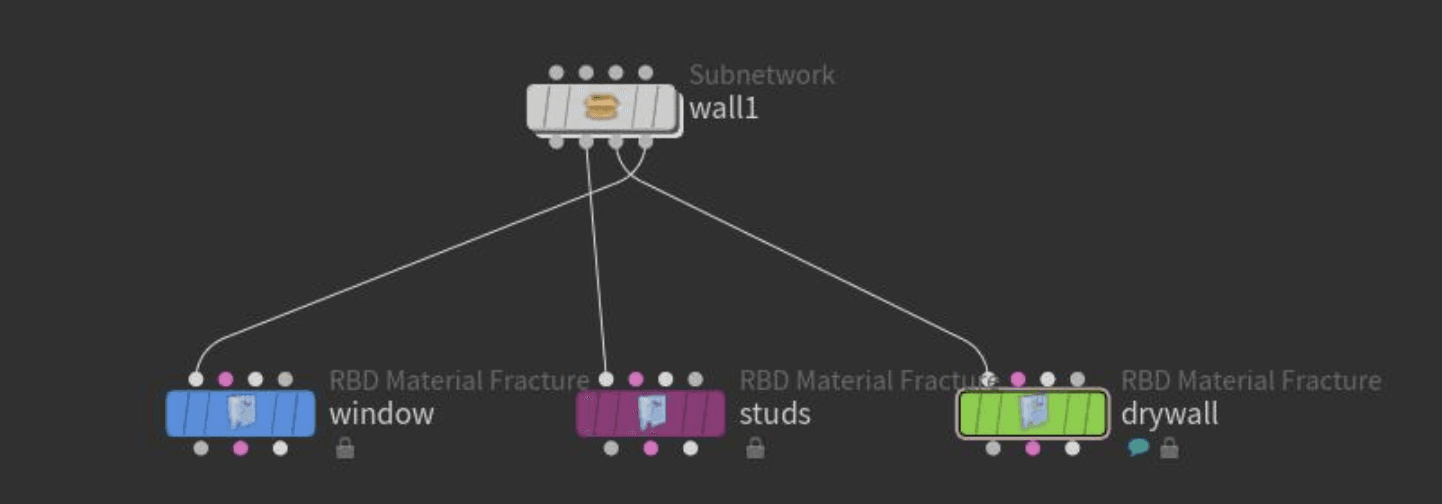
The working brief has three outcomes: the original impact, a lighter break, and a heavier break. All three must begin from the same panel geometry and use the same shot timing and camera. The differences should come from controls identified in the existing setup, such as impact motion or constraint strength. RBD Material Fracture can generate fractured pieces and their constraints, but that does not tell us which control this particular scene uses. Codex needs to inspect the graph before recommending one.
Source: SideFX
Make the acceptance criteria visible as well as technical. At the approved impact frame, each version should show a distinct degree of breakage. Before impact, the panel should retain its intended shape. During the break, important fragments should remain within the agreed framing. The original version must still match its approved preview.
Give each version its own cache and output destination. A different parameter value is of little use if all three versions load the same files or write over the approved sequence. Save a separately named working .hip file before making changes.
This brief gives Codex a defined task: identify the controls that could produce those variations, explain their likely effects, and wait for approval before editing or cooking.
Connect Codex to the Houdini Session
For this workflow, use a community Houdini MCP connector to give Codex access to the Houdini session running on the same computer. The connector is separate from Houdini and Codex. Installing it does not mean Codex can immediately edit a scene: Houdini must be open, its MCP server must be running, and Codex must be configured to reach that server.
Check the connector’s supported Houdini and Python versions before installing. From the repository root, run bash install/setup.sh on macOS or Linux, or install\setup.bat on Windows. The installer adds a Houdini package to your user preferences. Restart Houdini, then use the Houdini MCP shelf to start the server. These steps belong to this particular connector; another Houdini MCP project may use a different installation method or endpoint.

Source: Sylvestre_Gug
Register its default local endpoint with Codex:
The address http://localhost:9876/mcp is this connector’s default, not a universal Houdini address. If you changed its port, use the matching URL in Codex. The Codex MCP documentation explains how Codex manages server connections, while the connector’s setup instructions cover its Houdini-side installation.
Before opening the production shot, test the connection with a disposable .hip file containing a clearly named Geometry node. Give Codex a read-only request:
Report the Houdini version and the paths of the nodes in the current scene. Identify the named Geometry node. Do not change parameters, create nodes, cook, save, or render anything.
A server appearing in codex mcp list confirms its configuration, but the scene-specific response is the useful test. If Codex cannot identify the node you just created, check that the shelf server is running, the port matches, and Codex is connected to the intended Houdini session. Do not move on to the approved glass shot until that read-only check works.
Keep this endpoint local. The connector’s default loopback binding is designed for access from the same computer, and its documentation warns that it does not provide authentication or per-tool approval controls. Computer Use is a separate capability with its own app permissions; connecting MCP does not automatically give Codex visual access to Houdini’s interface.
Trace the Impact Through the Node Graph
The first production-scene task is inspection, not adjustment. Open a working copy of the approved shot and ask Codex to map the path from the glass panel to the simulated result. A useful request is: “Find the panel geometry, fracture setup, constraints, impact source, solver, and cache nodes. Report their paths and connections. Read parameters only; do not cook or edit.”
Codex should return a map you can check in Houdini, not just a suggested slider value. The panel may pass through RBD Material Fracture before its pieces and constraints reach an RBD Bullet Solver. The impact might come from animated collision geometry, an initial velocity, or another force in the scene. None of those paths can be assumed from the shot brief alone.

Source: SideFX
Ask Codex to separate what it found from what it inferred. For each likely revision control, it should provide the node path, parameter name, current value, and reason that parameter could affect the break. It should also flag expressions, keyframes, channel references, or upstream controls. Changing a value on a downstream node may do nothing if an expression replaces it at cook time.
Trace the result past the solver, too. A File Cache may feed the viewport and render branch. If that branch reads an earlier simulation, the shot can appear unchanged even after a valid parameter edit. Record the cache node’s path, its read or write state, and its file destination before testing a variation.
Finally, compare Codex’s map with the Houdini network view. Check that it identified the correct panel and shot branch, especially if the file contains archived tests or multiple impact setups. If it cannot establish which branch feeds the approved camera output, ask it to report that uncertainty. The next step should change one verified control, not the most plausible-looking parameter in an unverified graph.
Change One Constraint, Then Verify the Cook
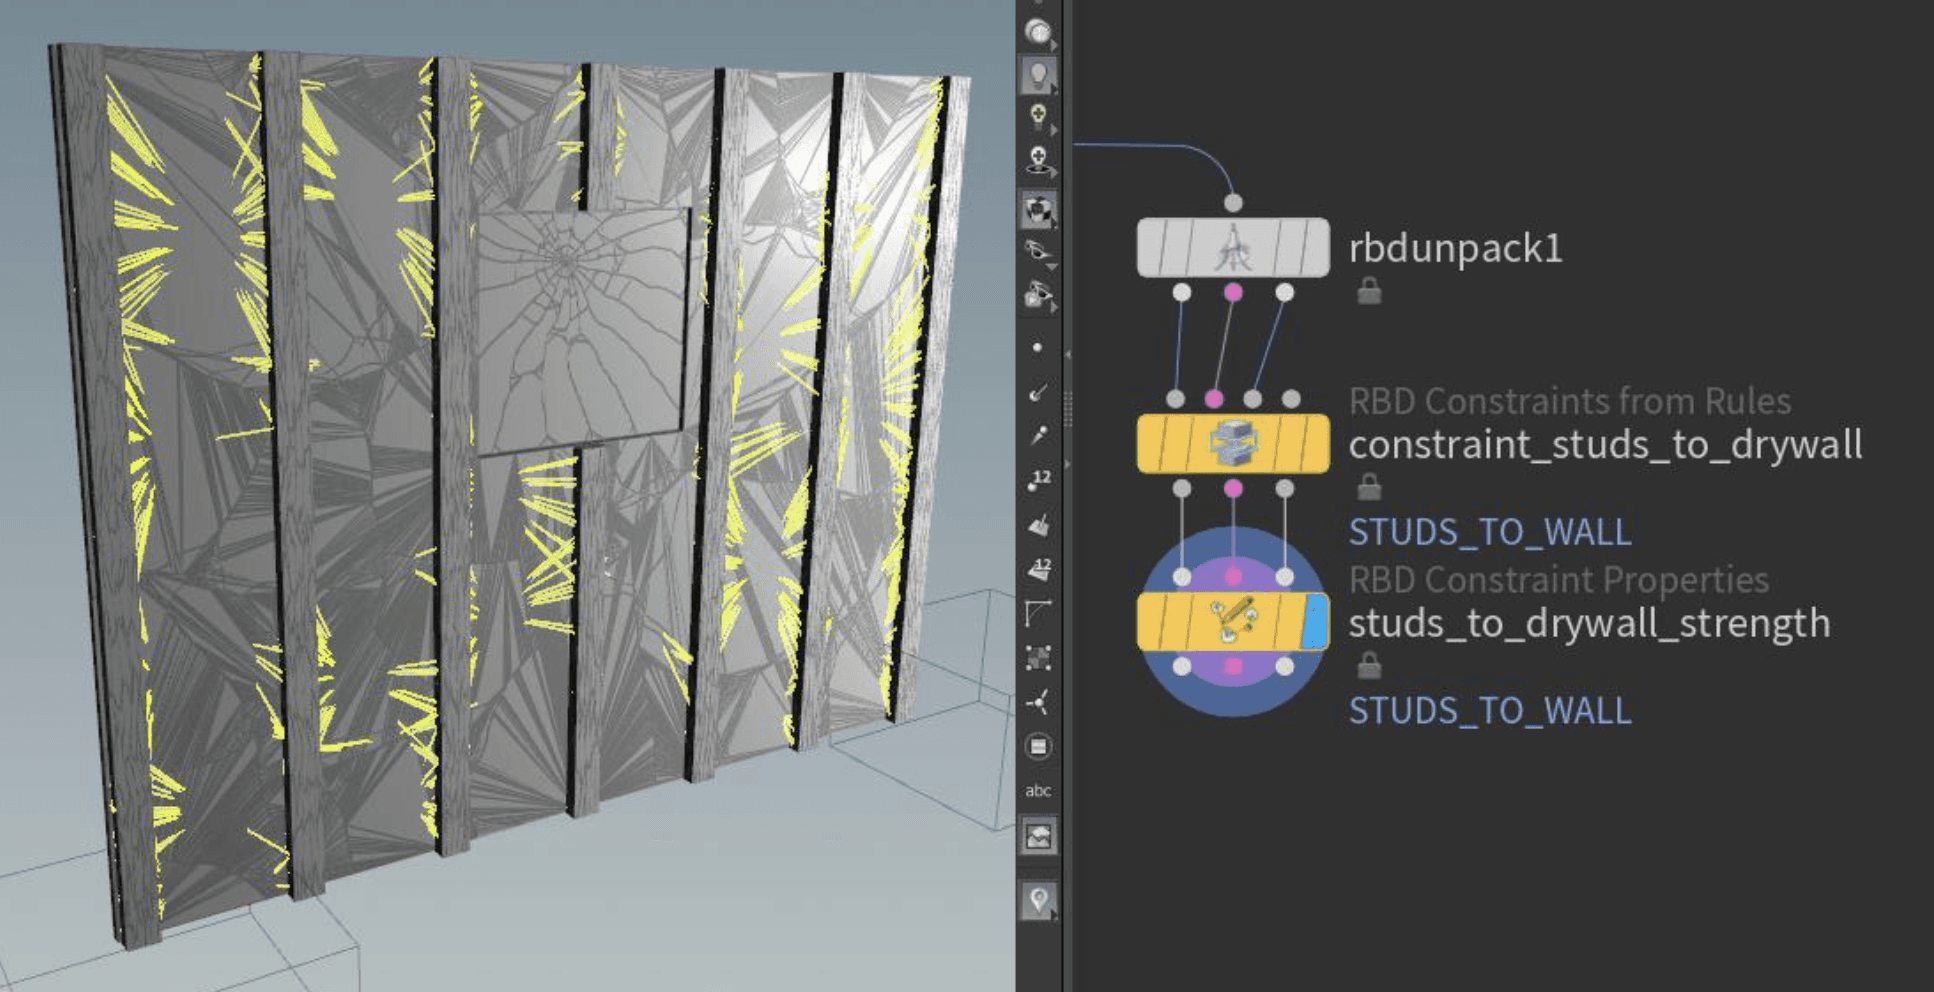
Suppose the graph inspection shows that the panel’s breakage is controlled by a constraint-strength parameter upstream of the RBD Bullet Solver. A lower value may let more pieces separate; a higher value may hold more of the panel together. That is a hypothesis for this scene, not a guaranteed recipe. Collision speed, fracture pattern, and neighboring constraints can also affect the result.
Source: SideFX
Start with the lighter-impact version. Ask Codex to name the exact node path, parameter, current value, and proposed value before it edits anything. Have it check whether the parameter is animated or driven by an expression. Once you approve the change, save it in the working copy and run a short simulation around the impact frame. Leave the camera, panel geometry, and shot timing untouched.
The request could be:
Propose one constraint-strength change for a lighter break. Show me the current and proposed values first. After I approve it, apply only that change to the working scene and cook frames 90–110. Do not overwrite the approved cache or save over the original
.hipfile.
This approval is a workflow instruction, not a security feature supplied by the connector. You still need to inspect the proposed edit and control what files the cook can write.

Source: SideFX
After the cook, ask Codex for evidence rather than a success statement. It should report whether Houdini returned errors or warnings, which frames were cooked, and which cache path was used. Then compare the result at frames before, during, and after the impact. If the break looks identical to the approved version, first check whether the viewport is reading an old cache. Do not keep lowering the constraint value until you know the new simulation is actually being displayed.
If the lighter version is visibly distinct and still meets the shot brief, record the tested value and its output path. Build the heavier version from the approved baseline, not from the lighter version. That keeps each variation attributable to its own change and makes it easier to reverse a result that fails review.
Use Computer Use to Judge the Simulation
A clean cook tells you Houdini finished processing. It does not tell you whether the glass break works on screen. For that, Codex needs a view of Houdini as well as the scene data available through MCP.
With Computer Use enabled and the Houdini window permitted, ask Codex to inspect the lighter variation in the viewport. Start before impact and advance through the break in small frame increments. Have it note when the first pieces separate, whether the opening reads clearly, and whether large fragments obscure the subject. It should report the frames it examined so you can check the same moments yourself.
A flipbook is useful for judging motion that individual frames can hide. Shards might look well placed at the impact frame but leave the camera view a few frames later. Ask Codex to review a short preview at the approved camera angle, then pause on any frame where a fragment crosses an important part of the composition. If the available Computer Use tools cannot inspect playback reliably, use still frames from the preview and review the motion yourself.
Keep the visual review tied to the original brief:
Before impact, does the panel retain the approved shape?
At impact, is the lighter version visibly different from the original?
After impact, do important fragments remain within the agreed framing?

Source: SideFX
Codex can describe what it sees, but do not treat a screenshot as a precise measurement of shard size, velocity, or clearance. Use Houdini’s scene data when a decision depends on an exact value. Conversely, node values alone cannot establish that the shot reads well from the camera. The two checks answer different questions.
If the lighter version passes, repeat the preview review for the heavier one. Compare both against the approved baseline at the same camera, frame range, and playback speed. Record a few representative frame numbers and what changed visually. Those notes make the next revision specific: “The heavy version reads clearly at impact, but the largest shard leaves frame by 106” is far more actionable than “make the break less chaotic.”
Compare Variants With Wedge TOPs
Once a single change produces a readable difference, you may want to test a small range of values rather than guess at the final one. Houdini’s Wedge TOP can create work items with different parameter values for downstream tasks. It does not automatically make a simulation safe to batch or prevent outputs from overwriting one another. Set up those destinations first.
For this shot, define three labeled cases: the approved baseline, lighter break, and heavier break. Ask Codex to propose the constraint values and show how each wedge value will reach the parameter identified during graph inspection. Review the proposed TOP network and output paths before allowing it to create or cook anything. If the scene does not already have a suitable TOP workflow, two separately saved test scenes may be simpler than adding one solely for three variants.

Source: SideFX
Each case needs a distinct cache directory and preview name. The approved baseline should remain read-only as a reference; a wedge labeled “baseline” should not write into its approved files. If the fracture or simulation uses a seed, record that seed as well. Otherwise, you may mistake a different random fracture pattern for the effect of your constraint change.
Cook a short impact range first. Then compare the three versions from the same camera at the same frames. Look for a useful progression, not merely three different numerical settings. If the heavier version produces the same visible break as the baseline, inspect the parameter reference and cache path before widening the value range.

Source: SideFX
Keep the result compact: variant label, tested value, seed, cache location, cook status, and a note on what the preview shows. That record gives the director clear choices and lets you reproduce the selected version without reconstructing a sequence of experimental edits.
Separate Cache, Preview, and Render
A simulation cache, a flipbook, and a final render answer different questions. The cache stores the result of a cook. The flipbook lets you judge motion and framing quickly. The render tests the final image, including lighting, materials, motion blur, and output settings. Passing one stage does not mean the next is ready.
After the director selects a variation, verify that its File Cache points to that variation’s files. Ask Codex to report the cache node path, file pattern, frame range, and whether the node is writing new files or loading existing ones. Compare the reported destination with the files on disk. A correctly changed solver parameter cannot affect a preview that still reads the baseline cache.
Next, generate a short preview from the approved camera. Keep the frame range, frame rate, and camera consistent with the earlier comparisons. Review the frames around impact and the aftermath. If the preview differs from the viewport result, pause before rendering and trace which branch each one uses. One may be displaying live geometry while the other reads cached geometry.
Only then prepare a render test. Ask Codex to inspect the render camera, output path, resolution, frame range, and relevant quality settings, but have it present those settings for your approval before starting. Render a few representative frames first: one before impact, one at the strongest break, and one after fragments have moved through the shot. This catches visual problems that a low-quality flipbook may not show without committing to the full sequence.

Source: SideFX
Use separate names and directories for caches, previews, test renders, and approved deliveries. For example, heavy/cache, heavy/preview, and heavy/render_test make the relationship clear while keeping each output type distinct. The exact folder scheme matters less than being able to answer which scene version produced each file.
When the selected variation passes the render test, save the final working .hip file and record the chosen parameter value, seed, cache path, and output settings. That small handoff record is what makes the approved result reproducible after the interactive session ends.
Set Boundaries Around Live Scene Control
A live Houdini connection can do more than answer questions. Depending on the connector’s tools, it may change parameters, create nodes, save a .hip file, start a cook, or write output files. Give Codex a narrow task before each of those actions: the scene copy, permitted node paths, frame range, and output directory.
Keep the approved shot separate from the working copy. Begin with read-only graph inspection, review proposed edits before they are applied, and check output paths before cooking or rendering. After an edit, ask Codex to report exactly what changed. If that report includes an unexpected node or file, stop and inspect the scene before continuing.
The community connector used here defaults to a local loopback address, but its documentation warns that it has no built-in authentication or per-tool approval system. A request for Codex to “ask first” is therefore a working rule, not a technical safeguard. Do not expose the server to a network or assume that a project-root setting restricts every path a Houdini parameter could write to.
Computer Use needs similar attention. Grant access only to the applications required for the review, keep sensitive windows out of view, and watch the first interaction with a new scene. Close the MCP server when the session is finished.
The practical boundary is simple: Codex can investigate and propose broadly, but writes should remain specific, reviewable, and recoverable. A separate scene copy and distinct output paths make that boundary useful even when a simulation produces the wrong result.
Give Houdini More Room to Cook on Vagon
A scene can be well organized and still exceed the workstation running it. If the glass variations spend more time cooking or rendering than you can afford, Vagon Cloud Computer gives you a remote Windows workstation with adjustable performance options. You can connect from your existing device while the Houdini workload runs on the remote machine.
Install Houdini, Codex, and the chosen MCP connector inside the same Vagon computer so the connector’s localhost address refers to that Windows session. Check your Houdini license, plug-ins, and connector compatibility before moving the production shot. Keep enough storage available for separate variant caches; extra compute will not help if those files run out of space or point to the wrong location.
Size the machine for the stage of work. Complex RBD cooks may need more CPU capacity and memory, while viewport review and rendering can place different demands on the GPU. Vagon lets you change performance options as the job moves from inspection to simulation and final output. Test a short frame range first, then choose whether a larger cook or render justifies a higher tier. Codex helps manage and verify the workflow; the workstation supplies the compute.
FAQs
Can Codex control Houdini without an MCP connector?
Codex can help write Python scripts or explain a node setup without a live connection. To inspect and change the open scene through MCP, it needs a compatible connector running in Houdini. Computer Use is a separate way to interact with the visible interface, subject to its own permissions.
Does a successful cook mean the variation worked?
No. It means Houdini completed the cook. Review the result from the approved camera, confirm the viewport is showing the new cache, and compare the impact and aftermath with the baseline. A valid simulation can still miss the visual brief.
Should I use Wedge TOPs for every revision?
Not necessarily. Wedges are useful when several controlled parameter values need to be cooked and compared. For two alternatives, separate working scenes and clearly named caches may be easier to audit. Choose the setup that makes each result reproducible.
Can I run Codex locally while Houdini runs on Vagon?
The connector described here uses a local localhost endpoint. The straightforward setup is to run Codex, Houdini, and the connector inside the same Vagon computer. If they run on different machines, that endpoint will not connect them by itself. Do not expose an unauthenticated MCP server to the public internet to bridge the gap.
Will Codex ask before changing the shot?
You can instruct it to present edits for approval, and you should review those proposals. The community connector in this guide does not provide a built-in per-tool approval system. Protect the original .hip file, work in a separate copy, and verify destinations before any cook or render.
The glass panel in your Houdini shot already breaks at the right moment. Then the director requests a lighter impact and a more violent version, both using the approved camera, timing, and panel design. A solver change may produce either result, but an old cache can hide the change, while flying shards can leave the frame.
Codex becomes useful when it can inspect the scene you are editing. Through a compatible Houdini MCP server, it can read node paths, connections, and parameters, then propose changes to the fracture or constraint setup. The available tools depend on the connector and Houdini version.
Computer Use adds a visual check. With access to the Houdini window, Codex can inspect node warnings, examine the fractured geometry, and review a flipbook around the moment of impact. Those observations help determine whether a successful cook produced the intended shot.
This guide follows the revision from live connection and graph inspection through controlled variations, cache checks, and render approval. Each step gives you evidence to review before the next cook or file write.
Source: SideFX
The Shot: Three Impact Variations, One Protected Setup
Start with the approved simulation as the reference. The director wants two alternatives, but has not asked for a new glass asset, camera move, or animation. Define that boundary before Codex touches the scene.
The working brief has three outcomes: the original impact, a lighter break, and a heavier break. All three must begin from the same panel geometry and use the same shot timing and camera. The differences should come from controls identified in the existing setup, such as impact motion or constraint strength. RBD Material Fracture can generate fractured pieces and their constraints, but that does not tell us which control this particular scene uses. Codex needs to inspect the graph before recommending one.
Source: SideFX
Make the acceptance criteria visible as well as technical. At the approved impact frame, each version should show a distinct degree of breakage. Before impact, the panel should retain its intended shape. During the break, important fragments should remain within the agreed framing. The original version must still match its approved preview.
Give each version its own cache and output destination. A different parameter value is of little use if all three versions load the same files or write over the approved sequence. Save a separately named working .hip file before making changes.
This brief gives Codex a defined task: identify the controls that could produce those variations, explain their likely effects, and wait for approval before editing or cooking.
Connect Codex to the Houdini Session
For this workflow, use a community Houdini MCP connector to give Codex access to the Houdini session running on the same computer. The connector is separate from Houdini and Codex. Installing it does not mean Codex can immediately edit a scene: Houdini must be open, its MCP server must be running, and Codex must be configured to reach that server.
Check the connector’s supported Houdini and Python versions before installing. From the repository root, run bash install/setup.sh on macOS or Linux, or install\setup.bat on Windows. The installer adds a Houdini package to your user preferences. Restart Houdini, then use the Houdini MCP shelf to start the server. These steps belong to this particular connector; another Houdini MCP project may use a different installation method or endpoint.
Source: Sylvestre_Gug
Register its default local endpoint with Codex:
The address http://localhost:9876/mcp is this connector’s default, not a universal Houdini address. If you changed its port, use the matching URL in Codex. The Codex MCP documentation explains how Codex manages server connections, while the connector’s setup instructions cover its Houdini-side installation.
Before opening the production shot, test the connection with a disposable .hip file containing a clearly named Geometry node. Give Codex a read-only request:
Report the Houdini version and the paths of the nodes in the current scene. Identify the named Geometry node. Do not change parameters, create nodes, cook, save, or render anything.
A server appearing in codex mcp list confirms its configuration, but the scene-specific response is the useful test. If Codex cannot identify the node you just created, check that the shelf server is running, the port matches, and Codex is connected to the intended Houdini session. Do not move on to the approved glass shot until that read-only check works.
Keep this endpoint local. The connector’s default loopback binding is designed for access from the same computer, and its documentation warns that it does not provide authentication or per-tool approval controls. Computer Use is a separate capability with its own app permissions; connecting MCP does not automatically give Codex visual access to Houdini’s interface.
Trace the Impact Through the Node Graph
The first production-scene task is inspection, not adjustment. Open a working copy of the approved shot and ask Codex to map the path from the glass panel to the simulated result. A useful request is: “Find the panel geometry, fracture setup, constraints, impact source, solver, and cache nodes. Report their paths and connections. Read parameters only; do not cook or edit.”
Codex should return a map you can check in Houdini, not just a suggested slider value. The panel may pass through RBD Material Fracture before its pieces and constraints reach an RBD Bullet Solver. The impact might come from animated collision geometry, an initial velocity, or another force in the scene. None of those paths can be assumed from the shot brief alone.
Source: SideFX
Ask Codex to separate what it found from what it inferred. For each likely revision control, it should provide the node path, parameter name, current value, and reason that parameter could affect the break. It should also flag expressions, keyframes, channel references, or upstream controls. Changing a value on a downstream node may do nothing if an expression replaces it at cook time.
Trace the result past the solver, too. A File Cache may feed the viewport and render branch. If that branch reads an earlier simulation, the shot can appear unchanged even after a valid parameter edit. Record the cache node’s path, its read or write state, and its file destination before testing a variation.
Finally, compare Codex’s map with the Houdini network view. Check that it identified the correct panel and shot branch, especially if the file contains archived tests or multiple impact setups. If it cannot establish which branch feeds the approved camera output, ask it to report that uncertainty. The next step should change one verified control, not the most plausible-looking parameter in an unverified graph.
Change One Constraint, Then Verify the Cook
Suppose the graph inspection shows that the panel’s breakage is controlled by a constraint-strength parameter upstream of the RBD Bullet Solver. A lower value may let more pieces separate; a higher value may hold more of the panel together. That is a hypothesis for this scene, not a guaranteed recipe. Collision speed, fracture pattern, and neighboring constraints can also affect the result.
Source: SideFX
Start with the lighter-impact version. Ask Codex to name the exact node path, parameter, current value, and proposed value before it edits anything. Have it check whether the parameter is animated or driven by an expression. Once you approve the change, save it in the working copy and run a short simulation around the impact frame. Leave the camera, panel geometry, and shot timing untouched.
The request could be:
Propose one constraint-strength change for a lighter break. Show me the current and proposed values first. After I approve it, apply only that change to the working scene and cook frames 90–110. Do not overwrite the approved cache or save over the original
.hipfile.
This approval is a workflow instruction, not a security feature supplied by the connector. You still need to inspect the proposed edit and control what files the cook can write.
Source: SideFX
After the cook, ask Codex for evidence rather than a success statement. It should report whether Houdini returned errors or warnings, which frames were cooked, and which cache path was used. Then compare the result at frames before, during, and after the impact. If the break looks identical to the approved version, first check whether the viewport is reading an old cache. Do not keep lowering the constraint value until you know the new simulation is actually being displayed.
If the lighter version is visibly distinct and still meets the shot brief, record the tested value and its output path. Build the heavier version from the approved baseline, not from the lighter version. That keeps each variation attributable to its own change and makes it easier to reverse a result that fails review.
Use Computer Use to Judge the Simulation
A clean cook tells you Houdini finished processing. It does not tell you whether the glass break works on screen. For that, Codex needs a view of Houdini as well as the scene data available through MCP.
With Computer Use enabled and the Houdini window permitted, ask Codex to inspect the lighter variation in the viewport. Start before impact and advance through the break in small frame increments. Have it note when the first pieces separate, whether the opening reads clearly, and whether large fragments obscure the subject. It should report the frames it examined so you can check the same moments yourself.
A flipbook is useful for judging motion that individual frames can hide. Shards might look well placed at the impact frame but leave the camera view a few frames later. Ask Codex to review a short preview at the approved camera angle, then pause on any frame where a fragment crosses an important part of the composition. If the available Computer Use tools cannot inspect playback reliably, use still frames from the preview and review the motion yourself.
Keep the visual review tied to the original brief:
Before impact, does the panel retain the approved shape?
At impact, is the lighter version visibly different from the original?
After impact, do important fragments remain within the agreed framing?
Source: SideFX
Codex can describe what it sees, but do not treat a screenshot as a precise measurement of shard size, velocity, or clearance. Use Houdini’s scene data when a decision depends on an exact value. Conversely, node values alone cannot establish that the shot reads well from the camera. The two checks answer different questions.
If the lighter version passes, repeat the preview review for the heavier one. Compare both against the approved baseline at the same camera, frame range, and playback speed. Record a few representative frame numbers and what changed visually. Those notes make the next revision specific: “The heavy version reads clearly at impact, but the largest shard leaves frame by 106” is far more actionable than “make the break less chaotic.”
Compare Variants With Wedge TOPs
Once a single change produces a readable difference, you may want to test a small range of values rather than guess at the final one. Houdini’s Wedge TOP can create work items with different parameter values for downstream tasks. It does not automatically make a simulation safe to batch or prevent outputs from overwriting one another. Set up those destinations first.
For this shot, define three labeled cases: the approved baseline, lighter break, and heavier break. Ask Codex to propose the constraint values and show how each wedge value will reach the parameter identified during graph inspection. Review the proposed TOP network and output paths before allowing it to create or cook anything. If the scene does not already have a suitable TOP workflow, two separately saved test scenes may be simpler than adding one solely for three variants.
Source: SideFX
Each case needs a distinct cache directory and preview name. The approved baseline should remain read-only as a reference; a wedge labeled “baseline” should not write into its approved files. If the fracture or simulation uses a seed, record that seed as well. Otherwise, you may mistake a different random fracture pattern for the effect of your constraint change.
Cook a short impact range first. Then compare the three versions from the same camera at the same frames. Look for a useful progression, not merely three different numerical settings. If the heavier version produces the same visible break as the baseline, inspect the parameter reference and cache path before widening the value range.
Source: SideFX
Keep the result compact: variant label, tested value, seed, cache location, cook status, and a note on what the preview shows. That record gives the director clear choices and lets you reproduce the selected version without reconstructing a sequence of experimental edits.
Separate Cache, Preview, and Render
A simulation cache, a flipbook, and a final render answer different questions. The cache stores the result of a cook. The flipbook lets you judge motion and framing quickly. The render tests the final image, including lighting, materials, motion blur, and output settings. Passing one stage does not mean the next is ready.
After the director selects a variation, verify that its File Cache points to that variation’s files. Ask Codex to report the cache node path, file pattern, frame range, and whether the node is writing new files or loading existing ones. Compare the reported destination with the files on disk. A correctly changed solver parameter cannot affect a preview that still reads the baseline cache.
Next, generate a short preview from the approved camera. Keep the frame range, frame rate, and camera consistent with the earlier comparisons. Review the frames around impact and the aftermath. If the preview differs from the viewport result, pause before rendering and trace which branch each one uses. One may be displaying live geometry while the other reads cached geometry.
Only then prepare a render test. Ask Codex to inspect the render camera, output path, resolution, frame range, and relevant quality settings, but have it present those settings for your approval before starting. Render a few representative frames first: one before impact, one at the strongest break, and one after fragments have moved through the shot. This catches visual problems that a low-quality flipbook may not show without committing to the full sequence.
Source: SideFX
Use separate names and directories for caches, previews, test renders, and approved deliveries. For example, heavy/cache, heavy/preview, and heavy/render_test make the relationship clear while keeping each output type distinct. The exact folder scheme matters less than being able to answer which scene version produced each file.
When the selected variation passes the render test, save the final working .hip file and record the chosen parameter value, seed, cache path, and output settings. That small handoff record is what makes the approved result reproducible after the interactive session ends.
Set Boundaries Around Live Scene Control
A live Houdini connection can do more than answer questions. Depending on the connector’s tools, it may change parameters, create nodes, save a .hip file, start a cook, or write output files. Give Codex a narrow task before each of those actions: the scene copy, permitted node paths, frame range, and output directory.
Keep the approved shot separate from the working copy. Begin with read-only graph inspection, review proposed edits before they are applied, and check output paths before cooking or rendering. After an edit, ask Codex to report exactly what changed. If that report includes an unexpected node or file, stop and inspect the scene before continuing.
The community connector used here defaults to a local loopback address, but its documentation warns that it has no built-in authentication or per-tool approval system. A request for Codex to “ask first” is therefore a working rule, not a technical safeguard. Do not expose the server to a network or assume that a project-root setting restricts every path a Houdini parameter could write to.
Computer Use needs similar attention. Grant access only to the applications required for the review, keep sensitive windows out of view, and watch the first interaction with a new scene. Close the MCP server when the session is finished.
The practical boundary is simple: Codex can investigate and propose broadly, but writes should remain specific, reviewable, and recoverable. A separate scene copy and distinct output paths make that boundary useful even when a simulation produces the wrong result.
Give Houdini More Room to Cook on Vagon
A scene can be well organized and still exceed the workstation running it. If the glass variations spend more time cooking or rendering than you can afford, Vagon Cloud Computer gives you a remote Windows workstation with adjustable performance options. You can connect from your existing device while the Houdini workload runs on the remote machine.
Install Houdini, Codex, and the chosen MCP connector inside the same Vagon computer so the connector’s localhost address refers to that Windows session. Check your Houdini license, plug-ins, and connector compatibility before moving the production shot. Keep enough storage available for separate variant caches; extra compute will not help if those files run out of space or point to the wrong location.
Size the machine for the stage of work. Complex RBD cooks may need more CPU capacity and memory, while viewport review and rendering can place different demands on the GPU. Vagon lets you change performance options as the job moves from inspection to simulation and final output. Test a short frame range first, then choose whether a larger cook or render justifies a higher tier. Codex helps manage and verify the workflow; the workstation supplies the compute.
FAQs
Can Codex control Houdini without an MCP connector?
Codex can help write Python scripts or explain a node setup without a live connection. To inspect and change the open scene through MCP, it needs a compatible connector running in Houdini. Computer Use is a separate way to interact with the visible interface, subject to its own permissions.
Does a successful cook mean the variation worked?
No. It means Houdini completed the cook. Review the result from the approved camera, confirm the viewport is showing the new cache, and compare the impact and aftermath with the baseline. A valid simulation can still miss the visual brief.
Should I use Wedge TOPs for every revision?
Not necessarily. Wedges are useful when several controlled parameter values need to be cooked and compared. For two alternatives, separate working scenes and clearly named caches may be easier to audit. Choose the setup that makes each result reproducible.
Can I run Codex locally while Houdini runs on Vagon?
The connector described here uses a local localhost endpoint. The straightforward setup is to run Codex, Houdini, and the connector inside the same Vagon computer. If they run on different machines, that endpoint will not connect them by itself. Do not expose an unauthenticated MCP server to the public internet to bridge the gap.
Will Codex ask before changing the shot?
You can instruct it to present edits for approval, and you should review those proposals. The community connector in this guide does not provide a built-in per-tool approval system. Protect the original .hip file, work in a separate copy, and verify destinations before any cook or render.
Get Beyond Your Computer Performance
Run applications on your cloud computer with the latest generation hardware. No more crashes or lags.

Trial includes 1 hour usage + 7 days of storage.
Summarize with AI

Ready to focus on your creativity?
Vagon gives you the ability to create & render projects, collaborate, and stream applications with the power of the best hardware.

Vagon Blog
Run heavy applications on any device with
your personal computer on the cloud.
San Francisco, California
Solutions
Vagon Teams
Vagon Streams
Use Cases
Resources
Vagon Blog
How to Use Godot With Codex: MCP & Computer Use Guide
How to Use Houdini With Codex: MCP, Computer Use & RBD
How to Use Cinema 4D With Codex: MCP & Computer Use
How to Use Higgsfield With Codex: MCP & Computer Use
How to Use DaVinci Resolve With Codex: MCP & Computer Use
How to Use ComfyUI With Claude: MCP & Computer Use Guide
How to Use Rhino With Codex: MCP & Computer Use Guide
How to Use KiCad With Codex: MCP & Computer Use Guide
How to Use KiCad With Claude: MCP & Computer Use Guide Meta
Vagon Blog
Run heavy applications on any device with
your personal computer on the cloud.
San Francisco, California
Solutions
Vagon Teams
Vagon Streams
Use Cases
Resources
Vagon Blog
How to Use Godot With Codex: MCP & Computer Use Guide
How to Use Houdini With Codex: MCP, Computer Use & RBD
How to Use Cinema 4D With Codex: MCP & Computer Use
How to Use Higgsfield With Codex: MCP & Computer Use
How to Use DaVinci Resolve With Codex: MCP & Computer Use
How to Use ComfyUI With Claude: MCP & Computer Use Guide
How to Use Rhino With Codex: MCP & Computer Use Guide
How to Use KiCad With Codex: MCP & Computer Use Guide
How to Use KiCad With Claude: MCP & Computer Use Guide Meta
Vagon Blog
Run heavy applications on any device with
your personal computer on the cloud.
San Francisco, California
Solutions
Vagon Teams
Vagon Streams
Use Cases
Resources
Vagon Blog