Instant Connection for Pixel Streaming
— New Feature Automated Setup

How to Use Cinema 4D With Codex: MCP & Computer Use
DigitalArt
-
How to Use Cinema 4D With Codex: MCP & Computer Use
DigitalArt
How to Use Cinema 4D With Codex: MCP & Computer Use
DigitalArt
-
Table of Contents
The landscape version of your brand animation is approved. Then the client requests a vertical cut, a square version, and a second color theme. Changing the output dimensions takes seconds. Keeping the logo readable, the camera framing intentional, and every version consistent takes longer.
This is where using Codex with Cinema 4D becomes more useful than asking it to write a Python script. Through a compatible MCP connection, Codex can inspect a live scene and use the available tools to adjust objects, parameters, animation, Takes, and render settings. Cinema 4D’s documentation describes a built-in MCP server, but availability must be checked against your installed version.
Computer use provides a complementary route: inspecting the interface, navigating supported controls, and checking visible results when scene data alone is insufficient. Neither route removes the need for creative judgment or approval before sensitive changes.
This guide follows one existing brand animation from scene inspection to controlled variations and render preparation, showing where structured tools help, where visual checks matter, and when Codex should stop for your input.

Source: Maxon
Start With the Scene, Not the Prompt
Before asking Codex to create six versions of your animation, establish what is already in the project. A camera adjustment that looks harmless in the viewport might affect another shot. A material change might reach several objects because they share the same material.
Your first task should therefore be read-only. Ask Codex to identify the active document, current Take, cameras, renderer, project frame rate, and animation range using the tools available through your connection. It should report anything it cannot inspect rather than fill the gap with an assumption.
For our brand animation, a useful starting prompt is:
Inspect the active Cinema 4D document without changing anything. Report its name, current Take, cameras, renderer, frame rate, and animation range. Identify the logo hierarchy, text objects, and assigned materials where accessible. Flag ambiguous names or shared materials. Do not save, render, or modify the scene.
Pay particular attention to the Take Manager. Takes can carry overrides that change the effective scene state. The values visible in one Take may differ from those used elsewhere, so Codex needs to know which version it is inspecting before proposing edits.

Source: Maxon
Use the resulting summary to define three boundaries:
Preserve: approved logo geometry, animation timing, and the original scene.
Adjust: explicitly named materials, cameras, and output settings.
Confirm first: missing assets, unclear object targets, or changes affecting shared resources.
Once you approve that scope, create a separately named working copy and confirm which document is active. Keep the original untouched. The purpose of this first pass is to give Codex reliable targets before it starts making changes.
Connect Codex to the Cinema 4D Session You Actually Use
The connection method depends on your installed Cinema 4D version. Start by checking whether Preferences includes an MCP category. Maxon’s documented built-in server and downloadable community bridges are separate integrations, not interchangeable installation steps.
Use the Built-In MCP Server When Available
In a version that includes it, open the MCP server settings and enable Allow MCP Server. Keep the connection local for this workflow. You do not need to expose Cinema 4D to another computer or network.
Next, open the Clients category. If your installed version offers Codex, use the corresponding configuration option. Otherwise, select Other and use Copy Config to obtain the connection details. Treat that configuration as sensitive because it includes authentication information or references to it.

Source: Maxon
Codex stores its MCP configuration in config.toml. Match the transport, executable arguments, and authentication method supplied by Cinema 4D to Codex’s supported configuration fields. Do not assume that JSON generated for another assistant can be pasted unchanged into this file, and do not invent a server URL from the port number alone.
Follow this startup order:
Start Cinema 4D and enable its MCP server.
Configure the Cinema 4D connection in Codex.
Restart or reload the Codex connection as required.
Inspect the available tools and perform a read-only test.
For the first test, ask:
Connect to Cinema 4D and report the active document name and available scene-inspection tools. Do not create objects, execute Python, save files, or start rendering.
A successful response should contain information retrieved from the running application, not merely a statement that the configuration looks correct. Confirm the document name against Cinema 4D before proceeding.
Leave unrestricted Python execution disabled initially. Enable additional capabilities only when a specific task requires them and you understand the access they introduce.

Source: Maxon
Use a Community Bridge Only When Needed
If your Cinema 4D version lacks the built-in server, a compatible community bridge may provide another route. These typically combine a plugin running inside Cinema 4D with an external MCP server that Codex launches.
The mcp-c4d-2025 Codex setup guide, for example, documents a Windows setup targeting Cinema 4D 2025.3.2. That is a version-specific option, not evidence of compatibility with every release.
Review its dependencies, security settings, and compatibility notes before installation. Use the documented executable and absolute paths, then verify the connection separately. When switching to the built-in server, disable the community connection so Codex is not offered two overlapping sets of Cinema 4D tools.
Give Codex a Revision Brief It Can Verify
Once the connection works, translate the client’s request into changes Codex can target and check. “Make a vertical version with a brighter look” leaves too many decisions open. It does not identify which camera to adjust, whether the logo may move, or which materials should change.
For our brand ident, the approved animation remains the reference. We need two color themes across three formats: 1920×1080 landscape, 1080×1080 square, and 1080×1920 vertical. That creates six deliverables, but it does not authorize six independent redesigns.
Separate the brief into fixed requirements and permitted adjustments. Logo geometry, typography, animation timing, and project frame rate remain unchanged. Camera framing and explicitly identified material parameters may change within the working copy. Output dimensions belong to each variant, while final rendering requires a separate approval.
A practical prompt could read:
Prepare a revision plan for the active working copy. We need landscape, square, and vertical versions in the dimensions listed above, each with the two approved color themes. Preserve logo geometry, text content, animation timing, and frame rate. Identify the camera and material targets from your scene inspection. Propose how to organize the variants, but do not apply changes or render yet. Flag shared materials, animated camera parameters, and anything you cannot verify.
Give Codex the actual approved color references rather than asking it to invent “brand-appropriate” alternatives. Specify whether those references describe material colors or the appearance expected in the rendered image. Lighting and shading can make those two things differ.
Then define what acceptance means:
The complete logo and required text remain inside the approved framing area.
Both themes change only the intended surfaces.
Each variant preserves the original animation duration.
Every output has a distinct name and destination.
Codex should return a plan tied to actual scene targets, with unresolved questions clearly marked. If several cameras or materials match the description, resolve that ambiguity before approving the plan.
This gives the next step a bounded purpose: prove one change works, then expand the same method to the remaining variants.
Make One Controlled Change Before Building Six Versions
Do not apply the entire revision plan at once. Choose one change that is easy to inspect, such as adjusting a named material for the second color theme. This tests whether Codex has identified the correct target and whether the change behaves as expected.
Before editing, have Codex report the material, affected objects, current parameter value, and proposed replacement. If the material is shared with elements that must remain unchanged, stop and decide whether a separate material or Take override is appropriate.
Your approval should identify the exact operation:
Apply only the approved color change to the identified material in the working copy. Use a supported undo group where available. Read the parameter back afterward and report what changed. Do not modify animation, camera settings, or other materials. Do not save over the original or start rendering.
The read-back confirms that a value was written, but it does not prove the rendered appearance is correct. Inspect the result under the existing lighting before accepting it. Only after that check should Codex repeat the operation for other approved targets.
Use Python for a Specific Gap, Not as the Default
The built-in MCP tools may already cover the operation. If they do not, Codex can propose a Python approach, but enabling execution gives it broader capabilities than a narrowly defined parameter tool.
Ask it to explain the required API calls and their scope before running them. Code must follow the Cinema 4D threading rules. Scene edits cannot safely be moved into an arbitrary background thread or placed inside a Python Generator simply because the code executes there.
Parameter values also need careful interpretation. A rotation displayed in degrees can require radians at the API level. Codex should verify the parameter’s unit instead of copying the visible number directly into code.
For supported document changes, a script may use StartUndo(), the appropriate AddUndo() calls, and EndUndo(). These are not a universal rollback mechanism: writing an external file or starting a render can have effects outside the document’s undo history.
Finish this test with three checks: the intended parameter changed, protected scene elements stayed unchanged, and the preview matches the approved direction. If any check fails, correct the single operation before scaling it across six deliverables.
Use Computer Use Where Scene Data Cannot Tell the Whole Story
MCP can report the camera position, output dimensions, and text object parameters. Those values cannot, by themselves, establish whether the vertical version feels balanced or whether the title disappears behind the logo during a transition.
Computer use gives Codex a complementary way to inspect Cinema 4D’s visible interface. It requires a supported desktop setup and permission to access the application. On Windows, expect it to use the active desktop while the task runs.
The following are proposed workflows for our brand ident, not claims that every Cinema 4D interface or plugin has been tested with Codex.
Check Typography and Framing Across Formats
After creating a vertical variant, ask Codex to inspect the approved camera view at the final hold frame. Give it specific criteria rather than asking whether the design “looks good.”
Inspect the vertical variant without changing anything. Check whether the complete logo and required text remain inside the approved framing area at the final hold. Report clipping, overlap, or unusually tight margins. Do not reposition objects or adjust the camera.
The useful result is a screenshot and a concrete observation, such as the subtitle touching the lower boundary. If Codex cannot identify the correct camera or view, it should stop rather than judge an unrelated editor perspective.
Approve any correction separately, then repeat the same check.
Inspect the Animation at Meaningful Frames
A final frame can look correct while the transition fails. Choose inspection points from the actual animation: the first visible logo frame, the moment of maximum movement, and the final hold.
Computer use can help navigate the timeline and inspect these states. For example, it might reveal that an animated element crosses the title in the square version, even though both objects are correctly positioned at the end.
These checks are samples, not proof that every frame is clean. Review playback or an approved preview sequence before accepting the complete animation. Motion blur, flicker, and brief intersections may require closer human inspection.
Investigate Missing Assets and Plugin Controls
The Project Asset Inspector provides another useful visual checkpoint. Ask Codex to inspect missing references and report the affected filenames or paths. Do not authorize it to substitute a similarly named texture simply to clear a warning.
Computer use may also help with third-party controls that your MCP connection does not expose. Scope the task to a named panel and setting. If the control is ambiguous, unavailable, or visually unreadable, require a screenshot and stop for clarification.

Source: Maxon
Compare Previews Before Approving Final Rendering
Once you authorize a small preview render, Codex can help compare the result with the approved reference: framing, text visibility, material changes, and unexpected differences.
Keep technical observations separate from creative approval. Codex might identify a clipped letter or missing texture, but you still decide whether the color treatment and composition represent the brand correctly.
The pattern stays consistent: inspect a known state, collect visible evidence, propose a bounded correction, and wait for approval before applying it.
Organize Variations With Takes Instead of Rebuilding the Scene
With the first change verified, organize the remaining versions without duplicating the entire scene six times. Cinema 4D’s Take System can store variations in cameras, materials, object parameters, and render settings while keeping a shared scene underneath.
For our brand ident, one possible structure is a Take for each format, with two color-theme children beneath it. The format Take defines the camera and render settings; each child adds the approved material overrides. This is a proposed organization, not a requirement. Choose the hierarchy that makes inheritance easiest to inspect in your project.
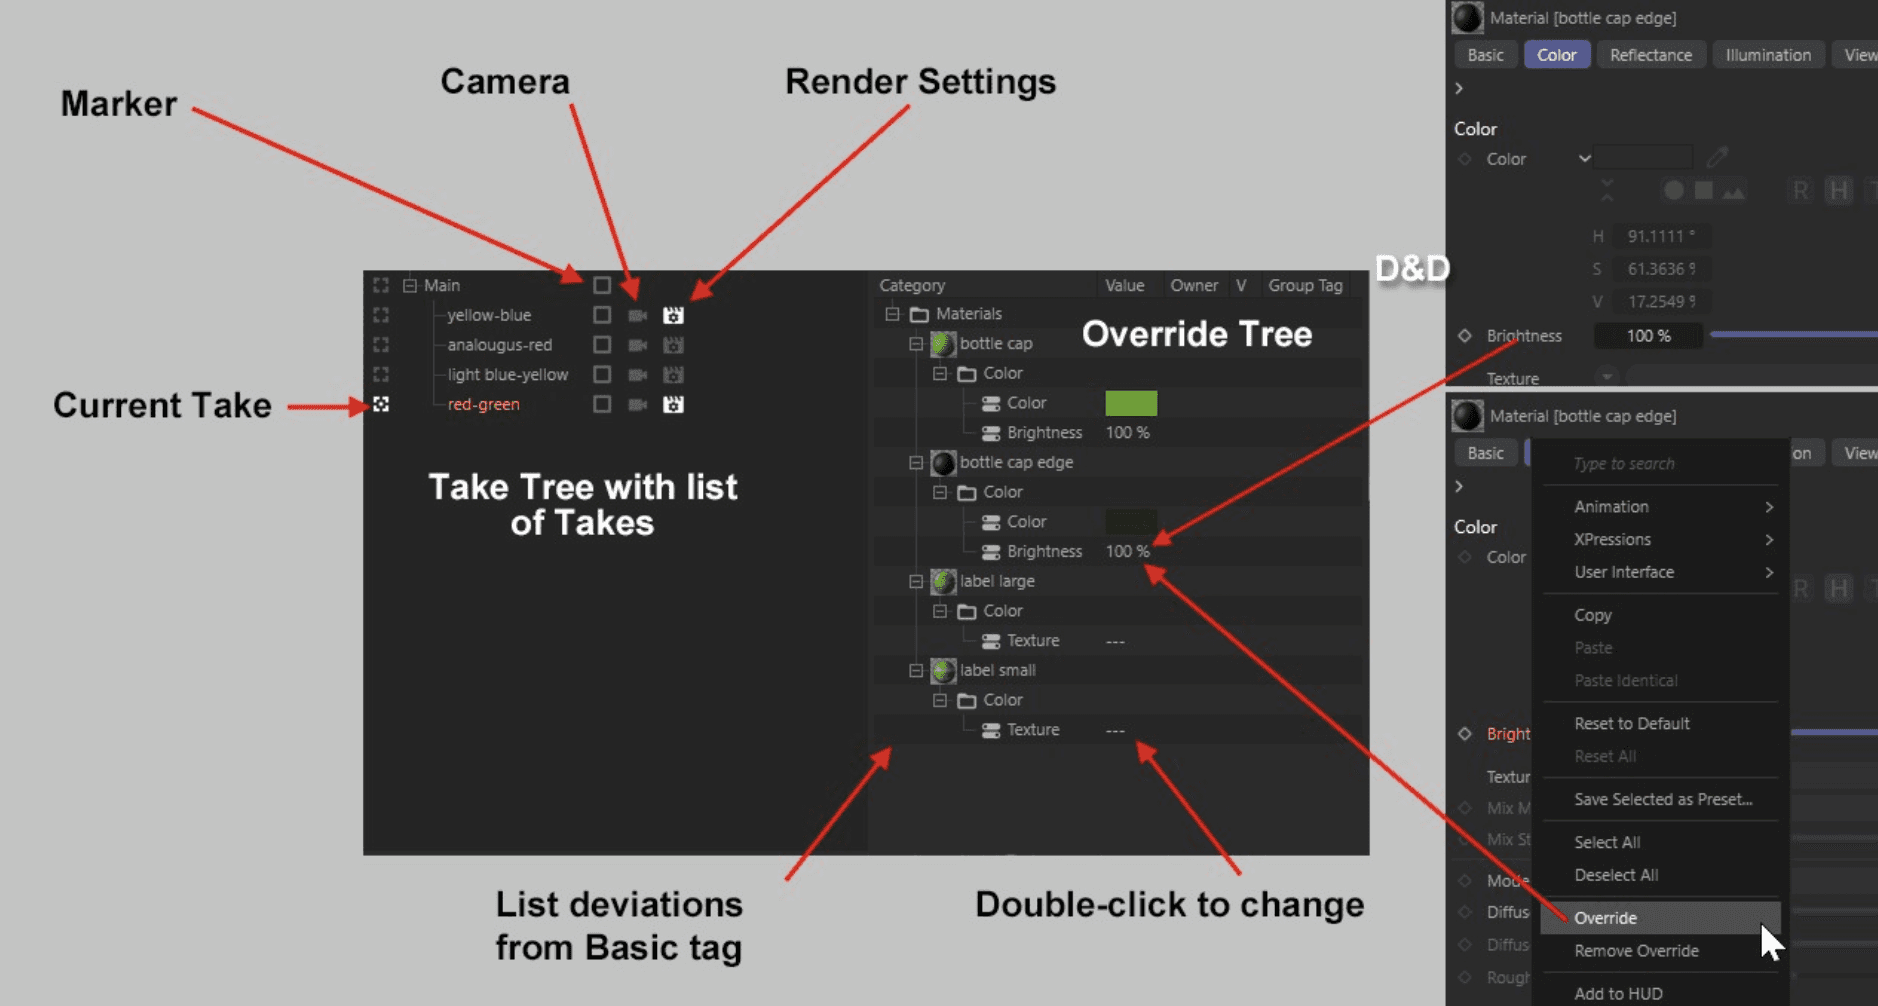
Source: Maxon
Keep the Main Take as the approved baseline. Ask Codex to create or modify Takes only if the available tools support the required operations. Otherwise, have it describe the structure for you to implement, or use an explicitly approved computer use task.
A bounded request might be:
Prepare the six approved variants using Takes in the working copy. Preserve the Main Take. Assign each variant its intended camera and render settings, and limit material overrides to the approved parameters. Report the hierarchy and effective settings for each variant. Do not render.
The word “effective” matters. A child Take may inherit settings rather than define them directly. Codex should check what each variant actually uses, not merely list its local overrides.
Changing dimensions also changes composition. A vertical camera may need different framing to preserve the logo and subtitle, while a square version might require less adjustment. Do not stretch the logo geometry to make it fit.
Before accepting the structure, switch between variants and verify that:
Each Take resolves to the intended camera and output dimensions.
Color changes stay within their designated theme.
Returning to Main restores the approved baseline.
Give the Takes descriptive names, such as Vertical_ThemeB, and record their intended output destinations. This makes the later render review easier and reduces the chance of producing the right image under the wrong filename.
Treat Render Approval as a Separate Step
Six prepared Takes do not automatically mean six approved render jobs. Before starting the batch, ask Codex to summarize what each job will produce and where its files will go.
The review should cover:
Take, camera, renderer, and output dimensions.
Frame range and frame rate.
File format, alpha requirements, and color-management settings.
Output folder and naming pattern.
Use the effective settings for each Take, including inherited values. If you use Cinema 4D’s Render Queue, verify its camera and render-setting assignments too. Do not assume they match the scene state you last inspected.
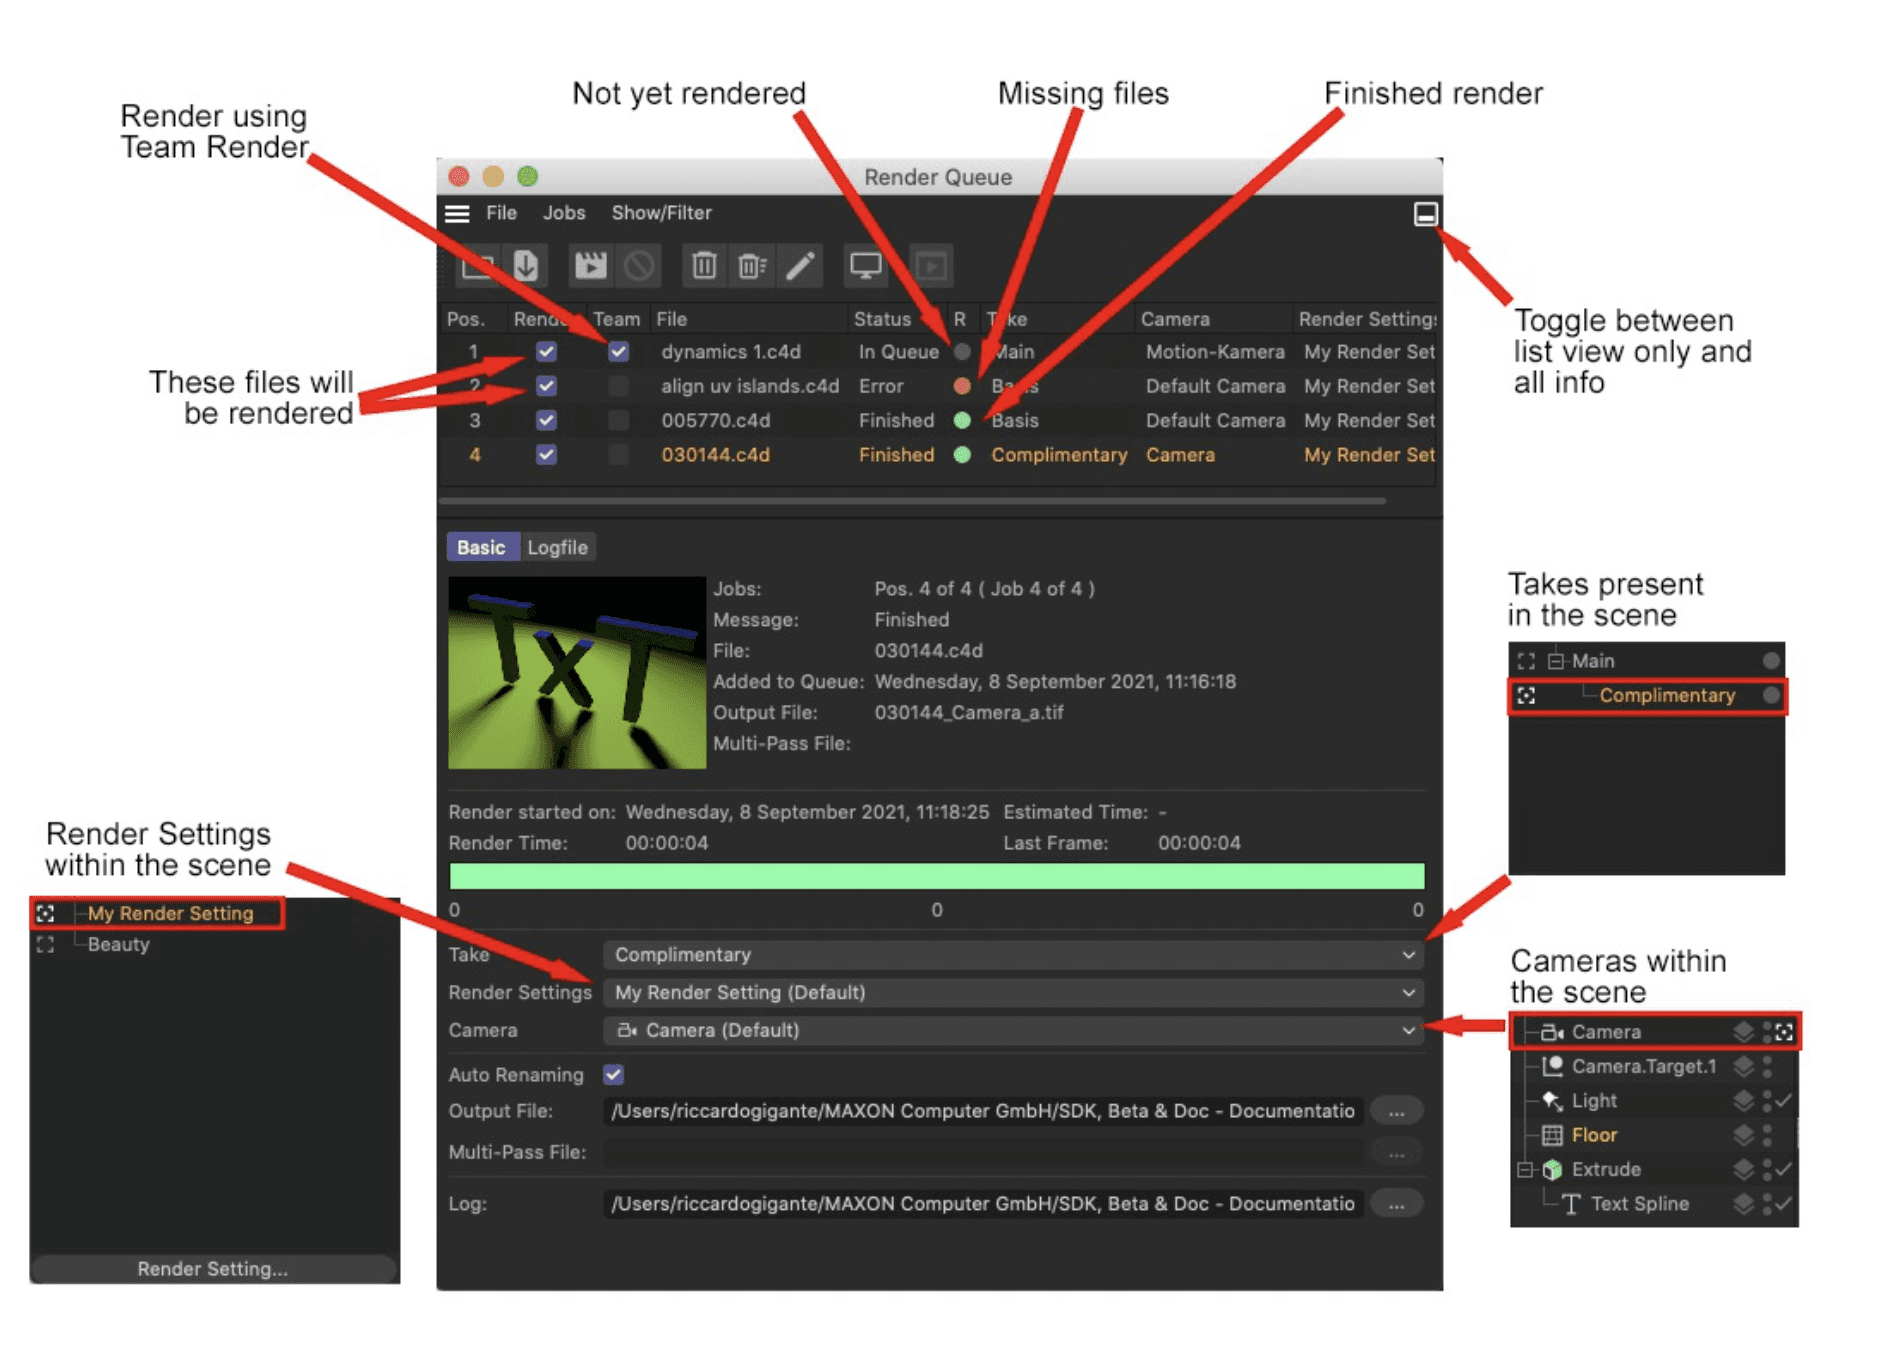
Source: Maxon
Authorize a small test before the full sequence:
Render only the approved test frames for Vertical_ThemeB into the designated preview folder. Report the settings used and resulting files. Do not start the remaining variants or overwrite existing outputs.
Choose frames that exercise the animation, not just the final hold. Inspect the test for framing, materials, transparency, and visible artifacts. If simulation or procedural evaluation affects the result, confirm the necessary preparation before relying on isolated-frame tests.
After approval, define the exact batch scope. Specify the Takes, frame ranges, destinations, and whether Codex may continue to the next job after a failure. A sensible default is to stop on an unexpected error rather than generate five more potentially incorrect sequences.
A successful tool call is not proof of a completed render. Codex should distinguish submission, running status, completion, and file verification. If its connection cannot monitor progress, use the visible interface or a manual check.
Finish by comparing expected and actual outputs. Missing frames, unreadable files, or incorrect dimensions keep the job incomplete, even when Cinema 4D reports that rendering has finished.
Know When Codex Should Stop
A reliable workflow needs clear stop conditions, not just a detailed task list. Codex should pause when it cannot establish which document, Take, or object a change will affect. Similar object names are not enough to justify editing the first match.
For the brand animation, define these boundaries before continuing:
Stop if the active document is not the approved working copy.
Ask before replacing missing assets, changing plugin settings, or modifying protected logo geometry.
Report unsupported operations instead of silently switching to unrestricted Python.
Pause if readback or preview results disagree with the approved revision.
Keep access proportional to the task. Cinema 4D’s MCP security settings let you control Python execution separately. Leave it disabled when the available structured tools cover the work. Keep connection tokens out of shared prompts, screenshots, and project notes.

Source: Maxon
A timeout also needs investigation before retrying. The previous operation might have completed even though its response never arrived. Inspect the scene or render status first to avoid duplicate objects, repeated edits, or duplicate jobs.
When something goes wrong, preserve the evidence: the requested operation, affected targets, reported error, and last verified state. Recover from a known checkpoint rather than layering speculative fixes onto an uncertain scene.
Undo is useful, but it is not a complete recovery plan for overwritten files or external changes. Those actions require separate approval and backups.
Give Cinema 4D More Rendering Headroom With Vagon
Codex can help prepare six animation variants, but your workstation still has to evaluate the scene and render every frame. When complex materials, high-resolution textures, or GPU memory demands become the bottleneck, better prompts cannot replace more capable hardware.
Vagon Cloud Computer gives you access to GPU-powered cloud workstations for Cinema 4D without buying a new desktop. Choose a configuration suited to your project, then handle scene revisions, previews, and final rendering from the same remote environment.
For the brand animation, that means keeping the working scene, assets, and approved outputs together while giving demanding render jobs more hardware headroom. Install and configure Codex alongside Cinema 4D if you want a local MCP connection inside that workstation.
Before committing to the full batch, confirm your Cinema 4D license, renderer, plugins, and GPU compatibility. Benchmark an approved test frame to choose the right configuration.
Keep your revision workflow controlled, then give it room to perform. With Vagon, your laptop does not have to carry the entire rendering workload.
FAQs
Can Codex control Cinema 4D directly?
Yes, through a compatible MCP connection. Cinema 4D releases that include Maxon’s built-in MCP server can expose scene operations to Codex. What Codex can actually do depends on the enabled tools, permissions, and installed version.
Do I need a third-party Cinema 4D MCP plugin?
Not if your release includes the native server and supports your setup. A community connector may be an alternative for older versions, but check its compatibility, installation requirements, and security controls before using it.
Can I use Codex without enabling Python execution?
Yes, when the structured tools cover your task. Leave unrestricted Python disabled unless a specific operation requires it. If Python becomes necessary, review the proposed code and its effects before authorizing execution.
Is computer use a replacement for MCP?
No. MCP is generally better for inspecting scene data and making precise parameter changes. Computer use complements it by navigating visible controls and checking framing, typography, previews, or dialogs that need visual inspection.
Can Codex create multiple versions with Cinema 4D Takes?
Potentially, if the connected toolset supports the required Take operations. Define the permitted overrides and verify each Take’s effective settings. Creating six Takes does not prove that all six compositions are ready to render.
Can Codex fix missing textures automatically?
It can help identify missing references, but replacement requires context. Ask it to report the affected assets first. Approve specific replacement files rather than allowing it to choose similar-looking textures that could change the design.
Will running Cinema 4D on Vagon make Codex more accurate?
No. More capable workstation hardware can help with scene processing and rendering, but it does not guarantee better AI decisions. Keep the same approval boundaries, readback checks, and visual verification regardless of where Cinema 4D runs.
The landscape version of your brand animation is approved. Then the client requests a vertical cut, a square version, and a second color theme. Changing the output dimensions takes seconds. Keeping the logo readable, the camera framing intentional, and every version consistent takes longer.
This is where using Codex with Cinema 4D becomes more useful than asking it to write a Python script. Through a compatible MCP connection, Codex can inspect a live scene and use the available tools to adjust objects, parameters, animation, Takes, and render settings. Cinema 4D’s documentation describes a built-in MCP server, but availability must be checked against your installed version.
Computer use provides a complementary route: inspecting the interface, navigating supported controls, and checking visible results when scene data alone is insufficient. Neither route removes the need for creative judgment or approval before sensitive changes.
This guide follows one existing brand animation from scene inspection to controlled variations and render preparation, showing where structured tools help, where visual checks matter, and when Codex should stop for your input.
Source: Maxon
Start With the Scene, Not the Prompt
Before asking Codex to create six versions of your animation, establish what is already in the project. A camera adjustment that looks harmless in the viewport might affect another shot. A material change might reach several objects because they share the same material.
Your first task should therefore be read-only. Ask Codex to identify the active document, current Take, cameras, renderer, project frame rate, and animation range using the tools available through your connection. It should report anything it cannot inspect rather than fill the gap with an assumption.
For our brand animation, a useful starting prompt is:
Inspect the active Cinema 4D document without changing anything. Report its name, current Take, cameras, renderer, frame rate, and animation range. Identify the logo hierarchy, text objects, and assigned materials where accessible. Flag ambiguous names or shared materials. Do not save, render, or modify the scene.
Pay particular attention to the Take Manager. Takes can carry overrides that change the effective scene state. The values visible in one Take may differ from those used elsewhere, so Codex needs to know which version it is inspecting before proposing edits.
Source: Maxon
Use the resulting summary to define three boundaries:
Preserve: approved logo geometry, animation timing, and the original scene.
Adjust: explicitly named materials, cameras, and output settings.
Confirm first: missing assets, unclear object targets, or changes affecting shared resources.
Once you approve that scope, create a separately named working copy and confirm which document is active. Keep the original untouched. The purpose of this first pass is to give Codex reliable targets before it starts making changes.
Connect Codex to the Cinema 4D Session You Actually Use
The connection method depends on your installed Cinema 4D version. Start by checking whether Preferences includes an MCP category. Maxon’s documented built-in server and downloadable community bridges are separate integrations, not interchangeable installation steps.
Use the Built-In MCP Server When Available
In a version that includes it, open the MCP server settings and enable Allow MCP Server. Keep the connection local for this workflow. You do not need to expose Cinema 4D to another computer or network.
Next, open the Clients category. If your installed version offers Codex, use the corresponding configuration option. Otherwise, select Other and use Copy Config to obtain the connection details. Treat that configuration as sensitive because it includes authentication information or references to it.
Source: Maxon
Codex stores its MCP configuration in config.toml. Match the transport, executable arguments, and authentication method supplied by Cinema 4D to Codex’s supported configuration fields. Do not assume that JSON generated for another assistant can be pasted unchanged into this file, and do not invent a server URL from the port number alone.
Follow this startup order:
Start Cinema 4D and enable its MCP server.
Configure the Cinema 4D connection in Codex.
Restart or reload the Codex connection as required.
Inspect the available tools and perform a read-only test.
For the first test, ask:
Connect to Cinema 4D and report the active document name and available scene-inspection tools. Do not create objects, execute Python, save files, or start rendering.
A successful response should contain information retrieved from the running application, not merely a statement that the configuration looks correct. Confirm the document name against Cinema 4D before proceeding.
Leave unrestricted Python execution disabled initially. Enable additional capabilities only when a specific task requires them and you understand the access they introduce.
Source: Maxon
Use a Community Bridge Only When Needed
If your Cinema 4D version lacks the built-in server, a compatible community bridge may provide another route. These typically combine a plugin running inside Cinema 4D with an external MCP server that Codex launches.
The mcp-c4d-2025 Codex setup guide, for example, documents a Windows setup targeting Cinema 4D 2025.3.2. That is a version-specific option, not evidence of compatibility with every release.
Review its dependencies, security settings, and compatibility notes before installation. Use the documented executable and absolute paths, then verify the connection separately. When switching to the built-in server, disable the community connection so Codex is not offered two overlapping sets of Cinema 4D tools.
Give Codex a Revision Brief It Can Verify
Once the connection works, translate the client’s request into changes Codex can target and check. “Make a vertical version with a brighter look” leaves too many decisions open. It does not identify which camera to adjust, whether the logo may move, or which materials should change.
For our brand ident, the approved animation remains the reference. We need two color themes across three formats: 1920×1080 landscape, 1080×1080 square, and 1080×1920 vertical. That creates six deliverables, but it does not authorize six independent redesigns.
Separate the brief into fixed requirements and permitted adjustments. Logo geometry, typography, animation timing, and project frame rate remain unchanged. Camera framing and explicitly identified material parameters may change within the working copy. Output dimensions belong to each variant, while final rendering requires a separate approval.
A practical prompt could read:
Prepare a revision plan for the active working copy. We need landscape, square, and vertical versions in the dimensions listed above, each with the two approved color themes. Preserve logo geometry, text content, animation timing, and frame rate. Identify the camera and material targets from your scene inspection. Propose how to organize the variants, but do not apply changes or render yet. Flag shared materials, animated camera parameters, and anything you cannot verify.
Give Codex the actual approved color references rather than asking it to invent “brand-appropriate” alternatives. Specify whether those references describe material colors or the appearance expected in the rendered image. Lighting and shading can make those two things differ.
Then define what acceptance means:
The complete logo and required text remain inside the approved framing area.
Both themes change only the intended surfaces.
Each variant preserves the original animation duration.
Every output has a distinct name and destination.
Codex should return a plan tied to actual scene targets, with unresolved questions clearly marked. If several cameras or materials match the description, resolve that ambiguity before approving the plan.
This gives the next step a bounded purpose: prove one change works, then expand the same method to the remaining variants.
Make One Controlled Change Before Building Six Versions
Do not apply the entire revision plan at once. Choose one change that is easy to inspect, such as adjusting a named material for the second color theme. This tests whether Codex has identified the correct target and whether the change behaves as expected.
Before editing, have Codex report the material, affected objects, current parameter value, and proposed replacement. If the material is shared with elements that must remain unchanged, stop and decide whether a separate material or Take override is appropriate.
Your approval should identify the exact operation:
Apply only the approved color change to the identified material in the working copy. Use a supported undo group where available. Read the parameter back afterward and report what changed. Do not modify animation, camera settings, or other materials. Do not save over the original or start rendering.
The read-back confirms that a value was written, but it does not prove the rendered appearance is correct. Inspect the result under the existing lighting before accepting it. Only after that check should Codex repeat the operation for other approved targets.
Use Python for a Specific Gap, Not as the Default
The built-in MCP tools may already cover the operation. If they do not, Codex can propose a Python approach, but enabling execution gives it broader capabilities than a narrowly defined parameter tool.
Ask it to explain the required API calls and their scope before running them. Code must follow the Cinema 4D threading rules. Scene edits cannot safely be moved into an arbitrary background thread or placed inside a Python Generator simply because the code executes there.
Parameter values also need careful interpretation. A rotation displayed in degrees can require radians at the API level. Codex should verify the parameter’s unit instead of copying the visible number directly into code.
For supported document changes, a script may use StartUndo(), the appropriate AddUndo() calls, and EndUndo(). These are not a universal rollback mechanism: writing an external file or starting a render can have effects outside the document’s undo history.
Finish this test with three checks: the intended parameter changed, protected scene elements stayed unchanged, and the preview matches the approved direction. If any check fails, correct the single operation before scaling it across six deliverables.
Use Computer Use Where Scene Data Cannot Tell the Whole Story
MCP can report the camera position, output dimensions, and text object parameters. Those values cannot, by themselves, establish whether the vertical version feels balanced or whether the title disappears behind the logo during a transition.
Computer use gives Codex a complementary way to inspect Cinema 4D’s visible interface. It requires a supported desktop setup and permission to access the application. On Windows, expect it to use the active desktop while the task runs.
The following are proposed workflows for our brand ident, not claims that every Cinema 4D interface or plugin has been tested with Codex.
Check Typography and Framing Across Formats
After creating a vertical variant, ask Codex to inspect the approved camera view at the final hold frame. Give it specific criteria rather than asking whether the design “looks good.”
Inspect the vertical variant without changing anything. Check whether the complete logo and required text remain inside the approved framing area at the final hold. Report clipping, overlap, or unusually tight margins. Do not reposition objects or adjust the camera.
The useful result is a screenshot and a concrete observation, such as the subtitle touching the lower boundary. If Codex cannot identify the correct camera or view, it should stop rather than judge an unrelated editor perspective.
Approve any correction separately, then repeat the same check.
Inspect the Animation at Meaningful Frames
A final frame can look correct while the transition fails. Choose inspection points from the actual animation: the first visible logo frame, the moment of maximum movement, and the final hold.
Computer use can help navigate the timeline and inspect these states. For example, it might reveal that an animated element crosses the title in the square version, even though both objects are correctly positioned at the end.
These checks are samples, not proof that every frame is clean. Review playback or an approved preview sequence before accepting the complete animation. Motion blur, flicker, and brief intersections may require closer human inspection.
Investigate Missing Assets and Plugin Controls
The Project Asset Inspector provides another useful visual checkpoint. Ask Codex to inspect missing references and report the affected filenames or paths. Do not authorize it to substitute a similarly named texture simply to clear a warning.
Computer use may also help with third-party controls that your MCP connection does not expose. Scope the task to a named panel and setting. If the control is ambiguous, unavailable, or visually unreadable, require a screenshot and stop for clarification.
Source: Maxon
Compare Previews Before Approving Final Rendering
Once you authorize a small preview render, Codex can help compare the result with the approved reference: framing, text visibility, material changes, and unexpected differences.
Keep technical observations separate from creative approval. Codex might identify a clipped letter or missing texture, but you still decide whether the color treatment and composition represent the brand correctly.
The pattern stays consistent: inspect a known state, collect visible evidence, propose a bounded correction, and wait for approval before applying it.
Organize Variations With Takes Instead of Rebuilding the Scene
With the first change verified, organize the remaining versions without duplicating the entire scene six times. Cinema 4D’s Take System can store variations in cameras, materials, object parameters, and render settings while keeping a shared scene underneath.
For our brand ident, one possible structure is a Take for each format, with two color-theme children beneath it. The format Take defines the camera and render settings; each child adds the approved material overrides. This is a proposed organization, not a requirement. Choose the hierarchy that makes inheritance easiest to inspect in your project.
Source: Maxon
Keep the Main Take as the approved baseline. Ask Codex to create or modify Takes only if the available tools support the required operations. Otherwise, have it describe the structure for you to implement, or use an explicitly approved computer use task.
A bounded request might be:
Prepare the six approved variants using Takes in the working copy. Preserve the Main Take. Assign each variant its intended camera and render settings, and limit material overrides to the approved parameters. Report the hierarchy and effective settings for each variant. Do not render.
The word “effective” matters. A child Take may inherit settings rather than define them directly. Codex should check what each variant actually uses, not merely list its local overrides.
Changing dimensions also changes composition. A vertical camera may need different framing to preserve the logo and subtitle, while a square version might require less adjustment. Do not stretch the logo geometry to make it fit.
Before accepting the structure, switch between variants and verify that:
Each Take resolves to the intended camera and output dimensions.
Color changes stay within their designated theme.
Returning to Main restores the approved baseline.
Give the Takes descriptive names, such as Vertical_ThemeB, and record their intended output destinations. This makes the later render review easier and reduces the chance of producing the right image under the wrong filename.
Treat Render Approval as a Separate Step
Six prepared Takes do not automatically mean six approved render jobs. Before starting the batch, ask Codex to summarize what each job will produce and where its files will go.
The review should cover:
Take, camera, renderer, and output dimensions.
Frame range and frame rate.
File format, alpha requirements, and color-management settings.
Output folder and naming pattern.
Use the effective settings for each Take, including inherited values. If you use Cinema 4D’s Render Queue, verify its camera and render-setting assignments too. Do not assume they match the scene state you last inspected.
Source: Maxon
Authorize a small test before the full sequence:
Render only the approved test frames for Vertical_ThemeB into the designated preview folder. Report the settings used and resulting files. Do not start the remaining variants or overwrite existing outputs.
Choose frames that exercise the animation, not just the final hold. Inspect the test for framing, materials, transparency, and visible artifacts. If simulation or procedural evaluation affects the result, confirm the necessary preparation before relying on isolated-frame tests.
After approval, define the exact batch scope. Specify the Takes, frame ranges, destinations, and whether Codex may continue to the next job after a failure. A sensible default is to stop on an unexpected error rather than generate five more potentially incorrect sequences.
A successful tool call is not proof of a completed render. Codex should distinguish submission, running status, completion, and file verification. If its connection cannot monitor progress, use the visible interface or a manual check.
Finish by comparing expected and actual outputs. Missing frames, unreadable files, or incorrect dimensions keep the job incomplete, even when Cinema 4D reports that rendering has finished.
Know When Codex Should Stop
A reliable workflow needs clear stop conditions, not just a detailed task list. Codex should pause when it cannot establish which document, Take, or object a change will affect. Similar object names are not enough to justify editing the first match.
For the brand animation, define these boundaries before continuing:
Stop if the active document is not the approved working copy.
Ask before replacing missing assets, changing plugin settings, or modifying protected logo geometry.
Report unsupported operations instead of silently switching to unrestricted Python.
Pause if readback or preview results disagree with the approved revision.
Keep access proportional to the task. Cinema 4D’s MCP security settings let you control Python execution separately. Leave it disabled when the available structured tools cover the work. Keep connection tokens out of shared prompts, screenshots, and project notes.
Source: Maxon
A timeout also needs investigation before retrying. The previous operation might have completed even though its response never arrived. Inspect the scene or render status first to avoid duplicate objects, repeated edits, or duplicate jobs.
When something goes wrong, preserve the evidence: the requested operation, affected targets, reported error, and last verified state. Recover from a known checkpoint rather than layering speculative fixes onto an uncertain scene.
Undo is useful, but it is not a complete recovery plan for overwritten files or external changes. Those actions require separate approval and backups.
Give Cinema 4D More Rendering Headroom With Vagon
Codex can help prepare six animation variants, but your workstation still has to evaluate the scene and render every frame. When complex materials, high-resolution textures, or GPU memory demands become the bottleneck, better prompts cannot replace more capable hardware.
Vagon Cloud Computer gives you access to GPU-powered cloud workstations for Cinema 4D without buying a new desktop. Choose a configuration suited to your project, then handle scene revisions, previews, and final rendering from the same remote environment.
For the brand animation, that means keeping the working scene, assets, and approved outputs together while giving demanding render jobs more hardware headroom. Install and configure Codex alongside Cinema 4D if you want a local MCP connection inside that workstation.
Before committing to the full batch, confirm your Cinema 4D license, renderer, plugins, and GPU compatibility. Benchmark an approved test frame to choose the right configuration.
Keep your revision workflow controlled, then give it room to perform. With Vagon, your laptop does not have to carry the entire rendering workload.
FAQs
Can Codex control Cinema 4D directly?
Yes, through a compatible MCP connection. Cinema 4D releases that include Maxon’s built-in MCP server can expose scene operations to Codex. What Codex can actually do depends on the enabled tools, permissions, and installed version.
Do I need a third-party Cinema 4D MCP plugin?
Not if your release includes the native server and supports your setup. A community connector may be an alternative for older versions, but check its compatibility, installation requirements, and security controls before using it.
Can I use Codex without enabling Python execution?
Yes, when the structured tools cover your task. Leave unrestricted Python disabled unless a specific operation requires it. If Python becomes necessary, review the proposed code and its effects before authorizing execution.
Is computer use a replacement for MCP?
No. MCP is generally better for inspecting scene data and making precise parameter changes. Computer use complements it by navigating visible controls and checking framing, typography, previews, or dialogs that need visual inspection.
Can Codex create multiple versions with Cinema 4D Takes?
Potentially, if the connected toolset supports the required Take operations. Define the permitted overrides and verify each Take’s effective settings. Creating six Takes does not prove that all six compositions are ready to render.
Can Codex fix missing textures automatically?
It can help identify missing references, but replacement requires context. Ask it to report the affected assets first. Approve specific replacement files rather than allowing it to choose similar-looking textures that could change the design.
Will running Cinema 4D on Vagon make Codex more accurate?
No. More capable workstation hardware can help with scene processing and rendering, but it does not guarantee better AI decisions. Keep the same approval boundaries, readback checks, and visual verification regardless of where Cinema 4D runs.
Get Beyond Your Computer Performance
Run applications on your cloud computer with the latest generation hardware. No more crashes or lags.

Trial includes 1 hour usage + 7 days of storage.
Summarize with AI

Ready to focus on your creativity?
Vagon gives you the ability to create & render projects, collaborate, and stream applications with the power of the best hardware.

Vagon Blog
Run heavy applications on any device with
your personal computer on the cloud.
San Francisco, California
Solutions
Vagon Teams
Vagon Streams
Use Cases
Resources
Vagon Blog
How to Use Godot With Codex: MCP & Computer Use Guide
How to Use Houdini With Codex: MCP, Computer Use & RBD
How to Use Cinema 4D With Codex: MCP & Computer Use
How to Use Higgsfield With Codex: MCP & Computer Use
How to Use DaVinci Resolve With Codex: MCP & Computer Use
How to Use ComfyUI With Claude: MCP & Computer Use Guide
How to Use Rhino With Codex: MCP & Computer Use Guide
How to Use KiCad With Codex: MCP & Computer Use Guide
How to Use KiCad With Claude: MCP & Computer Use Guide Meta
Vagon Blog
Run heavy applications on any device with
your personal computer on the cloud.
San Francisco, California
Solutions
Vagon Teams
Vagon Streams
Use Cases
Resources
Vagon Blog
How to Use Godot With Codex: MCP & Computer Use Guide
How to Use Houdini With Codex: MCP, Computer Use & RBD
How to Use Cinema 4D With Codex: MCP & Computer Use
How to Use Higgsfield With Codex: MCP & Computer Use
How to Use DaVinci Resolve With Codex: MCP & Computer Use
How to Use ComfyUI With Claude: MCP & Computer Use Guide
How to Use Rhino With Codex: MCP & Computer Use Guide
How to Use KiCad With Codex: MCP & Computer Use Guide
How to Use KiCad With Claude: MCP & Computer Use Guide Meta
Vagon Blog
Run heavy applications on any device with
your personal computer on the cloud.
San Francisco, California
Solutions
Vagon Teams
Vagon Streams
Use Cases
Resources
Vagon Blog