Instant Connection for Pixel Streaming
— New Feature Automated Setup

How to Use ComfyUI With Codex: MCP and Computer Use
DigitalArt
-
How to Use ComfyUI With Codex: MCP and Computer Use
DigitalArt
How to Use ComfyUI With Codex: MCP and Computer Use
DigitalArt
-
Table of Contents
codeYour product photo looks right in the first ComfyUI result. Then you generate another background, and the label changes, the bottle becomes wider, or the lighting no longer matches the scene. Producing more images is easy. Producing usable variations without losing control of the product is the harder part.
Using ComfyUI with Codex means giving the assistant access to the workflow behind those results, not just asking it to improve a prompt. Through Comfy MCP, Codex can inspect available nodes and models, validate a workflow, submit a generation, and retrieve its outputs. With Computer Use enabled and the appropriate permissions, it can also interact with the interface to inspect masks, check the loaded graph, and help review results. The connected image model still generates the pixels; Codex coordinates the process.
This guide follows one practical task: turning a single product photo into several advertising concepts while keeping the product recognizable. You will connect Codex to a working ComfyUI installation, test a controlled background change, and expand approved results into a traceable batch. Along the way, you will separate successful execution from visual approval, because a completed workflow does not automatically produce a campaign-ready image.

Source: ComfyUI Documentation
Give Codex a Workflow, Not Just a Prompt
“Create three advertising backgrounds for this product” describes a creative goal, but it leaves important decisions unresolved. Which model should run? Which image regions can change? Where should the files be saved? Should Codex submit three jobs immediately or wait for approval after the first?
A ComfyUI workflow makes those decisions explicit. Its nodes define how images, masks, conditioning, sampling, and outputs connect. Codex can help inspect and modify that structure, but the right access method depends on the task.
Access method | Best suited to | What it does not establish |
|---|---|---|
Workflow files and API | Editing JSON, comparing revisions, and preparing repeatable runs | Whether the result looks acceptable |
MCP | Discovering available tools, validating workflows, and managing execution | Whether the interface displays the submitted graph |
Computer Use | Inspecting masks, navigating the canvas, and reviewing visible results | Whether a workflow is technically valid |
With MCP, Codex communicates through structured tools. That is useful when you need precise information about installed nodes, model names, or execution status. Computer Use provides a separate interface-control capability, with its own setup and permissions. Connecting an MCP server does not automatically give Codex access to your screen.
For our product-background task, the practical division is straightforward: use structured access to inspect and run the graph, then use visual inspection to check the mask and generated composition. Keep the original product image available throughout.
Give Codex boundaries alongside the objective: preserve the source workflow, create a separate revision, generate one test image, and stop for review before expanding the batch.
Prepare One Working Graph Before Connecting Anything
Start with a workflow that already produces a usable image in ComfyUI. It does not need to deliver the final campaign look, but it should load its models, accept your source image, and save an output without errors. That baseline gives Codex something concrete to inspect and prevents connection troubleshooting from becoming mixed with model or node problems.
For this example, choose an image-editing workflow that accepts a product photo and a mask defining the background area to change. The exact graph depends on the model family. Do not assume that a checkpoint, conditioning node, or sampler configuration from one tutorial will work unchanged with another model.
Before connecting Codex, check these essentials:
Models: Loader nodes reference files installed in your ComfyUI environment.
Custom nodes: Required node classes are available, with no unresolved dependencies.
Inputs: The product photo and mask load correctly.
Execution: One manual test finishes and saves an identifiable output.
Save the working graph before making changes. Keep the source photo and mask alongside it, with clear filenames such as product-original.png and background-mask.png.

Source: ComfyUI Documentation
Keep the Editor and Execution Formats Separate
ComfyUI’s editor workflow stores information needed to reconstruct the canvas, including node positions. Its API-format graph describes the executable nodes and their inputs. The official API examples use the latter when submitting a workflow directly to the server.
An API-format node can look like this:
Here, 42 is a workflow-specific node ID, not a universal identifier for image loading. Codex should inspect the actual graph before changing any inputs.
Retain the editor workflow for visual inspection, and export the API format when your execution method requires it. Before submitting either file, confirm what the selected tool expects. They are related representations, not interchangeable JSON files.
A useful first instruction is: “Inspect this baseline workflow and identify its model, image, mask, and output inputs. Do not modify or run it yet.”
Connect Codex to ComfyUI Through MCP
For this walkthrough, use Comfy’s official local MCP server. It connects Codex to your own ComfyUI installation, so workflow validation and node discovery reflect that environment rather than a generic catalog.
The connection has two separate parts: ComfyUI runs the generation workflow, while the MCP server exposes tools Codex can call. Starting Codex does not automatically start ComfyUI.

Source: ComfyUI Documentation
1. Prepare the Local Connection
Following the Comfy MCP installation instructions, install the components in a dedicated Python environment:
If ComfyUI is already installed, point Comfy CLI at that workspace:
Confirm that this is the installation containing your tested workflow’s models and custom nodes. Avoid accidentally selecting a second, empty workspace.
Start ComfyUI if it is not already running:
Leave it running during the connection test.
2. Register the Server in Codex
Codex supports local MCP servers over STDIO. If the installed commands are available on its launch environment’s PATH, register the server with:
When using a virtual environment, absolute executable paths are more reliable:
These placeholder paths must match your machine. The registration follows Codex’s MCP configuration; it does not install ComfyUI or grant screen-control permissions.
Start a fresh Codex session after registration so the tools can load.
3. Verify Before Generating
Ask Codex:
Confirm which ComfyUI workspace is running. Inspect the installed nodes and models, then validate my baseline workflow. Do not install dependencies, change files, or submit a generation.
The local server provides tools including server_info, node inspection, model search, and validate_workflow. Resolve any reported mismatch before running the graph. A connected MCP process alone does not prove that the intended ComfyUI workspace is ready.
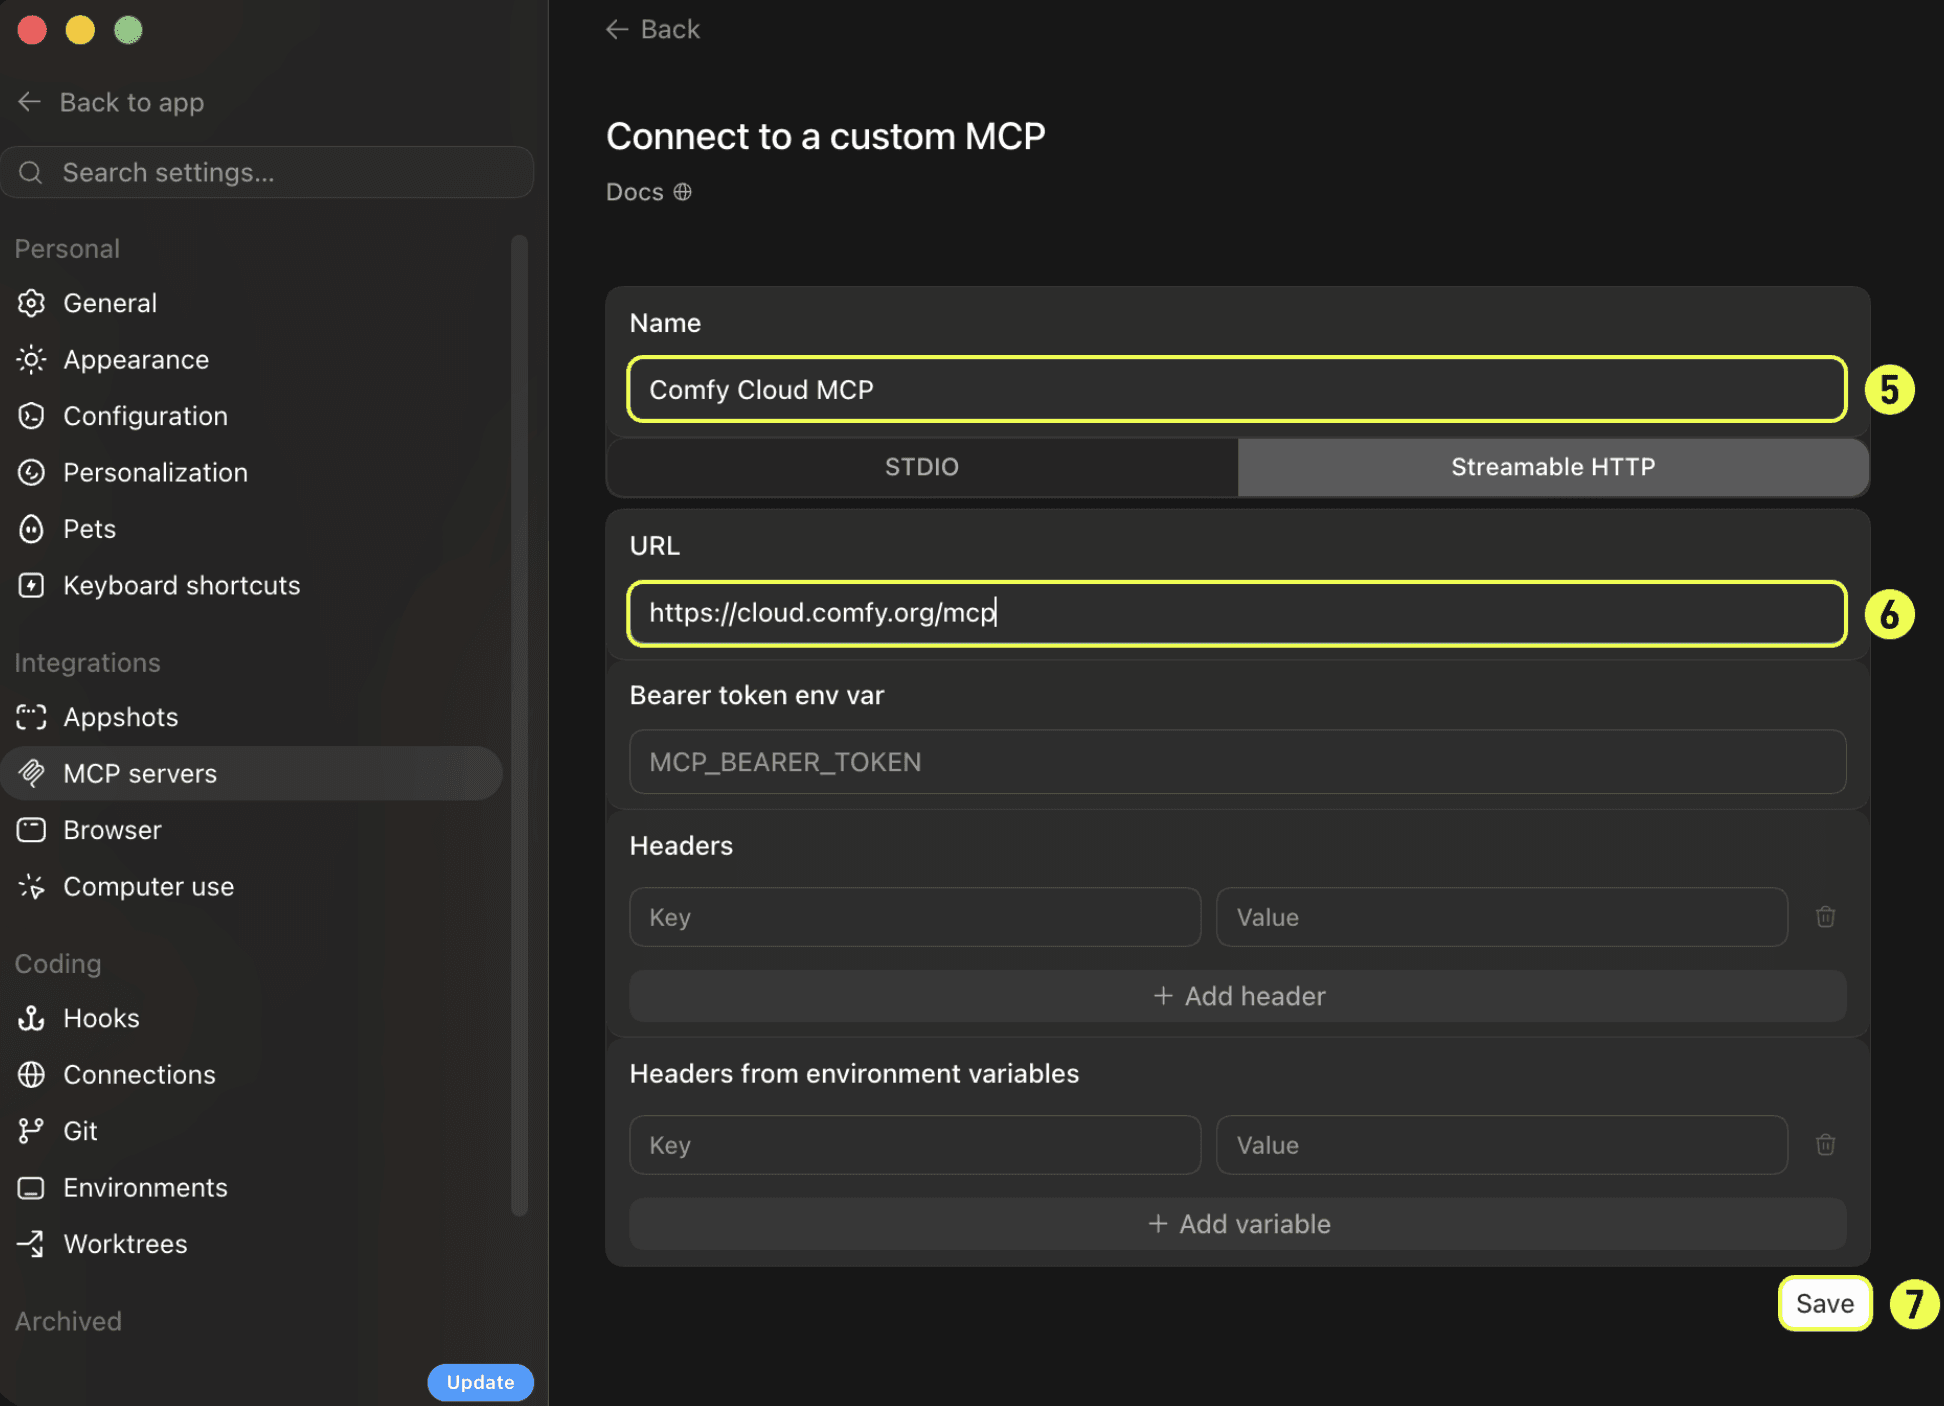
Comfy Cloud is a separate option, connected through its hosted MCP endpoint. It runs workflows in Comfy’s hosted environment. By contrast, a ComfyUI installation on a Vagon Cloud Computer still uses the local connection on that computer. In either case, explicitly identify where the workflow should execute before uploading assets or starting jobs.
Source: ComfyUI Documentation
Change the Background Without Redesigning the Product
The first controlled edit should change less than you might expect. Keep the original image, model, output dimensions, and sampling configuration unchanged. Introduce one background concept, then check whether the workflow respects the intended editing region.
With inpainting, a mask defines where the model can make changes. For our product shot, that means the surrounding background rather than the product itself. However, mask handling depends on the selected nodes. Inspect the mask actually entering the editing stage instead of assuming that the overlay’s appearance proves which pixels will change.

Source: ComfyUI Documentation
Pay particular attention to three areas:
Product edges: Thin handles, transparent surfaces, and reflective borders can be difficult to separate.
Contact shadows: Preserving every surrounding pixel may leave a shadow that does not fit the new environment.
Transition regions: Excessive mask expansion can expose product pixels, while abrupt boundaries can create visible seams.

Source: ComfyUI Documentation
Treat Product Identity as a Separate Requirement
A fixed seed is useful for controlled comparisons, but it does not lock the product’s identity. Changing conditioning, model settings, or the graph can still change the result. Likewise, a lower denoise value is not a universal preservation setting across different editing workflows.
If a logo, label, or silhouette must remain exact, a more controlled approach is to generate the surroundings and composite the original product over them. This preserves the original product pixels, although edges, lighting, and shadows still require review. Do not describe generative editing as a guarantee of brand accuracy.
Give Codex a bounded task:
Create a separate revision of the baseline workflow for a warm studio background with a pale ceramic surface. Preserve the original product image and mask files. Inspect which mask region is editable and explain any proposed changes before applying them. Keep the current model and output dimensions. Submit only one test image after approval, record its execution ID, and stop before generating further variations.
This instruction separates preparation, approval, and execution. If Codex identifies a missing compositing stage or an unsuitable mask, address that first. The objective is not simply a different background, but a result that can survive comparison with the source photograph.
Run One Test and Track the Exact Output
Once the proposed workflow changes are approved, submit a single test. Do not begin the full batch just because validation passed. Validation can identify structural problems, but it cannot establish whether the product looks correct in the generated scene.
The local MCP server’s run_workflow tool supports asynchronous execution, returning a prompt_id when called with wait=False. Codex can then follow that job using status or waiting tools and retrieve its files with fetch_outputs. These operations are documented in the Comfy MCP tool reference.
Keep three checkpoints separate:
Submitted: The server accepted the workflow and assigned an execution ID.
Completed: The job finished without an execution error.
Approved: The correct output was inspected and accepted for further production.
A submitted job may still be waiting in the queue. A completed job may produce an image with a distorted label or an unsuitable shadow.
Match the Image to Its Execution
When using the underlying API, ComfyUI’s server routes provide queue, history, and image-retrieval endpoints. Use the execution ID to locate the corresponding output, rather than selecting whichever file appears newest in the output folder. Another workflow or user could have generated that file.
Ask Codex to save a small run record alongside the retrieved image. For example:
{
  "workflow_revision": "background-studio-v01",
  "prompt_id": "<returned execution ID>",
  "seed": 18472,
  "model": "<actual loaded model filename>",
  "source_image": "product-original.png",
  "mask": "background-mask.png",
  "output_file": "<retrieved output filename>
{
  "workflow_revision": "background-studio-v01",
  "prompt_id": "<returned execution ID>",
  "seed": 18472,
  "model": "<actual loaded model filename>",
  "source_image": "product-original.png",
  "mask": "background-mask.png",
  "output_file": "<retrieved output filename>
The values should come from the submitted graph and execution response, not from assumptions about the open canvas. Preserve the exact workflow revision as well, since a filename alone does not capture its contents.
Finally, inspect the retrieved image against the original photograph. If it fails, record the reason before changing anything. “Label altered” or “mask seam visible” gives the next revision a specific problem to solve. Only an approved test should become the basis for the batch.
Where Computer Use Adds Real Value
MCP can tell Codex which workflow ran and where its output was saved. It does not, by itself, establish whether a mask clips the product’s handle or whether the finished composition leaves enough room for advertising copy.
With Computer Use configured and the necessary permissions granted, Codex can interact with the visible interface. Use this access for bounded inspection tasks, while keeping structured tools responsible for workflow validation and execution.
Check the Mask Before Spending GPU Time
Open the source image in ComfyUI’s Mask Editor and inspect the boundary around the product. A useful instruction is:
Zoom into the product edges and inspect the mask around the cap, label, and base. Identify any areas that appear incorrectly included or excluded. Do not repaint or save the mask without approval.
This makes the task more specific than “check the image.” Thin edges, transparent packaging, and small gaps deserve close inspection. If a correction is approved, save a separate mask revision and verify its effect in the graph before submitting another test.

Source: ComfyUI Documentation
Make Sure the Canvas Matches the Submitted Workflow
A workflow submitted through the API should not be assumed to replace the graph currently displayed in the browser. The canvas may still show an earlier revision, even while another graph executes successfully.
Before asking Codex to inspect node settings visually:
Load the editor workflow associated with the test.
Confirm the relevant image, mask, and model inputs.
Open the output matched to the recorded execution ID.
Do not rely exclusively on dragging a generated image back into ComfyUI. Workflow recovery depends on whether that output contains the required metadata. Keeping the editor workflow separately avoids that dependency.

Source: ComfyUI Documentation
Review the Result Against the Original
Give Codex concrete review criteria: compare the label text, product outline, edge transitions, contact shadow, and available space for campaign copy. Where supported, it can open the original and generated output for comparison and report visible differences.
Ask for observations, not an automatic declaration that the image is production-ready. Small lettering, transparent surfaces, and subtle brand details can require human inspection.
Computer Use is particularly helpful for navigating previews, checking the intended crop, and documenting visible defects. Once a problem is identified, return to the workflow or mask for a targeted correction rather than repeatedly manipulating the interface and regenerating without a clear hypothesis.
Turn the Approved Graph Into a Controlled Batch
Once the test image passes review, preserve that workflow revision and use it as the baseline for further variations. The next step is not to give Codex unrestricted permission to generate alternatives. Define a small experiment with a clear stopping point.
For our product campaign, start with three background concepts:
Concept | Change | Keep fixed |
|---|---|---|
Studio | Pale ceramic surface and warm backdrop | Product source, mask, model, dimensions |
Lifestyle | A restrained countertop setting | Product source, mask, model, dimensions |
Minimal campaign | Simple background with space for copy | Product source, mask, model, dimensions |
Use the same initial seed where the workflow supports it, while recognizing that different prompts still produce different results. This makes the comparison more controlled, not identical.
Ask Codex to submit one image per concept and record each execution separately. The manifest should connect every output to its background prompt, seed, workflow revision, and actual model filename. Preserve the source assets too. If a mask or workflow file changes, assign a new revision rather than overwriting the approved baseline.
A bounded instruction could be:
Generate one image for each approved background concept using the recorded baseline. Change only the background conditioning. Save each output with its execution record, then stop. Do not upscale, install nodes, or generate replacement images without approval.
Review the three outputs before increasing the batch size. If one concept fails, revise that branch rather than regenerating the successful alternatives.
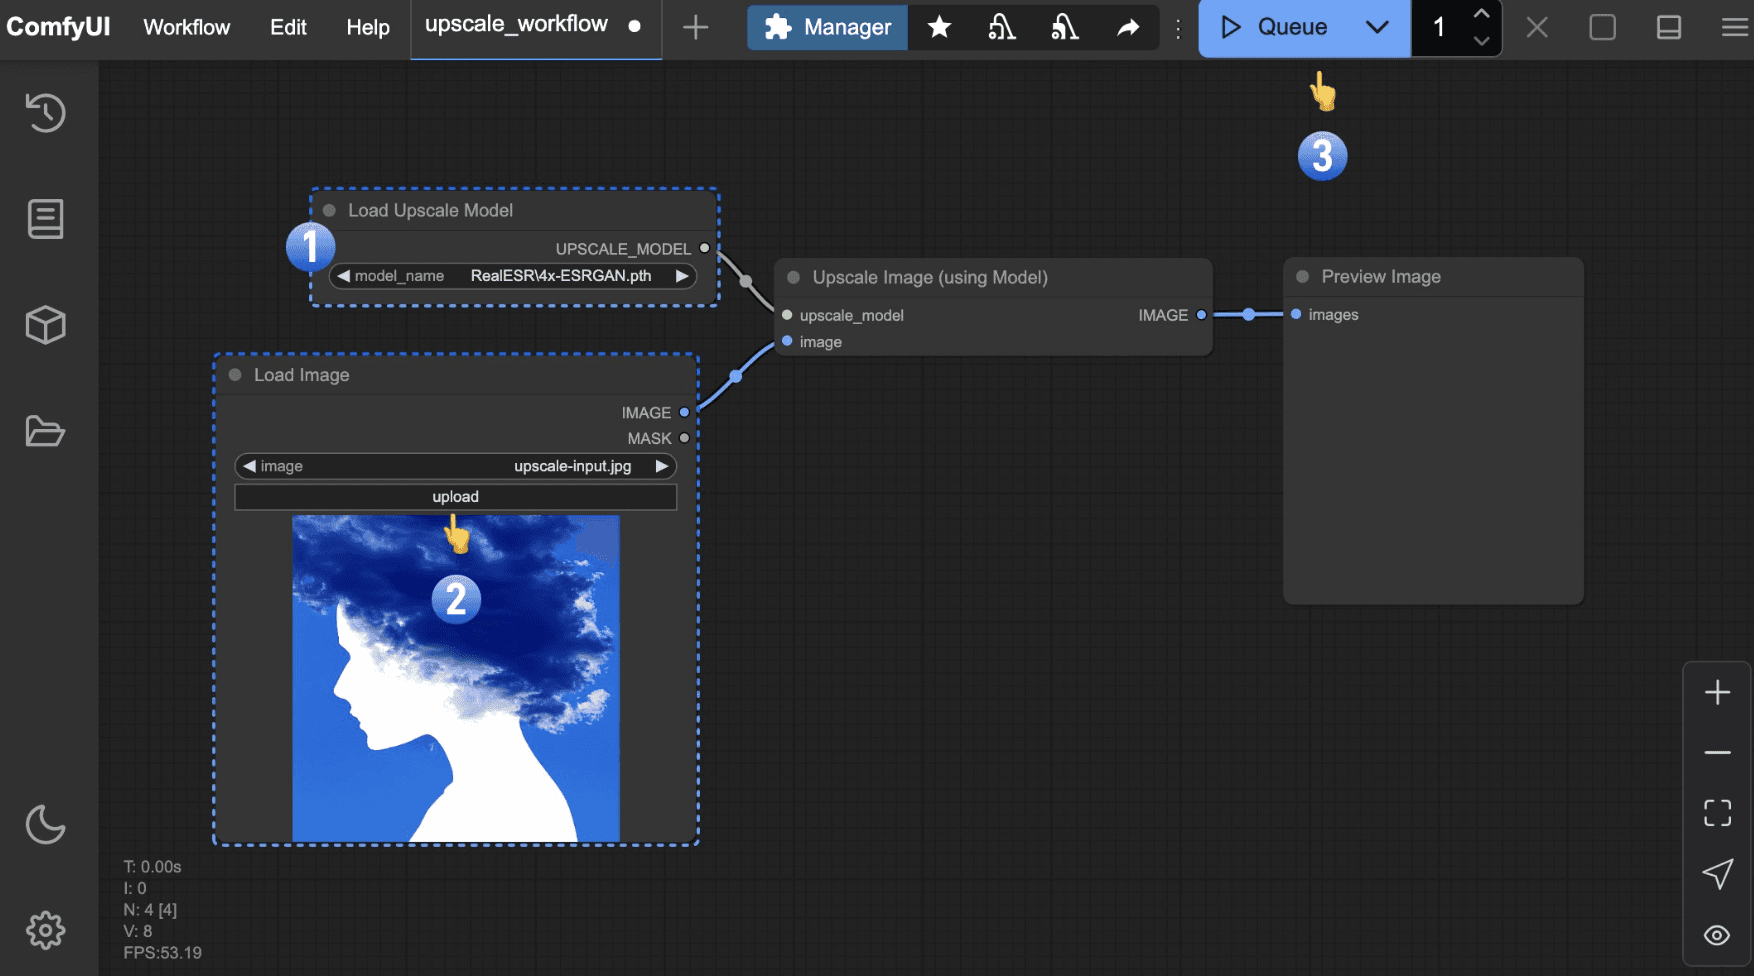
Upscaling should come after selection. An upscale stage adds processing time and may introduce new visual changes depending on the workflow. Run it on an approved candidate, then inspect the final image again. The batch is complete only when selected files, workflow revisions, and execution records remain clearly associated.
Source: ComfyUI Documentation
Fix the Failure Before Regenerating Everything
When a run fails, identify the stage that failed before changing the workflow. A missing model, an invalid connection, and a visually incorrect output need different responses. Repeatedly submitting the same graph can waste GPU time without revealing anything new.
Ask Codex to inspect the validation response or execution error and compare it with the submitted workflow. ComfyUI’s execution messages distinguish errors and interruptions from successful completion. Keep that technical status separate from your visual review.
Symptom | First check | Targeted response |
|---|---|---|
Workflow fails validation | Node classes, required inputs, and connections | Correct the reported mismatch, then validate again |
Model cannot be loaded | Exact filename and selected workspace | Select the intended installed model |
GPU memory error | Resolution, batch size, and model requirements | Reduce one workload setting and retest |
Product appearance changes | Mask coverage and preservation method | Correct the mask or composite the original product |
Canvas differs from the run | Loaded workflow revision | Open the matching editor workflow |
Expected output is missing | Execution ID and recorded output files | Retrieve that job’s outputs explicitly |
Keep Repairs Narrow
A missing custom node does not automatically justify installing every dependency suggested by a workflow. First establish which package supplies the node, whether it is appropriate for your environment, and what changes installation would introduce. Request approval before adding unfamiliar code or replacing working dependencies.

Source: ComfyUI Documentation
Similarly, do not clear the entire queue to resolve one problematic job. Other jobs may belong to separate workflows or users. Establish the affected job and the scope of the available cancellation operation first.
For visual defects, record a specific hypothesis: “The editable mask includes the bottle edge” is actionable; “the image looks wrong” is not. Change one relevant variable, preserve the previous revision, and submit one replacement test. This keeps troubleshooting traceable and prevents a small defect from turning into an uncontrolled rebuild.
Give ComfyUI More GPU Headroom on Vagon
A controlled workflow becomes more valuable when your hardware can keep up with it. Larger models, higher-resolution images, and additional processing stages can push a local machine beyond its available GPU memory. Even when a graph runs successfully, long waits between tests can slow creative decisions.
Vagon Cloud Computer gives you access to a GPU-equipped cloud workstation from your existing device. You can install ComfyUI, bring your models and custom nodes, and keep your production files in that environment. Instead of choosing every workflow around the limits of your laptop, you can select available performance options suited to the work you want to run.
For this setup, place Codex, the local Comfy MCP server, and ComfyUI on the same cloud computer. That keeps workflow paths, model discovery, and output retrieval within one environment. “Local” then refers to the cloud workstation, not the laptop you use to access it. Confirm the connection there before submitting your first job.
The practical benefit is room to develop the approved workflow further: test higher-resolution backgrounds, process selected images through an upscale stage, or explore a more demanding model without buying a new workstation. Actual capacity and generation speed depend on the selected hardware, model, and graph, so test one representative run before expanding production.
Vagon’s GPU supports inference running inside that workstation. It does not accelerate Codex’s own responses or generations executed by external model providers.
Once your baseline is working, use Vagon to give ComfyUI more processing capacity while keeping the same disciplined approach: validate, test, review, then scale.
FAQs
Can Codex Run ComfyUI Workflows Directly?
Yes, with an appropriate connection and a running ComfyUI environment. Through Comfy MCP, Codex can inspect available nodes and models, validate a workflow, execute it, and retrieve outputs. The image-generation model produces the pixels. Codex manages the workflow and surrounding tasks.
Do I Need MCP, or Can Codex Use the ComfyUI API?
MCP is not mandatory. Codex can also help write scripts that submit API-format workflows through the ComfyUI API. MCP exposes operations as discoverable tools, making interactive orchestration easier. Direct API scripts can suit repeatable pipelines where you want explicit control over requests, job tracking, and file handling.
Can I Use Computer Use With a Local ComfyUI Interface?
Yes, where Codex Computer Use is available and configured with the required permissions. It can help navigate the interface, inspect masks, and review visible outputs. MCP registration does not grant screen access. For browser-based tasks, use supported browser controls where appropriate rather than assuming every interaction requires mouse-and-keyboard automation.
Does a Fixed Seed Preserve the Same Product in Every Image?
No. A seed controls part of the generation process, but changes to prompts, models, inputs, or sampling settings can change the result. Masked editing provides more control, but it is not an identity guarantee. If product pixels must remain exact, composite the original product over the generated surroundings and review edges and shadows.
Why Does the ComfyUI Canvas Look Unchanged After an API Run?
Submitting a graph for execution is separate from loading it into the editor. The browser may still display an earlier workflow. Open the editor revision associated with the submitted job before inspecting its settings. Do not assume that an output image can restore the graph, since embedded workflow metadata may be absent.
Can I Run ComfyUI and Codex Together on a Cloud Computer?
Yes, provided the environment supports their installation and requirements. Keep ComfyUI, Codex, and the local MCP server on the same workstation for simpler path and connection handling. Choose hardware appropriate to the model and workflow, then test one run before submitting a batch. Partner-model nodes may execute externally and incur separate charges.
codeYour product photo looks right in the first ComfyUI result. Then you generate another background, and the label changes, the bottle becomes wider, or the lighting no longer matches the scene. Producing more images is easy. Producing usable variations without losing control of the product is the harder part.
Using ComfyUI with Codex means giving the assistant access to the workflow behind those results, not just asking it to improve a prompt. Through Comfy MCP, Codex can inspect available nodes and models, validate a workflow, submit a generation, and retrieve its outputs. With Computer Use enabled and the appropriate permissions, it can also interact with the interface to inspect masks, check the loaded graph, and help review results. The connected image model still generates the pixels; Codex coordinates the process.
This guide follows one practical task: turning a single product photo into several advertising concepts while keeping the product recognizable. You will connect Codex to a working ComfyUI installation, test a controlled background change, and expand approved results into a traceable batch. Along the way, you will separate successful execution from visual approval, because a completed workflow does not automatically produce a campaign-ready image.
Source: ComfyUI Documentation
Give Codex a Workflow, Not Just a Prompt
“Create three advertising backgrounds for this product” describes a creative goal, but it leaves important decisions unresolved. Which model should run? Which image regions can change? Where should the files be saved? Should Codex submit three jobs immediately or wait for approval after the first?
A ComfyUI workflow makes those decisions explicit. Its nodes define how images, masks, conditioning, sampling, and outputs connect. Codex can help inspect and modify that structure, but the right access method depends on the task.
Access method | Best suited to | What it does not establish |
|---|---|---|
Workflow files and API | Editing JSON, comparing revisions, and preparing repeatable runs | Whether the result looks acceptable |
MCP | Discovering available tools, validating workflows, and managing execution | Whether the interface displays the submitted graph |
Computer Use | Inspecting masks, navigating the canvas, and reviewing visible results | Whether a workflow is technically valid |
With MCP, Codex communicates through structured tools. That is useful when you need precise information about installed nodes, model names, or execution status. Computer Use provides a separate interface-control capability, with its own setup and permissions. Connecting an MCP server does not automatically give Codex access to your screen.
For our product-background task, the practical division is straightforward: use structured access to inspect and run the graph, then use visual inspection to check the mask and generated composition. Keep the original product image available throughout.
Give Codex boundaries alongside the objective: preserve the source workflow, create a separate revision, generate one test image, and stop for review before expanding the batch.
Prepare One Working Graph Before Connecting Anything
Start with a workflow that already produces a usable image in ComfyUI. It does not need to deliver the final campaign look, but it should load its models, accept your source image, and save an output without errors. That baseline gives Codex something concrete to inspect and prevents connection troubleshooting from becoming mixed with model or node problems.
For this example, choose an image-editing workflow that accepts a product photo and a mask defining the background area to change. The exact graph depends on the model family. Do not assume that a checkpoint, conditioning node, or sampler configuration from one tutorial will work unchanged with another model.
Before connecting Codex, check these essentials:
Models: Loader nodes reference files installed in your ComfyUI environment.
Custom nodes: Required node classes are available, with no unresolved dependencies.
Inputs: The product photo and mask load correctly.
Execution: One manual test finishes and saves an identifiable output.
Save the working graph before making changes. Keep the source photo and mask alongside it, with clear filenames such as product-original.png and background-mask.png.
Source: ComfyUI Documentation
Keep the Editor and Execution Formats Separate
ComfyUI’s editor workflow stores information needed to reconstruct the canvas, including node positions. Its API-format graph describes the executable nodes and their inputs. The official API examples use the latter when submitting a workflow directly to the server.
An API-format node can look like this:
Here, 42 is a workflow-specific node ID, not a universal identifier for image loading. Codex should inspect the actual graph before changing any inputs.
Retain the editor workflow for visual inspection, and export the API format when your execution method requires it. Before submitting either file, confirm what the selected tool expects. They are related representations, not interchangeable JSON files.
A useful first instruction is: “Inspect this baseline workflow and identify its model, image, mask, and output inputs. Do not modify or run it yet.”
Connect Codex to ComfyUI Through MCP
For this walkthrough, use Comfy’s official local MCP server. It connects Codex to your own ComfyUI installation, so workflow validation and node discovery reflect that environment rather than a generic catalog.
The connection has two separate parts: ComfyUI runs the generation workflow, while the MCP server exposes tools Codex can call. Starting Codex does not automatically start ComfyUI.
Source: ComfyUI Documentation
1. Prepare the Local Connection
Following the Comfy MCP installation instructions, install the components in a dedicated Python environment:
If ComfyUI is already installed, point Comfy CLI at that workspace:
Confirm that this is the installation containing your tested workflow’s models and custom nodes. Avoid accidentally selecting a second, empty workspace.
Start ComfyUI if it is not already running:
Leave it running during the connection test.
2. Register the Server in Codex
Codex supports local MCP servers over STDIO. If the installed commands are available on its launch environment’s PATH, register the server with:
When using a virtual environment, absolute executable paths are more reliable:
These placeholder paths must match your machine. The registration follows Codex’s MCP configuration; it does not install ComfyUI or grant screen-control permissions.
Start a fresh Codex session after registration so the tools can load.
3. Verify Before Generating
Ask Codex:
Confirm which ComfyUI workspace is running. Inspect the installed nodes and models, then validate my baseline workflow. Do not install dependencies, change files, or submit a generation.
The local server provides tools including server_info, node inspection, model search, and validate_workflow. Resolve any reported mismatch before running the graph. A connected MCP process alone does not prove that the intended ComfyUI workspace is ready.
Comfy Cloud is a separate option, connected through its hosted MCP endpoint. It runs workflows in Comfy’s hosted environment. By contrast, a ComfyUI installation on a Vagon Cloud Computer still uses the local connection on that computer. In either case, explicitly identify where the workflow should execute before uploading assets or starting jobs.
Source: ComfyUI Documentation
Change the Background Without Redesigning the Product
The first controlled edit should change less than you might expect. Keep the original image, model, output dimensions, and sampling configuration unchanged. Introduce one background concept, then check whether the workflow respects the intended editing region.
With inpainting, a mask defines where the model can make changes. For our product shot, that means the surrounding background rather than the product itself. However, mask handling depends on the selected nodes. Inspect the mask actually entering the editing stage instead of assuming that the overlay’s appearance proves which pixels will change.
Source: ComfyUI Documentation
Pay particular attention to three areas:
Product edges: Thin handles, transparent surfaces, and reflective borders can be difficult to separate.
Contact shadows: Preserving every surrounding pixel may leave a shadow that does not fit the new environment.
Transition regions: Excessive mask expansion can expose product pixels, while abrupt boundaries can create visible seams.
Source: ComfyUI Documentation
Treat Product Identity as a Separate Requirement
A fixed seed is useful for controlled comparisons, but it does not lock the product’s identity. Changing conditioning, model settings, or the graph can still change the result. Likewise, a lower denoise value is not a universal preservation setting across different editing workflows.
If a logo, label, or silhouette must remain exact, a more controlled approach is to generate the surroundings and composite the original product over them. This preserves the original product pixels, although edges, lighting, and shadows still require review. Do not describe generative editing as a guarantee of brand accuracy.
Give Codex a bounded task:
Create a separate revision of the baseline workflow for a warm studio background with a pale ceramic surface. Preserve the original product image and mask files. Inspect which mask region is editable and explain any proposed changes before applying them. Keep the current model and output dimensions. Submit only one test image after approval, record its execution ID, and stop before generating further variations.
This instruction separates preparation, approval, and execution. If Codex identifies a missing compositing stage or an unsuitable mask, address that first. The objective is not simply a different background, but a result that can survive comparison with the source photograph.
Run One Test and Track the Exact Output
Once the proposed workflow changes are approved, submit a single test. Do not begin the full batch just because validation passed. Validation can identify structural problems, but it cannot establish whether the product looks correct in the generated scene.
The local MCP server’s run_workflow tool supports asynchronous execution, returning a prompt_id when called with wait=False. Codex can then follow that job using status or waiting tools and retrieve its files with fetch_outputs. These operations are documented in the Comfy MCP tool reference.
Keep three checkpoints separate:
Submitted: The server accepted the workflow and assigned an execution ID.
Completed: The job finished without an execution error.
Approved: The correct output was inspected and accepted for further production.
A submitted job may still be waiting in the queue. A completed job may produce an image with a distorted label or an unsuitable shadow.
Match the Image to Its Execution
When using the underlying API, ComfyUI’s server routes provide queue, history, and image-retrieval endpoints. Use the execution ID to locate the corresponding output, rather than selecting whichever file appears newest in the output folder. Another workflow or user could have generated that file.
Ask Codex to save a small run record alongside the retrieved image. For example:
{
  "workflow_revision": "background-studio-v01",
  "prompt_id": "<returned execution ID>",
  "seed": 18472,
  "model": "<actual loaded model filename>",
  "source_image": "product-original.png",
  "mask": "background-mask.png",
  "output_file": "<retrieved output filename>
The values should come from the submitted graph and execution response, not from assumptions about the open canvas. Preserve the exact workflow revision as well, since a filename alone does not capture its contents.
Finally, inspect the retrieved image against the original photograph. If it fails, record the reason before changing anything. “Label altered” or “mask seam visible” gives the next revision a specific problem to solve. Only an approved test should become the basis for the batch.
Where Computer Use Adds Real Value
MCP can tell Codex which workflow ran and where its output was saved. It does not, by itself, establish whether a mask clips the product’s handle or whether the finished composition leaves enough room for advertising copy.
With Computer Use configured and the necessary permissions granted, Codex can interact with the visible interface. Use this access for bounded inspection tasks, while keeping structured tools responsible for workflow validation and execution.
Check the Mask Before Spending GPU Time
Open the source image in ComfyUI’s Mask Editor and inspect the boundary around the product. A useful instruction is:
Zoom into the product edges and inspect the mask around the cap, label, and base. Identify any areas that appear incorrectly included or excluded. Do not repaint or save the mask without approval.
This makes the task more specific than “check the image.” Thin edges, transparent packaging, and small gaps deserve close inspection. If a correction is approved, save a separate mask revision and verify its effect in the graph before submitting another test.
Source: ComfyUI Documentation
Make Sure the Canvas Matches the Submitted Workflow
A workflow submitted through the API should not be assumed to replace the graph currently displayed in the browser. The canvas may still show an earlier revision, even while another graph executes successfully.
Before asking Codex to inspect node settings visually:
Load the editor workflow associated with the test.
Confirm the relevant image, mask, and model inputs.
Open the output matched to the recorded execution ID.
Do not rely exclusively on dragging a generated image back into ComfyUI. Workflow recovery depends on whether that output contains the required metadata. Keeping the editor workflow separately avoids that dependency.
Source: ComfyUI Documentation
Review the Result Against the Original
Give Codex concrete review criteria: compare the label text, product outline, edge transitions, contact shadow, and available space for campaign copy. Where supported, it can open the original and generated output for comparison and report visible differences.
Ask for observations, not an automatic declaration that the image is production-ready. Small lettering, transparent surfaces, and subtle brand details can require human inspection.
Computer Use is particularly helpful for navigating previews, checking the intended crop, and documenting visible defects. Once a problem is identified, return to the workflow or mask for a targeted correction rather than repeatedly manipulating the interface and regenerating without a clear hypothesis.
Turn the Approved Graph Into a Controlled Batch
Once the test image passes review, preserve that workflow revision and use it as the baseline for further variations. The next step is not to give Codex unrestricted permission to generate alternatives. Define a small experiment with a clear stopping point.
For our product campaign, start with three background concepts:
Concept | Change | Keep fixed |
|---|---|---|
Studio | Pale ceramic surface and warm backdrop | Product source, mask, model, dimensions |
Lifestyle | A restrained countertop setting | Product source, mask, model, dimensions |
Minimal campaign | Simple background with space for copy | Product source, mask, model, dimensions |
Use the same initial seed where the workflow supports it, while recognizing that different prompts still produce different results. This makes the comparison more controlled, not identical.
Ask Codex to submit one image per concept and record each execution separately. The manifest should connect every output to its background prompt, seed, workflow revision, and actual model filename. Preserve the source assets too. If a mask or workflow file changes, assign a new revision rather than overwriting the approved baseline.
A bounded instruction could be:
Generate one image for each approved background concept using the recorded baseline. Change only the background conditioning. Save each output with its execution record, then stop. Do not upscale, install nodes, or generate replacement images without approval.
Review the three outputs before increasing the batch size. If one concept fails, revise that branch rather than regenerating the successful alternatives.
Upscaling should come after selection. An upscale stage adds processing time and may introduce new visual changes depending on the workflow. Run it on an approved candidate, then inspect the final image again. The batch is complete only when selected files, workflow revisions, and execution records remain clearly associated.
Source: ComfyUI Documentation
Fix the Failure Before Regenerating Everything
When a run fails, identify the stage that failed before changing the workflow. A missing model, an invalid connection, and a visually incorrect output need different responses. Repeatedly submitting the same graph can waste GPU time without revealing anything new.
Ask Codex to inspect the validation response or execution error and compare it with the submitted workflow. ComfyUI’s execution messages distinguish errors and interruptions from successful completion. Keep that technical status separate from your visual review.
Symptom | First check | Targeted response |
|---|---|---|
Workflow fails validation | Node classes, required inputs, and connections | Correct the reported mismatch, then validate again |
Model cannot be loaded | Exact filename and selected workspace | Select the intended installed model |
GPU memory error | Resolution, batch size, and model requirements | Reduce one workload setting and retest |
Product appearance changes | Mask coverage and preservation method | Correct the mask or composite the original product |
Canvas differs from the run | Loaded workflow revision | Open the matching editor workflow |
Expected output is missing | Execution ID and recorded output files | Retrieve that job’s outputs explicitly |
Keep Repairs Narrow
A missing custom node does not automatically justify installing every dependency suggested by a workflow. First establish which package supplies the node, whether it is appropriate for your environment, and what changes installation would introduce. Request approval before adding unfamiliar code or replacing working dependencies.
Source: ComfyUI Documentation
Similarly, do not clear the entire queue to resolve one problematic job. Other jobs may belong to separate workflows or users. Establish the affected job and the scope of the available cancellation operation first.
For visual defects, record a specific hypothesis: “The editable mask includes the bottle edge” is actionable; “the image looks wrong” is not. Change one relevant variable, preserve the previous revision, and submit one replacement test. This keeps troubleshooting traceable and prevents a small defect from turning into an uncontrolled rebuild.
Give ComfyUI More GPU Headroom on Vagon
A controlled workflow becomes more valuable when your hardware can keep up with it. Larger models, higher-resolution images, and additional processing stages can push a local machine beyond its available GPU memory. Even when a graph runs successfully, long waits between tests can slow creative decisions.
Vagon Cloud Computer gives you access to a GPU-equipped cloud workstation from your existing device. You can install ComfyUI, bring your models and custom nodes, and keep your production files in that environment. Instead of choosing every workflow around the limits of your laptop, you can select available performance options suited to the work you want to run.
For this setup, place Codex, the local Comfy MCP server, and ComfyUI on the same cloud computer. That keeps workflow paths, model discovery, and output retrieval within one environment. “Local” then refers to the cloud workstation, not the laptop you use to access it. Confirm the connection there before submitting your first job.
The practical benefit is room to develop the approved workflow further: test higher-resolution backgrounds, process selected images through an upscale stage, or explore a more demanding model without buying a new workstation. Actual capacity and generation speed depend on the selected hardware, model, and graph, so test one representative run before expanding production.
Vagon’s GPU supports inference running inside that workstation. It does not accelerate Codex’s own responses or generations executed by external model providers.
Once your baseline is working, use Vagon to give ComfyUI more processing capacity while keeping the same disciplined approach: validate, test, review, then scale.
FAQs
Can Codex Run ComfyUI Workflows Directly?
Yes, with an appropriate connection and a running ComfyUI environment. Through Comfy MCP, Codex can inspect available nodes and models, validate a workflow, execute it, and retrieve outputs. The image-generation model produces the pixels. Codex manages the workflow and surrounding tasks.
Do I Need MCP, or Can Codex Use the ComfyUI API?
MCP is not mandatory. Codex can also help write scripts that submit API-format workflows through the ComfyUI API. MCP exposes operations as discoverable tools, making interactive orchestration easier. Direct API scripts can suit repeatable pipelines where you want explicit control over requests, job tracking, and file handling.
Can I Use Computer Use With a Local ComfyUI Interface?
Yes, where Codex Computer Use is available and configured with the required permissions. It can help navigate the interface, inspect masks, and review visible outputs. MCP registration does not grant screen access. For browser-based tasks, use supported browser controls where appropriate rather than assuming every interaction requires mouse-and-keyboard automation.
Does a Fixed Seed Preserve the Same Product in Every Image?
No. A seed controls part of the generation process, but changes to prompts, models, inputs, or sampling settings can change the result. Masked editing provides more control, but it is not an identity guarantee. If product pixels must remain exact, composite the original product over the generated surroundings and review edges and shadows.
Why Does the ComfyUI Canvas Look Unchanged After an API Run?
Submitting a graph for execution is separate from loading it into the editor. The browser may still display an earlier workflow. Open the editor revision associated with the submitted job before inspecting its settings. Do not assume that an output image can restore the graph, since embedded workflow metadata may be absent.
Can I Run ComfyUI and Codex Together on a Cloud Computer?
Yes, provided the environment supports their installation and requirements. Keep ComfyUI, Codex, and the local MCP server on the same workstation for simpler path and connection handling. Choose hardware appropriate to the model and workflow, then test one run before submitting a batch. Partner-model nodes may execute externally and incur separate charges.
Get Beyond Your Computer Performance
Run applications on your cloud computer with the latest generation hardware. No more crashes or lags.

Trial includes 1 hour usage + 7 days of storage.
Summarize with AI

Ready to focus on your creativity?
Vagon gives you the ability to create & render projects, collaborate, and stream applications with the power of the best hardware.

Vagon Blog
Run heavy applications on any device with
your personal computer on the cloud.
San Francisco, California
Solutions
Vagon Teams
Vagon Streams
Use Cases
Resources
Vagon Blog
How to Use SketchUp With Claude: MCP and Computer Use
How to Use ComfyUI With Codex: MCP and Computer Use
How to Use Godot With Codex: MCP & Computer Use Guide
How to Use Houdini With Codex: MCP, Computer Use & RBD
How to Use Cinema 4D With Codex: MCP & Computer Use
How to Use Higgsfield With Codex: MCP & Computer Use
How to Use DaVinci Resolve With Codex: MCP & Computer Use
How to Use ComfyUI With Claude: MCP & Computer Use Guide
How to Use Rhino With Codex: MCP & Computer Use Guide
Vagon Blog
Run heavy applications on any device with
your personal computer on the cloud.
San Francisco, California
Solutions
Vagon Teams
Vagon Streams
Use Cases
Resources
Vagon Blog
How to Use SketchUp With Claude: MCP and Computer Use
How to Use ComfyUI With Codex: MCP and Computer Use
How to Use Godot With Codex: MCP & Computer Use Guide
How to Use Houdini With Codex: MCP, Computer Use & RBD
How to Use Cinema 4D With Codex: MCP & Computer Use
How to Use Higgsfield With Codex: MCP & Computer Use
How to Use DaVinci Resolve With Codex: MCP & Computer Use
How to Use ComfyUI With Claude: MCP & Computer Use Guide
How to Use Rhino With Codex: MCP & Computer Use Guide
Vagon Blog
Run heavy applications on any device with
your personal computer on the cloud.
San Francisco, California
Solutions
Vagon Teams
Vagon Streams
Use Cases
Resources
Vagon Blog